4.Dagger2
什么是Dagger2
1
2
| Dagger 2是由Google开发的 依赖注入框架,它利用Java和Java注解处理器的强大功能,提供了一种优雅的方式来进行依赖注入。
Dagger 2基于一组注解和代码生成器,可以在编译时自动生成依赖注入的代码,从而提高性能和类型安全性。
|
dagger2 简单理解
1
2
3
4
5
| 1.一般我们使用一个实体类或者工具或者请求,比如在MainActivity中使用UerInfo.class,我们会在new Userinfo(),去使用
而dagger帮我们省略了这一步,dagger去管理new UserInfo(),我们直接在Activity中使用。
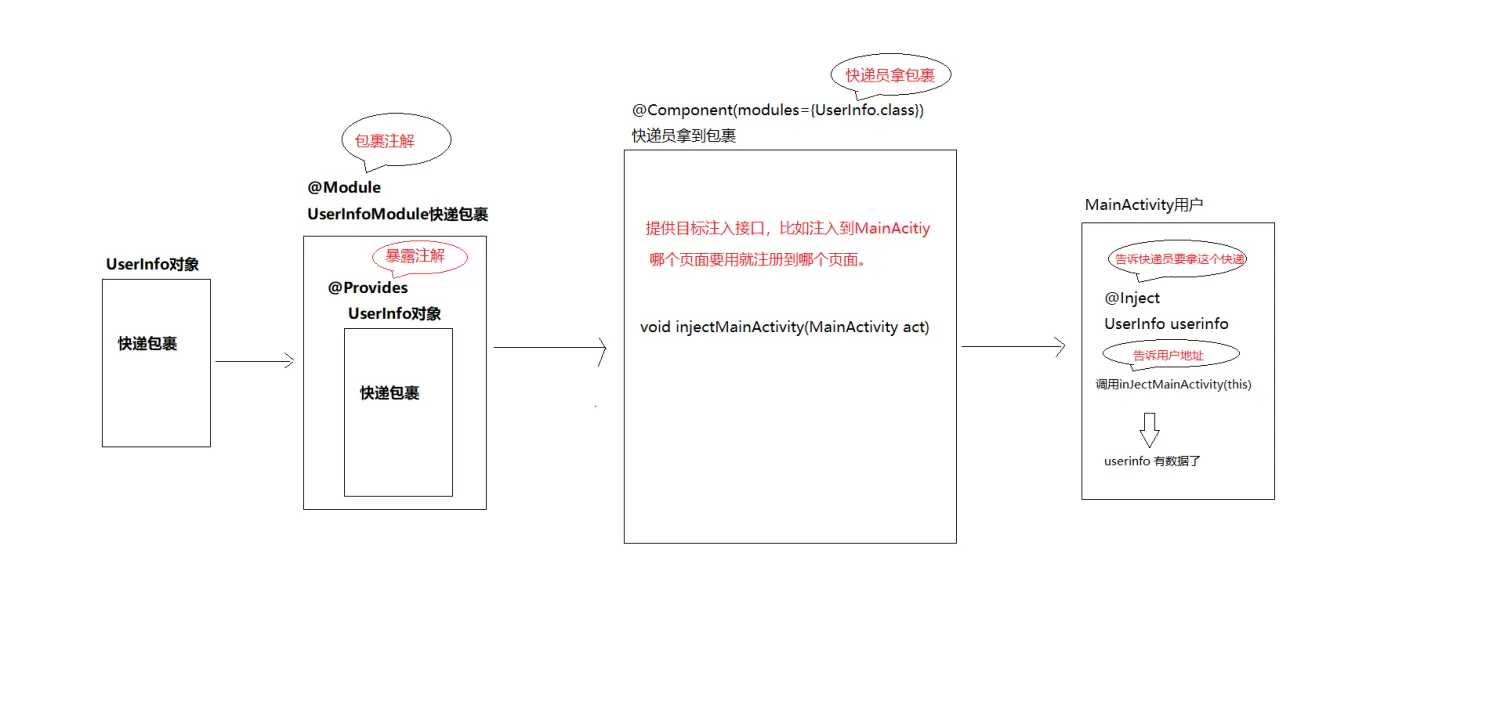
2.dagger 理解其实就是相当于买了快递后,快递送货流程
实现此流程需要四个注解 @Module @Component @Provides @Inject
如下图:
|
dagger2 的使用
1.在build.gradle中引入插件
1
2
3
4
|
implementation 'com.google.dagger:dagger:2.4'
annotationProcessor 'com.google.dagger:dagger-compiler:2.4'
|
2.简单使用:
1
2
3
4
5
6
7
8
9
10
11
12
13
14
15
16
17
18
19
20
21
22
23
24
25
26
27
28
29
30
31
32
33
34
35
36
37
38
39
40
41
42
|
public class HttpObject {
private String HttpClient="client";
public String getHttpClient() {
return HttpClient;
}
public void setHttpClient(String httpClient) {
HttpClient = httpClient;
}
}
@Module
public class HttpModule {
@Provides
public HttpObject providerHttpObject(){
return new HttpObject();
}
}
@Component(modules = {HttpModule.class, DataModule.class})
public interface MyComponent {
void injectMainActivity(Dagger2Activity mainActivity);
}
public class Dagger2Activity extends AppCompatActivity {
@Inject
HttpObject httpObject;
@Override
protected void onCreate(@Nullable Bundle savedInstanceState) {
super.onCreate(savedInstanceState);
setContentView(R.layout.activity_dagger);
DaggerMyComponent.builder().httpModule(new HttpModule()).build().injectMainActivity(this);
Log.e("tyl",httpObject.getHttpClient());
}
}
|
3.dagger2 单例使用
1
2
3
| 1.局域单例:存在于当前类中,只有一个实例,需要增加一个单例注解 @Singleton。
2.全局单例:存在于整个项目,只有一个实例,需要增加一个单例注解 @Singleton,全局单例需要配合Application使用,否则只能是
当前activity单例。
|
局域单例示例:(在moudle和Component类中添加@Singleton注解)
1
2
3
4
5
6
7
8
9
10
11
12
13
14
15
16
17
18
19
20
21
22
23
24
25
26
27
28
29
30
31
32
33
34
35
36
|
@Module
public class HttpModule {
@Singleton
@Provides
public HttpObject providerHttpObject(){
return new HttpObject();
}
}
@Singleton
@Component(modules = {HttpModule.class})
public interface MyComponent {
void injectMainActivity(Dagger2Activity dagger2Activity);
}
public class Dagger2Activity extends AppCompatActivity {
@Inject
HttpObject httpObject;
@Inject
HttpObject httpObject2;
@Override
protected void onCreate(@Nullable Bundle savedInstanceState) {
super.onCreate(savedInstanceState);
setContentView(R.layout.activity_dagger);
DaggerMyComponent.builder().httpModule(new HttpModule()).build().injectMainActivity(this);
Log.e("tyl",httpObject.hashCode()+"");
Log.e("tyl",httpObject2.hashCode()+"");
}
}
|
全局单例示例:(在moudle和Component类中添加@Singleton注解)
1
2
3
4
5
6
7
8
9
10
11
12
13
14
15
16
17
18
19
20
21
22
23
24
25
26
27
28
29
30
31
32
33
34
35
36
37
38
39
40
41
42
43
44
45
46
47
48
49
50
51
52
53
|
@Singleton
@Component(modules = {HttpModule.class})
public interface MyComponent {
void injectMainActivity(Dagger2Activity dagger2Activity);
void injectSecActivity(Dagger2Activity2 dagger2Activity2);
}
public class MyApplication extends Application {
private MyComponent myComponent;
private static MyApplication context;
@Override
public void onCreate() {
super.onCreate();
context = this;
myComponent = DaggerMyComponent.builder()
.httpModule(new HttpModule())
.build();
}
public static MyApplication getInstance() {
return context;
}
public MyComponent getMyComponent() {
return myComponent;
}
}
public class Dagger2Activity extends AppCompatActivity {
@Inject
HttpObject httpObject;
@Override
protected void onCreate(@Nullable Bundle savedInstanceState) {
super.onCreate(savedInstanceState);
setContentView(R.layout.activity_dagger);
MyApplication.getInstance().getMyComponent().injectMainActivity(this);
Log.e("tyl",httpObject.hashCode()+"");
}
public void jump(View view) {
startActivity(new Intent(this,Dagger2Activity2.class));
}
}
public class Dagger2Activity2 extends AppCompatActivity {
@Inject
HttpObject httpObject;
@Override
protected void onCreate(@Nullable Bundle savedInstanceState) {
super.onCreate(savedInstanceState);
MyApplication.getInstance().getMyComponent().injectSecActivity(this);
Log.e("tyl",httpObject.hashCode()+"");
}
}
|
4.多个Component组合依赖
dagger2不能使用多个Component同时注入同一个类中 这种情况需要进行Component的组合;
先确定使用哪个 Component 作为主 Component,确定后,主 Component 仍然执行注入操作,而其他 Component 作为依赖项,不再执行注入,转而提供 Module 提供的对象。一般我们会选择 ApplicationComponent 作为主 Component。
1
2
3
4
5
6
7
8
9
10
11
12
13
14
15
16
17
18
19
20
21
22
23
24
25
26
27
28
29
30
31
32
33
34
35
36
37
38
39
40
41
42
43
44
45
46
47
48
49
50
51
52
53
54
55
56
57
58
59
60
61
62
63
64
65
66
67
68
69
70
|
public class DataObject {
private String data="data";
public String getData() {
return data;
}
public void setData(String data) {
this.data = data;
}
}
@Module
public class DataModule {
@Provides
public DataObject providerDatabaseObject(){
return new DataObject();
}
}
@Component(modules = {DataModule.class})
public interface SecondComponent {
DataObject providerDatabaseObject();
}
@Singleton
@Component(modules = {HttpModule.class},dependencies = {SecondComponent.class})
public interface MyComponent {
void injectMainActivity(Dagger2Activity dagger2Activity);
void injectSecActivity(Dagger2Activity2 dagger2Activity2);
}
public class MyApplication extends Application {
private MyComponent myComponent;
private static MyApplication context;
@Override
public void onCreate() {
super.onCreate();
context = this;
myComponent = DaggerMyComponent.builder()
.httpModule(new HttpModule())
.secondComponent(DaggerSecondComponent.create())
.build();
}
public static MyApplication getInstance() {
return context;
}
public MyComponent getMyComponent() {
return myComponent;
}
}
public class Dagger2Activity extends AppCompatActivity {
@Inject
HttpObject httpObject;
@Inject
DataObject dataObject;
@Override
protected void onCreate(@Nullable Bundle savedInstanceState) {
super.onCreate(savedInstanceState);
setContentView(R.layout.activity_dagger);
MyApplication.getInstance().getMyComponent().injectMainActivity(this);
Log.e("tyl",httpObject.hashCode()+"");
Log.e("tyl2",dataObject.getData()+"");
}
}
|
- @Scope
假如现在有个需求,想让 DataObject 也变成个单例对象,按照我们之前的做法,给 PresenterModule 中的 Provides 方法和 PresenterComponent 加上 @Singleton 之后,会发现编译报错了:
1
| com.demo.dagger.component.ApplicationComponent also has @Singleton
|
它说 ApplicationComponent 中已经有 @Singleton 了。显然,Dagger2 要求 @Singleton 不能用在多个组件上。
1
2
3
4
5
6
| 使用 @Scope 的原则:
1.多个 Component 上面的 Scope 不能相同
2.没有 Scope 的 Component 不能依赖有 Scope 的组件
3.使用作用域注解的模块只能在带有相同作用域注解的组件中使用
4.使用构造方法注入(通过 @Inject)时,应在类中添加作用域注解;使用 Dagger 模块时,应在 @Provides 方法中添加作用域注解
|
@Scope 注解表示作用域,被其修饰的类或提供对象的方法会被做成单例,所以我们可以用 @Scope 自定义一个作用域注解:
1
2
3
| @Scope
@Retention(RetentionPolicy.RUNTIME)
public @interface MyScope {}
|
实际上它和 @Singleton 一样只是名字不同:
1
2
3
4
| @Scope
@Documented
@Retention(RUNTIME)
public @interface Singleton {}
|
以下示例编译报错,未查明原因
Component使用
1
2
3
4
5
6
7
| @MyScope
@Component(modules = {DataObject.class})
public interface SecondComponent {
//使用依赖关系,就不再使用这种语法
// void inject(MainActivity activity);
DataObject providerDatabaseObject();
}
|
moudle使用
1
2
3
4
5
6
7
8
9
10
| @Module
@MyScope
public class DataModule {
@MyScope
@Provides
public DataObject providerDatabaseObject(){
//........
return new DataObject();
}
}
|