5.卡顿优化
1
2
3
4
//卡顿优化
1.硬件性能导致卡顿:CPU Profiler/Systrace 分析查看CPU利用率
2.使用blockcanary可以实现自动化监测卡顿
3.anr检测:ANR-WatchDog,logcat/trace.txt日志分析信息

一、卡顿介绍及工具选择

背景介绍

1
2
1.很多性能问题不易被发现,但是卡顿很容易被直观感受
2.卡顿问题难以定位

CPU Profiler

1
2
3
4
5
6
7
1.图形的形式展示执行时间、调用栈等
2.信息全面,包含所有线程
3.运行时开销严重,整体都会变慢
4.使用方式
- Debug.startMethodTracing(");
- Debug.stopMethodTracing();
- 生成文件在sd卡:Android/data/packagename/files

Systrace

1
2
3
4
5
6
7
8
9
1.监控和跟踪Api调用、线程运行情况,生成Html报告
2.API18以上使用,推荐TraceCompat
3.使用方式
python systrace.py -t 10 [other-options] [categories]
文档:https://developer.android.com/studio/command-line/systrace#command options
4.优点
1.轻量级,开销小
2.直观反映CPU利用率
3.给出建议

StrictMode

1
2
3
4
5
6
7
8
9
10
11
1.严苛模式,Android提供的一种运行时检测机制
2.方便强大,容易被忽视
3.包含: 线程策略和虚拟机策略检测
4.线程策略
自定义的耗时调用,detectCustomSlowCalls()
磁盘读取操作,detectDiskReads
网络操作,detectNetwork
5.虚拟机策略
Activity泄露,detectActivityLeaks()
Sqlite对象泄露,detectLeakedSqlLiteObjects
检测实例数量,setClassInstanceLimit()
1
2
3
4
5
6
7
8
9
10
11
12
13
14
15
16
17
18
//使用示例:
private void initStrictMode() {
if (DEV_MODE) {
StrictMode.setThreadPolicy(new StrictMode.ThreadPolicy.Builder()
.detectCustomSlowCalls() //API等级11,使用StrictMode.noteSlowCode
.detectDiskReads()
.detectDiskWrites()
.detectNetwork()// or .detectAll() for all detectable problems
.penaltyLog() //在Logcat 中打印违规异常信息
.build());
StrictMode.setVmPolicy(new StrictMode.VmPolicy.Builder()
.detectLeakedSqlLiteObjects()
.setClassInstanceLimit(NewsItem.class, 1)
.detectLeakedClosableObjects() //API等级11
.penaltyLog()
.build());
}
}

运行后的开始自动检测结果如下:image-20230919151328240

二、自动化卡顿检测方案及优化

为什么需要自动化检测方案

1
2
1.系统工具适合线下针对性分析
2.线上及测试环节需要自动化检测方案

方案原理

1
2
3
1.消息处理机制,一个线程只有一个Looper
2.mLogging对象在每个message处理前后被调用
3.主线程发生卡顿,是在dispatchMessage执行耗时操作

具体实现

1
2
3
1.Looper.getMainLooper().setMessageLogging();
2.匹配>>>>>Dispatching,闽值时间后执行任务(获取堆栈)
3.匹配<<<<<Finished,任务启动之前取消掉

AndroidPerformanceMonitor

1
2
3
4
5
6
7
8
9
10
11
12
13
14
15
16
17
18
19
非侵入式的性能监控组件,通知形式弹出卡顿信息
- com.github.markzhai:blockcanary-android
- https://github.com/markzhai/AndroidPerformanceMonitor
使用:
implementation 'com.github.markzhai:blockcanary-android:1.5.0'
//application中执行初始化
BlockCanary.install(this, new AppBlockCanaryContext()).start();
//mainActivity演示Msg导致的主线程卡顿
new Handler().post(new Runnable() {
@Override
public void run() {
LogUtils.i("Msg 执行");
try {
Thread.sleep(1000);
} catch (InterruptedException e) {
e.printStackTrace();
}
}
});
1
2
3
4
5
6
7
8
9
10
11
12
13
14
15
16
17
18
19
20
21
22
23
24
25
26
27
28
29
30
31
32
33
34
35
36
37
38
39
40
41
42
43
44
45
46
47
48
49
50
51
52
53
54
55
56
57
58
59
60
61
62
63
64
65
66
67
68
69
70
71
72
73
74
75
76
77
78
79
80
81
82
83
84
85
86
87
88
89
90
91
92
93
94
95
96
97
98
99
100
101
102
103
104
105
106
107
108
109
110
111
112
113
114
115
116
117
118
119
120
121
122
123
124
125
126
127
128
129
130
131
132
133
134
135
136
137
138
139
140
141
142
143
144
145
146
147
148
149
150
151
152
153
154
155
156
157
158
159
160
161
162
163
164
//自定义类
package com.optimize.performance.block;

import android.content.Context;
import android.util.Log;

import com.github.moduth.blockcanary.BlockCanaryContext;
import com.github.moduth.blockcanary.internal.BlockInfo;

import java.io.File;
import java.util.LinkedList;
import java.util.List;

/**
* BlockCanary配置的各种信息
*/
public class AppBlockCanaryContext extends BlockCanaryContext {

/**
* Implement in your project.
*
* @return Qualifier which can specify this installation, like version + flavor.
*/
public String provideQualifier() {
return "unknown";
}

/**
* Implement in your project.
*
* @return user id
*/
public String provideUid() {
return "uid";
}

/**
* Network type
*
* @return {@link String} like 2G, 3G, 4G, wifi, etc.
*/
public String provideNetworkType() {
return "unknown";
}

/**
* Config monitor duration, after this time BlockCanary will stop, use
* with {@code BlockCanary}'s isMonitorDurationEnd
*
* @return monitor last duration (in hour)
*/
public int provideMonitorDuration() {
return -1;
}

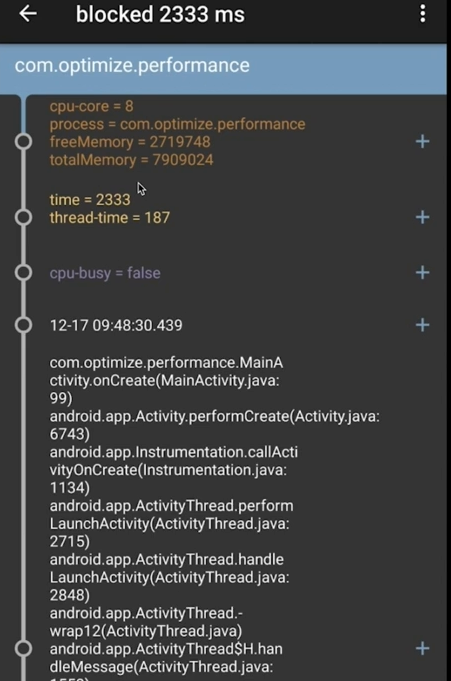
/**
* Config block threshold (in millis), dispatch over this duration is regarded as a BLOCK. You may set it
* from performance of device.
*
* @return threshold in mills
*/
public int provideBlockThreshold() {
return 500;
}

/**
* Thread stack dump interval, use when block happens, BlockCanary will dump on main thread
* stack according to current sample cycle.
* <p>
* Because the implementation mechanism of Looper, real dump interval would be longer than
* the period specified here (especially when cpu is busier).
* </p>
*
* @return dump interval (in millis)
*/
public int provideDumpInterval() {
return provideBlockThreshold();
}

/**
* Path to save log, like "/blockcanary/", will save to sdcard if can.
*
* @return path of log files
*/
public String providePath() {
return "/blockcanary/";
}

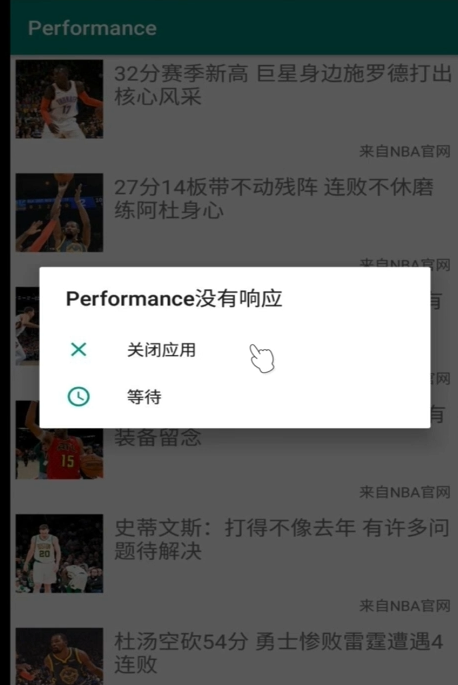
/**
* If need notification to notice block.
*
* @return true if need, else if not need.
*/
public boolean displayNotification() {
return true;
}

/**
* Implement in your project, bundle files into a zip file.
*
* @param src files before compress
* @param dest files compressed
* @return true if compression is successful
*/
public boolean zip(File[] src, File dest) {
return false;
}

/**
* Implement in your project, bundled log files.
*
* @param zippedFile zipped file
*/
public void upload(File zippedFile) {
throw new UnsupportedOperationException();
}


/**
* Packages that developer concern, by default it uses process name,
* put high priority one in pre-order.
*
* @return null if simply concern only package with process name.
*/
public List<String> concernPackages() {
return null;
}

/**
* Filter stack without any in concern package, used with @{code concernPackages}.
*
* @return true if filter, false it not.
*/
public boolean filterNonConcernStack() {
return false;
}

/**
* Provide white list, entry in white list will not be shown in ui list.
*
* @return return null if you don't need white-list filter.
*/
public List<String> provideWhiteList() {
LinkedList<String> whiteList = new LinkedList<>();
whiteList.add("org.chromium");
return whiteList;
}

/**
* Whether to delete files whose stack is in white list, used with white-list.
*
* @return true if delete, false it not.
*/
public boolean deleteFilesInWhiteList() {
return true;
}

/**
* Block interceptor, developer may provide their own actions.
*/
public void onBlock(Context context, BlockInfo blockInfo) {
Log.i("lz","blockInfo "+blockInfo.toString());
}
}

代码运行后点击顶部通知栏出现下图:image-20230920092229592

方案总结

1
2
3
4
5
1.非侵入式
2.方便精准,定位到代码某一行
缺点:
1.确实卡顿了,但卡顿堆栈可能不准确
2.和OOM一样,最后的堆栈只是表象,不是真正问题

image-20230920092401457

自动检测方案优化

1
2
获取监控周期内的多个堆栈,而不仅是最后一个
startMonitor->高频采集堆栈->endMonitor->记录多个堆栈->上报

海量卡顿堆栈处理

1
2
3
4
高频卡顿上报量太大,服务端有压力
分析:一个卡顿下多个堆栈大概率有重复
解决:对一个卡顿下堆栈进行hash排重,找出重复的堆栈
效果:极大的减少展示量同时更高效找到卡顿堆栈

三、ANR分析与实战

ANR介绍

1
2
3
KeyDispatchTimeout,5s
BroadcastTimeout,前台10s,后台60s
ServiceTimeout,前台20s,后台200s

ANR执行流程

1
2
3
发生ANR
进程接收异常终止信号,开始写入进程ANR信息
弹出ANR提示框(Rom表现不一,有的手机可能不弹)

ANR解决套路

1
2
adb pull data/anr/traces.txt 存储路径(发送anr系统会保存自动保存信息到该文件)
详细分析:CPU、IO、锁

模拟anr触发

1
2
3
4
5
6
7
8
9
10
11
12
13
14
15
16
17
18
19
 @Override
protected void onCreate(Bundle savedInstanceState) {
...
new Thread(){
@Override
public void run() {
super.run();
synchronized (MainActivity.this){
try {
Thread.sleep( millis: 20000);
} catch (InterruptedException e) {
e.printStackTrace();
}.start();
...
synchronized (MainActivity.this){
LogUtils.i( msg:");
}
...
}

发送anr(弹框弹出来的时间不止5m钟,因为系统会先将anr信息写入文件后再弹窗)image-20230920093842853

执行adb pull data/anr/traces.txt后分析日志

线上ANR监控方案

1
通过FileOberver监控文件变化,高版本权限问题(高版本上权限问题导致无法监控到文件变化)

ANR-WatchDog

1
2
3
4
5
6
7
8
9
10
11
非侵入式的ANR监控组件
- com.github.anrwatchdog:anrwatchdog:1.3.0
- https://github.com/SalomonBrys/ANRWatchDog
使用:
new ANRWatchDog().start();(Application中)
ANR-WatchDog原理:
start->post消息改值->sleep->检测是否修改->判断ANR发生->抛出异常(线下调试方便,自动定位到异常代码位置)
//可以复写他的异常处理代码,改为上传到自己服务器上而不跑出异常
优点:
- 非侵入式
- 弥补高版本无权限问题

区别

1
2
3
1.AndroidPerformanceMonitor:监控Msg
2.ANR-WatchDog :看最终结果
3.前者适合监控卡顿,后者适合补充ANR监控

四、卡顿单点问题检测方案

背景介绍

1
2
3
1.自动卡顿监测方案并不够(有卡顿但是不到阈值)
2.体系化解决方案务必尽早暴露问题
3.单点问题:主线程IPC、DB

IPC问题监测

1
2
3
4
5
6
7
8
9
10
11
12
13
14
15
16
17
18
监测指标
- IPC调用类型
- 调用耗时、次数
- 调用堆栈、发生线程
常规方案
- IPC前后加埋点
- 不优雅、容易忘记
- 维护成本大
IPC问题监测技巧
- adb 命令
- adb shell am trace-ipc start
- adb shell am trace-ipc stop -dump-file/data/local/tmp/ipc-trace.txt
- adb pull /data/local/tmp/ipc-trace.txt
IPC问题监测
- 优雅方案
- ARTHook 还是AspectJ ?
- ARTHook:可以Hook系统方法
- AspectJ:非系统方法
1
2
3
4
5
6
7
8
9
10
11
12
13
14
示例:
try {
DexposedBridge.findAndHookMethod(Class.forName("android.os.BinderProxy"), "transact",
int.class, Parcel.class, Parcel.class, int.class, new XC_MethodHook() {
@Override
protected void beforeHookedMethod(MethodHookParam param) throws Throwable {
LogUtils.i( "BinderProxy beforeHookedMethod " + param.thisObject.getClass().getSimpleName()
+ "\n" + Log.getStackTraceString(new Throwable()));
super.beforeHookedMethod(param);
}
});
} catch (ClassNotFoundException e) {
e.printStackTrace();
}

卡顿问题监测方案

1
2
1.利用ARTHook完善线下工具
2.开发阶段Hook相关操作,暴露、分析问题

监控纬度

1
2
3
1.IPC
2.IO、DB
3.View绘制

五、如何实现界面秒开

界面秒开实现

1
2
3
1.SysTrace,优雅异步+优雅延迟初始化
2.异步Inflate、X2C、绘制优化
3.提前获取页面数据

界面秒开率统计

1
2
1.onCreate到onWindowFocusChanged
2.特定接口

Lancet

1
2
3
4
5
6
7
轻量级Android AOP框架
- 编译速度快,支持增量编译
- API简单,没有任何多余代码插入 apk
- https://github.com/eleme/lancet
使用介绍
- @Proxyi通常用与对系统API调用的Hook
- @Insert 常用于操作App与library的类

使用示例:

1
2
3
implementation 'me.ele:lancet-base:1.0.4'
//相当于hook acitivity的生命周期实现展开时间的计算
//也可自定义hook其他系统方法,如log.i实现自定义消息拼接或处理
1
2
3
4
5
6
7
8
9
10
11
12
13
14
15
16
17
18
19
20
21
22
23
24
25
26
27
28
29
30
31
32
33
34
35
36
37
38
39
40
41
42
43
44
45
46
47
48
49
50
51
52
53
54
55
56
57
58
59
60
61
62
63
64
65
66
67
68
69
70
71
72
73
74
75
76
77
78
79
80
81
82
83
84
85
86
87
88
89
90
91
package com.optimize.performance.aop;

import android.content.Context;
import android.os.Bundle;
import android.os.Handler;
import android.util.Log;

import com.optimize.performance.utils.LogUtils;
import com.optimize.performance.wakelock.WakeLockUtils;

import me.ele.lancet.base.Origin;
import me.ele.lancet.base.Scope;
import me.ele.lancet.base.annotations.Insert;
import me.ele.lancet.base.annotations.Proxy;
import me.ele.lancet.base.annotations.TargetClass;

public class ActivityHooker {

public static ActivityRecord sActivityRecord;

static {
sActivityRecord = new ActivityRecord();
}

public static String trace;

@Insert(value = "onCreate",mayCreateSuper = true)
@TargetClass(value = "android.support.v7.app.AppCompatActivity",scope = Scope.ALL)
protected void onCreate(Bundle savedInstanceState) {
sActivityRecord.mOnCreateTime = System.currentTimeMillis();
Origin.callVoid();
}

@Insert(value = "onWindowFocusChanged",mayCreateSuper = true)
@TargetClass(value = "android.support.v7.app.AppCompatActivity",scope = Scope.ALL)
public void onWindowFocusChanged(boolean hasFocus) {
sActivityRecord.mOnWindowsFocusChangedTime = System.currentTimeMillis();
LogUtils.i("onWindowFocusChanged cost "+(sActivityRecord.mOnWindowsFocusChangedTime - sActivityRecord.mOnCreateTime));
Origin.callVoid();
}


public static long sStartTime = 0;

@Insert(value = "acquire")
@TargetClass(value = "com.optimize.performance.wakelock.WakeLockUtils",scope = Scope.SELF)
public static void acquire(Context context){
trace = Log.getStackTraceString(new Throwable());
sStartTime = System.currentTimeMillis();
Origin.callVoid();
new Handler().postDelayed(new Runnable() {
@Override
public void run() {
WakeLockUtils.release();
}
},1000);
}

@Insert(value = "release")
@TargetClass(value = "com.optimize.performance.wakelock.WakeLockUtils",scope = Scope.SELF)
public static void release(){
LogUtils.i("PowerManager "+(System.currentTimeMillis() - sStartTime)+"/n"+trace);
Origin.callVoid();
}


public static long runTime = 0;

@Insert(value = "run")
@TargetClass(value = "java.lang.Runnable",scope = Scope.ALL)
public void run(){
runTime = System.currentTimeMillis();
Origin.callVoid();
LogUtils.i("runTime "+(System.currentTimeMillis() - runTime));
}

@Proxy("i")
@TargetClass("android.util.Log")
public static int i(String tag, String msg) {
msg = msg + "";
return (int) Origin.call();
}
}


package com.optimize.performance.aop;
public class ActivityRecord {
public long mOnCreateTime;
public long mOnWindowsFocusChangedTime;
}

界面秒开监控纬度

1
2
3
1.总体耗时
2.生命周期耗时
3.生命周期间隔耗时

六、优雅监控耗时盲区

耗时盲区监控背景

1
2
3
1.生命周期的间隔
2.onResume到Feed展示的间隔
3.举例 : postMessage,很可能在Feed之前执行(handler的消息中存在耗时操作)

耗时盲区监控难点

1
2
1.只知道盲区时间,不清楚具体在做什么
2.线上盲区无从追查

耗时盲区监控线下方案

1
2
3
TraceView
- 特别适合一段时间内的盲区监控
- 线程具体时间做了什么,一目了然

耗时盲区监控线上方案

1
2
3
4
思考分析
- 所有方法都是Msg,mLogging ?没有Msg具体堆栈
- AOP切Handler方法?不清楚准确执行时间
//上面2种方式都有各自的问题

耗时盲区监控线上方案

1
2
1.使用统一的Handler:定制具体方法
2.定制gradle插件,编译期动态替换
1
2
3
4
5
6
7
8
9
10
11
12
13
14
15
16
17
18
19
20
21
22
23
24
25
26
27
28
29
30
31
32
33
34
35
36
37
38
39
40
41
42
43
44
45
46
47
48
49
50
51
52
53
54
55
56
57
58
59
60
package com.optimize.performance.handler;

import android.os.Handler;
import android.os.Looper;
import android.os.Message;
import android.util.Log;

import com.optimize.performance.utils.LogUtils;

import org.json.JSONObject;

public class SuperHandler extends Handler {

private long mStartTime = System.currentTimeMillis();

public SuperHandler() {
super(Looper.myLooper(), null);
}

public SuperHandler(Callback callback) {
super(Looper.myLooper(), callback);
}

public SuperHandler(Looper looper, Callback callback) {
super(looper, callback);
}

public SuperHandler(Looper looper) {
super(looper);
}

@Override
public boolean sendMessageAtTime(Message msg, long uptimeMillis) {
boolean send = super.sendMessageAtTime(msg, uptimeMillis);
if (send) {
GetDetailHandlerHelper.getMsgDetail().put(msg, Log.getStackTraceString(new Throwable()).replace("java.lang.Throwable", ""));
}
return send;
}

@Override
public void dispatchMessage(Message msg) {
mStartTime = System.currentTimeMillis();
super.dispatchMessage(msg);

if (GetDetailHandlerHelper.getMsgDetail().containsKey(msg)
&& Looper.myLooper() == Looper.getMainLooper()) {
JSONObject jsonObject = new JSONObject();
try {
jsonObject.put("Msg_Cost", System.currentTimeMillis() - mStartTime);
jsonObject.put("MsgTrace", msg.getTarget() + " " + GetDetailHandlerHelper.getMsgDetail().get(msg));

LogUtils.i("MsgDetail " + jsonObject.toString());
GetDetailHandlerHelper.getMsgDetail().remove(msg);
} catch (Exception e) {
}
}
}

}

//视频中使用的普通handler发送消息后拿到的log日志

耗时盲区监控方案总结

1
2
3
1.卡顿监控重要的一环,全面性保障
2.TraceView适合线下,可以监控系统Msg
3.动态替换适合线上,只有应用自身的Msg

七、卡顿优化技巧总结

卡顿优化实践经验

1
2
3
耗时操作:异步、延迟
布局优化:异步Inflate、X2C、重绘解决
内存:降低内存占用,减少GC时间

卡顿优化工具建设

1
2
3
4
5
6
7
8
9
10
11
12
13
14
系统工具认识、使用
- SysTrace
- TraceView
- StrictMode
自动化监控及优化
- AndroidPerformanceMonitor、ANR-WatchDog
- 高频采集,找出重复率高的堆栈
卡顿监控工具
- 单点问题:AOP、Hook
- 盲区监控: gradle编译期替换
卡顿监控指标
- 卡顿率、ANR率、界面秒开率
- 交互时间、生命周期时间
- 上报环境、场景信息

八、问题

1
2
3
4
5
6
7
8
9
10
11
1.你是怎么做卡顿优化的
- 第一阶段:系统工具定位、解决
- 第二阶段:自动化卡顿方案及优化
- 第三阶段:线上监控及线下监测工具建设
2.怎么自动化的获取卡顿信息
- mLogging.println
- 高频采集,找出重复堆栈
3.卡顿的一整套解决方案是怎么做的
- 线下、线上工具相结合
- 特定难题突破:单点问题、盲区监控
- 线上监控建设