# For more information about using CMake with Android Studio, read the # documentation: https://d.android.com/studio/projects/add-native-code.html. # For more examples on how to use CMake, see https://github.com/android/ndk-samples.
# Sets the minimum CMake version required for this project. cmake_minimum_required(VERSION 3.22.1)
# Declares the project name. The project name can be accessed via ${ PROJECT_NAME}, # Since this is the top level CMakeLists.txt, the project name is also accessible # with ${CMAKE_PROJECT_NAME} (both CMake variables are in-sync within the top level # build script scope). project("mqtt") message("openssl/${CMAKE_ANDROID_ARCH_ABI}/include") # 包含子目录相关头文件 include_directories(mqttsrc)
while getopts n:o:a:t:d:h: option do case "${option}" in n) ANDROID_NDK=${OPTARG};; o) OPENSSL_VERSION=${OPTARG};; a) API_LEVEL=${OPTARG};; t) BUILD_TARGETS=${OPTARG};; d) OUT_DIR=${OPTARG};; h) HOST_TAG=${OPTARG};; *) twentytwo=${OPTARG};; esac done
if [ ! -d openssl-${OPENSSL_VERSION} ] then if [ ! -f openssl-${OPENSSL_VERSION}.tar.gz ] then wget https://www.openssl.org/source/openssl-${OPENSSL_VERSION}.tar.gz || exit 128 fi tar xzf openssl-${OPENSSL_VERSION}.tar.gz || exit 128 fi
cd openssl-${OPENSSL_VERSION} || exit 128 ##### export ndk directory. Required by openssl-build-scripts ##### case ${OPENSSL_VERSION} in 1.1.1*) export ANDROID_NDK_HOME=$ANDROID_NDK ;; *) export ANDROID_NDK_ROOT=$ANDROID_NDK ;; esac
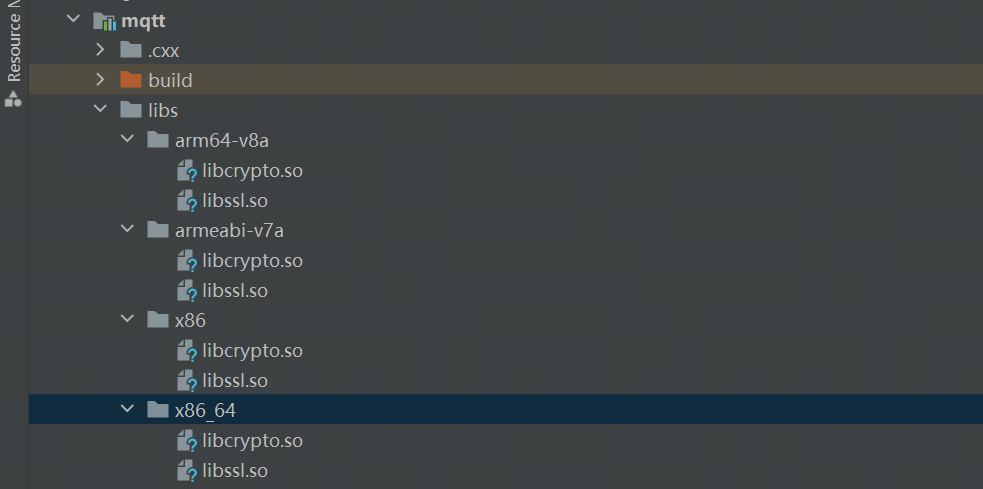
export PATH=$ANDROID_NDK/toolchains/llvm/prebuilt/$HOST_TAG/bin:$PATH ##### build-function ##### build_the_thing() { make clean ./Configure $SSL_TARGET -D__ANDROID_API__=$API_LEVEL && \ make -j128 SHLIB_EXT=.so && \ make install SHLIB_EXT=.so DESTDIR=$DESTDIR || exit 128 } ##### set variables according to build-tagret ##### for build_target in $BUILD_TARGETS do case $build_target in armeabi-v7a) DESTDIR="$BUILD_DIR/armeabi-v7a" SSL_TARGET="android-arm" ;; x86) DESTDIR="$BUILD_DIR/x86" SSL_TARGET="android-x86" ;; x86_64) DESTDIR="$BUILD_DIR/x86_64" SSL_TARGET="android-x86_64" ;; arm64-v8a) DESTDIR="$BUILD_DIR/arm64-v8a" SSL_TARGET="android-arm64" ;; esac
# For more information about using CMake with Android Studio, read the # documentation: https://d.android.com/studio/projects/add-native-code.html. # For more examples on how to use CMake, see https://github.com/android/ndk-samples.
# Sets the minimum CMake version required for this project. cmake_minimum_required(VERSION 3.22.1)
# Declares the project name. The project name can be accessed via ${ PROJECT_NAME}, # Since this is the top level CMakeLists.txt, the project name is also accessible # with ${CMAKE_PROJECT_NAME} (both CMake variables are in-sync within the top level # build script scope). project("mmkv")
# Creates and names a library, sets it as either STATIC # or SHARED, and provides the relative paths to its source code. # You can define multiple libraries, and CMake builds them for you. # Gradle automatically packages shared libraries with your APK. # # In this top level CMakeLists.txt, ${CMAKE_PROJECT_NAME} is used to define # the target library name; in the sub-module's CMakeLists.txt, ${PROJECT_NAME} # is preferred for the same purpose. # # In order to load a library into your app from Java/Kotlin, you must call # System.loadLibrary() and pass the name of the library defined here; # for GameActivity/NativeActivity derived applications, the same library name must be # used in the AndroidManifest.xml file. add_library(${CMAKE_PROJECT_NAME} SHARED # List C/C++ source files with relative paths to this CMakeLists.txt. # 添加源文件,这个源文件可加可不加,随意 libmmkv.cpp mmkv.cpp)
# Specifies libraries CMake should link to your target library. You # can link libraries from various origins, such as libraries defined in this # build script, prebuilt third-party libraries, or Android system libraries. target_link_libraries(${CMAKE_PROJECT_NAME} mmkv core # pthread 这里注意,不能链接pthread,在NDK中使用stdc++ stdc++ # List libraries link to the target library android log)
libusb 是一个 C 库,提供对 USB 设备的通用访问。开发人员旨在使用它来促进与 USB 硬件通信的应用程序的生产。 它是可移植的:使用单个跨平台 API,它提供对 Linux、macOS、Windows 等 USB 设备的访问 它是用户模式:应用程序与设备通信不需要特殊权限或提升权限。 它与版本无关:支持从 1.0 到 3.1(最新)的所有 USB 协议版本。
The Android build system will then correctly include libusb in the application package (APK) file, provided ndk-build is invoked before the package is built.
Runtime Permissions: --------------------
The Runtime Permissions on Android can be transferred from Java to Native over the following approach:
JAVA:
--> Obtain USB permissions over the android.hardware.usb.UsbManager class
set_the_native_Descriptor(int fileDescriptor) { libusb_context *ctx; libusb_device_handle *devh; libusb_set_option(&ctx, LIBUSB_OPTION_NO_DEVICE_DISCOVERY, NULL); libusb_init(&ctx); libusb_wrap_sys_device(NULL, (intptr_t)fileDescriptor, &devh); } /* From this point you can regularly use all libusb functions as usual */
About LIBUSB_OPTION_NO_DEVICE_DISCOVERY:
The method libusb_set_option(&ctx, LIBUSB_OPTION_NO_DEVICE_DISCOVERY, NULL) does not affect the ctx. It allows initializing libusb on unrooted Android devices by skipping the device enumeration.
Rooted Devices: ---------------
For rooted devices the code using libusb could be executed as root using the "su" command. An alternative would be to use the "su" command to change the permissions on the appropriate /dev/bus/usb/ files.
Users have reported success in using android.hardware.usb.UsbManager to request permission to use the UsbDevice and then opening the device. The difficulties in this method is that there is no guarantee that it will continue to work in the future Android versions, it requires invoking Java APIs and running code to match each android.hardware.usb.UsbDevice to a libusb_device.
For a rooted device it is possible to install libusb into the system image of a running device:
1. Enable ADB on the device.
2. Connect the device to a machine running ADB.
3. Execute the following commands on the machine running ADB:
# Make the system partition writable adb shell su -c "mount -o remount,rw /system"
/* * C++ object wrapper. * * This is usually overlaid on a C struct whose first element is a * JNINativeInterface*. We rely somewhat on compiler behavior. */ struct_JNIEnv { /* do not rename this; it does not seem to be entirely opaque */ conststructJNINativeInterface* functions;
// Find your class. JNI_OnLoad is called from the correct class loader context for this to work. jclass c = env->FindClass("com/example/app/package/MyClass"); if (c == nullptr) return JNI_ERR;
// Register your class' native methods. staticconst JNINativeMethod methods[] = { {"nativeFoo", "()V", reinterpret_cast<void*>(nativeFoo)}, {"nativeBar", "(Ljava/lang/String;I)Z", reinterpret_cast<void*>(nativeBar)}, }; int rc = env->RegisterNatives(c, methods, sizeof(methods)/sizeof(JNINativeMethod)); if (rc != JNI_OK) return rc;
/* * Reference types, in C++ */ class_jobject {}; class_jclass : public _jobject {}; class_jstring : public _jobject {}; class_jarray : public _jobject {}; class_jobjectArray : public _jarray {}; class_jbooleanArray : public _jarray {}; class_jbyteArray : public _jarray {}; class_jcharArray : public _jarray {}; class_jshortArray : public _jarray {}; class_jintArray : public _jarray {}; class_jlongArray : public _jarray {}; class_jfloatArray : public _jarray {}; class_jdoubleArray : public _jarray {}; class_jthrowable : public _jobject {};
pi@raspberrypi:~/Downloads $ touch abc pi@raspberrypi:~/Downloads $ ls -l total 0 -rw-r--r-- 1 pi pi 0 Jul 1810:32 abc pi@raspberrypi:~/Downloads $ sudo touch bbb pi@raspberrypi:~/Downloads $ ls -l total 0 -rw-r--r-- 1 pi pi 0 Jul 1810:32 abc -rw-r--r-- 1 root root 0 Jul 1810:32 bbb pi@raspberrypi:~/Downloads $
如上,我在当前目录下使用当前用户pi创建了一个文件,那么从结果来看-rw-r--r-- 1 pi pi 0 Jul 18 10:32 abc我们就知道了这个文件的uid为pi ,gid为pi,其rwx权限为-rw-r--r--,其中第一个横杠-代表是一个文件,其余的9位,以3位为一组,分别代表当前用户对着文件的所有权,当前用户组对这个文件的所有权,以及其他用户组对这个文件的所有权,
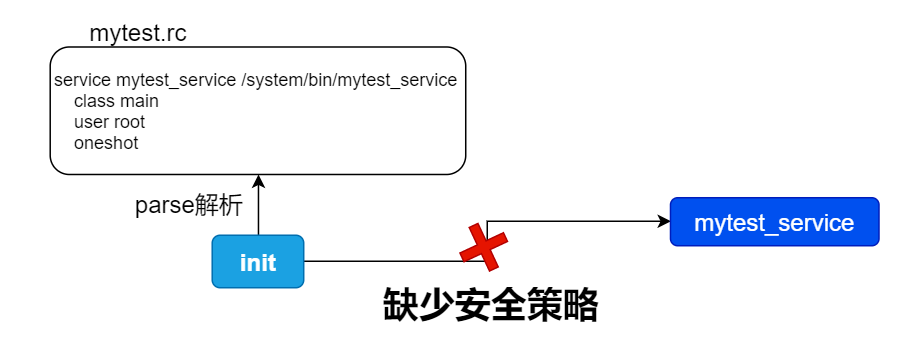
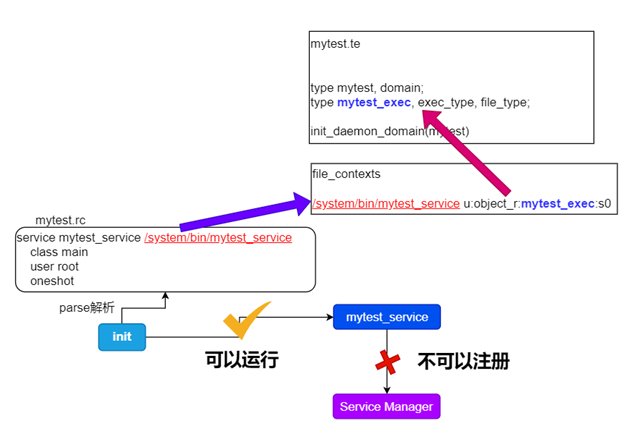
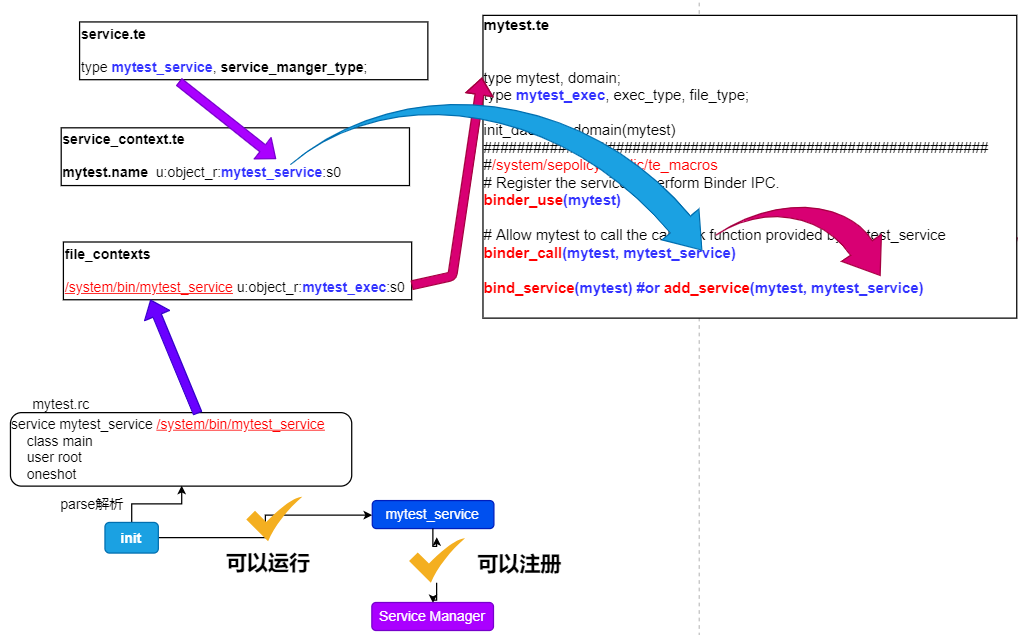
service surfaceflinger /system/bin/surfaceflinger class core user system group graphics drmrpc readproc onrestart restart zygote writepid /sys/fs/cgroup/stune/foreground/tasks
什么时候用静态库,什么时候用动态库? 一般情况下,可以从几个方面考虑: a. 内存: 一些通用的库可以使用动态库,它是共享的,相对节省内存,比如log,utils b. 存储:动态库只需要一份就可以了,所以依赖越多,相对空间节省越多 c. 环境: 如果是标准环境,比如pc,对于通用库一般依赖动态库(比如系统库),但如果是一些环境情况不清楚,或者为了减少兼容性问题,则 选择静态库 d. 速度: 静态库运行速度比动态库快(理论上是,实际上基本察觉不出);
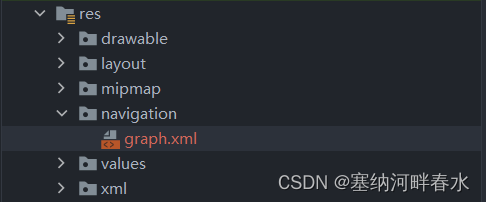
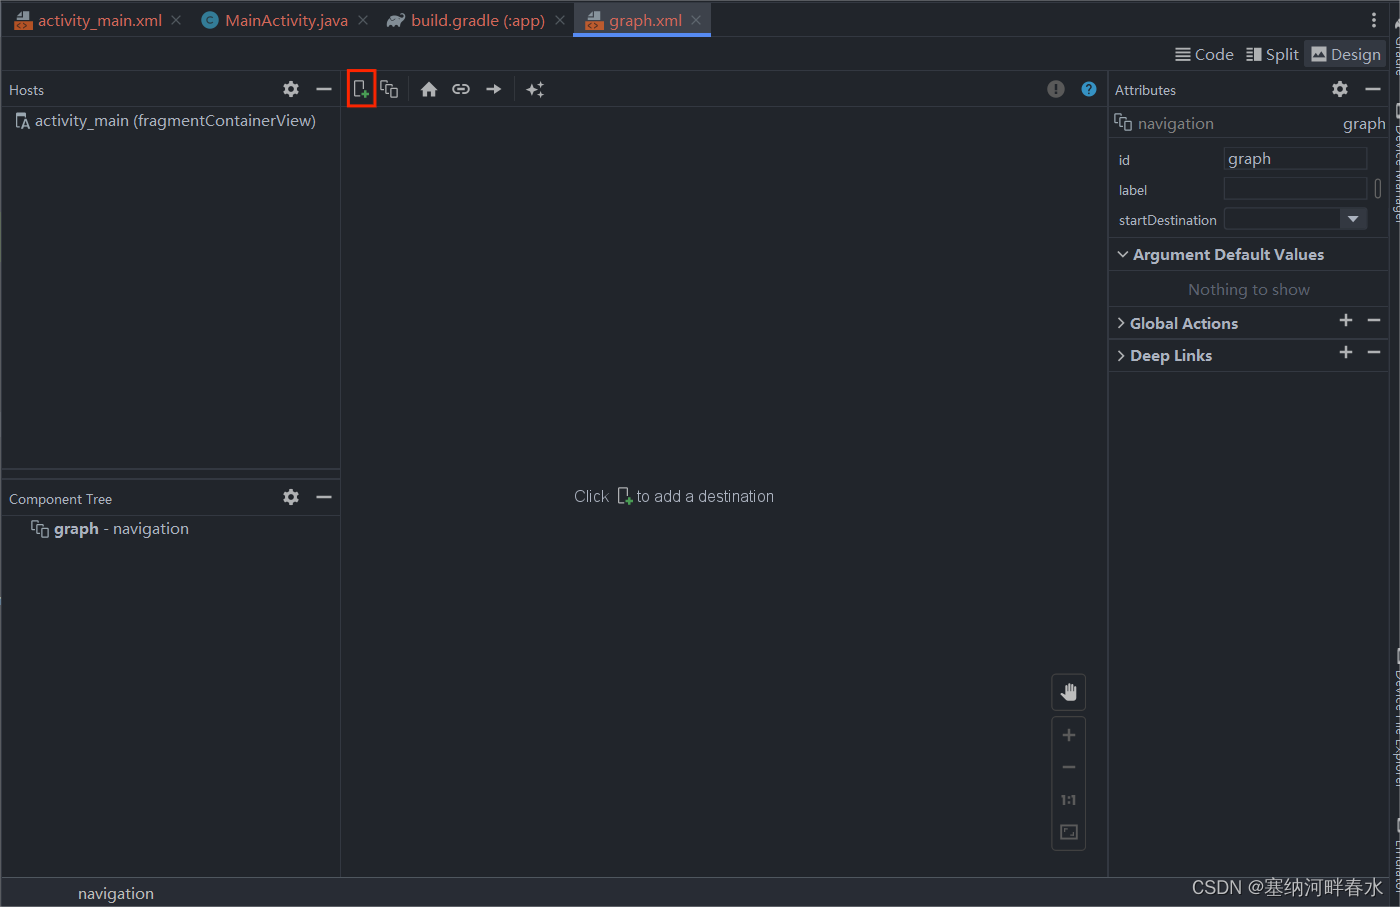
1.在“Project”窗口中,点击 res 目录,然后依次选择 New > Android Resource File。此时系统会显示 New Resource File 对话框。 2.在 File name 字段中输入Navigation的名称,例如“graph”。 3.从 Resource type 下拉列表中选择 Navigation,然后点击 OK。 这样就完成了空白导航图的创建,这时来到res文档下就会看到navigation文件夹还有你创建的导航图
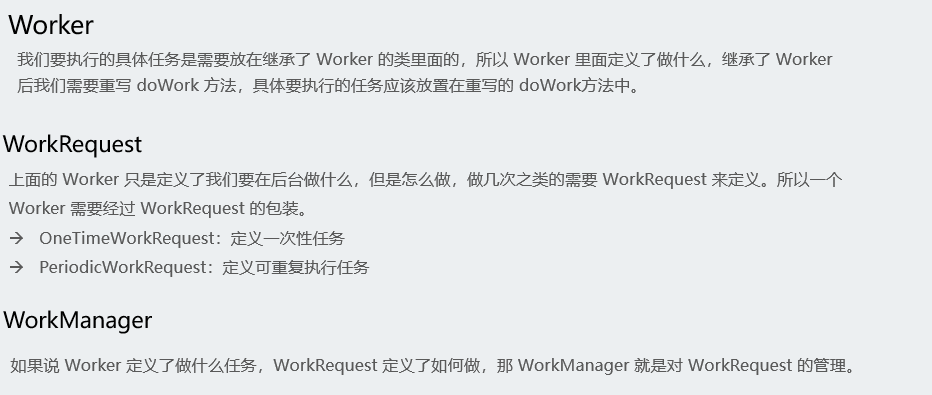
public class DemoWork extends Worker { public static final String TAG = DemoWork.class.getSimpleName(); private Context context; private WorkerParameters workerParams;
public DemoWork(@NonNull Context context, @NonNull WorkerParameters workerParams) { super(context, workerParams); this.context = context; this.workerParams = workerParams; } @NonNull @Override public Result doWork() { Log.e(TAG, "doWork----------**-----------: 后台任务执行了"); // 接收Activity传递过来的数据 final String dataString = workerParams.getInputData().getString("data"); Log.e(TAG, "doWork: 接收Activity传递过来的数据:" + dataString); // 反馈数据 给 Activity // 把任务中的数据回传到activity中 // Data outputData = new Data.Builder().putString("data", "执行完任务将结果和数据回传给Activity").build(); @SuppressLint("RestrictedApi") Result.Success success = new Result.Success(); // return new Result.Failure(); // 本地执行 doWork 任务时 失败 // return new Result.Retry(); // 本地执行 doWork 任务时 重试 // return new Result.Success(); // 本地执行 doWork 任务时 成功 执行任务完毕 return success; } }
单次执行及延迟调用的示例
1 2 3 4 5 6 7
//工作通过把WorkRequest传入WorkManager中进行定义。使WorkManager可以调度任何工作; OneTimeWorkRequest oneTimeWorkRequest = new OneTimeWorkRequest.Builder(DemoWork.class) .setInitialDelay(10,TimeUnit.SECONDS) .build();