Android Studio for Platform 这个是最新的google开发的阅读aosp源码的工具,特别适合做原生系统开发。具体官方介绍如下地址:
参考链接:http://developer.android.google.cn/studio/platform

1、android studio for platform工具介绍

在这里插入图片描述
可以直接点击下载(提示目前只有ubuntu可以哈,语言切换到英文,中文发现无法下载)

看看相关的官方介绍:

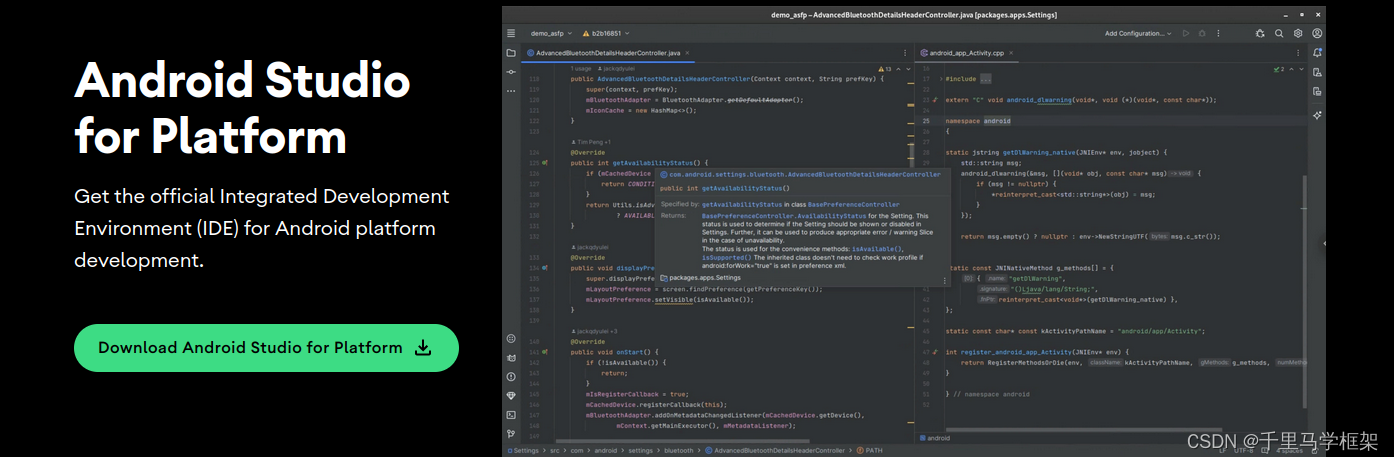
Android Studio for Platform (ASfP) is the version of the Android Studio IDE for Android Open Source Project (AOSP) platform developers who build with the Soong build system. ASfP includes the following features:

language
Multi-language Support
Edit C++, Kotlin, and Java programming languages in the same IDE.
settings
Project Setup Wizard
Configure your lunch target and platform modules.

官方的介绍就以上一小段文字,总结如下:
ASfP是专门用于开发aosp的ide工具,有着 Soong build system.,主要有以下几个特点
语言支持部分:
同时支持:C++, Kotlin, and Java 同时使用在ide中编程
设置部分:
可以配置你的编译target和具体的模块

2、android studio for platform痛点解决

这里最吸引我们的还是他居然支持多语言,c++,java,kotlin同时都支持。
以前我们开发aosp时候,其实java部分使用android studio的体验还是相当好,但是android studio没办法支持c++等native代码的跳转和代码提示,所以不得不使用vscode工具,这个vscode工具相关看c++等代码也是比较方便,基本上的代码也是可以跳转的,但是毕竟有时候需要两个工具相互切快捷键等还是有一点点不方便,虽然不太影响。

所以开发aosp之前的选择就是:
java相关代码使用android studio
c++相关代码使用vscode

目前ASfP工具出现真的是我们framework开发者的一个巨大福音,解决了android studio无法跳转c++代码的这个巨大痛点。

3、android studio for platform使用体验

官方使用介绍:

Get started with ASfP

    If you haven't already installed repo, follow the instructions at Installing Repo.
    If you haven't already initialized and synced your Repo checkout, follow the instructions at Initializing a Repo client.
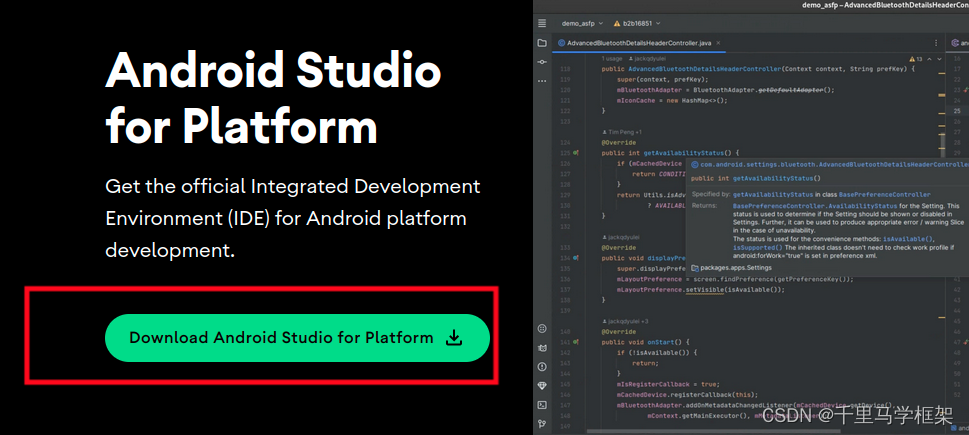
    Download ASfP.
    Install ASfP: sudo dpkg -i /path/to/asfp-2023.1.1.19-linux.deb.
    Open ASfP from the command line: /opt/android-studio-for-platform/bin/studio.sh.
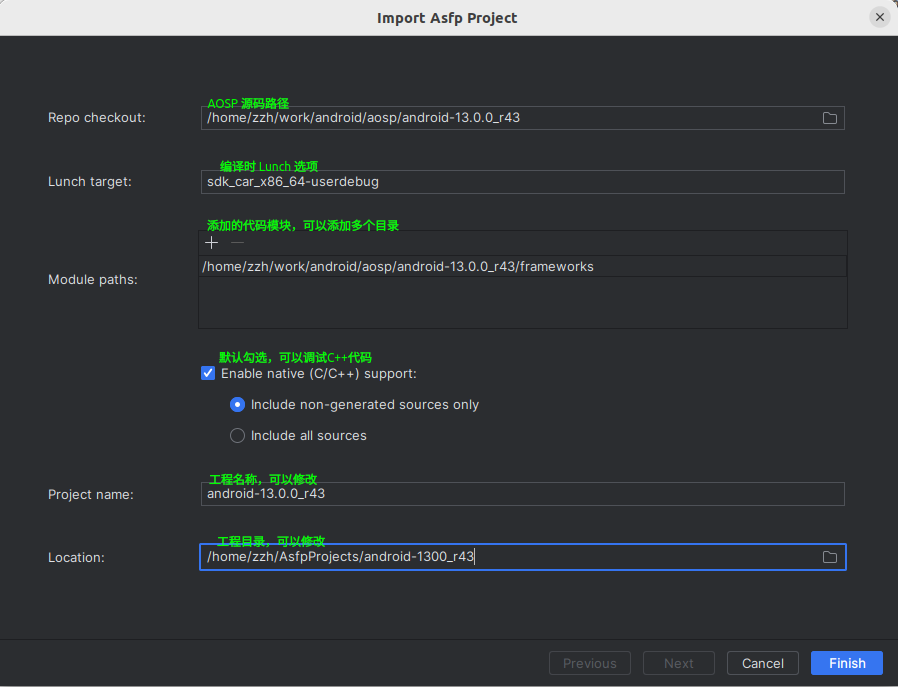
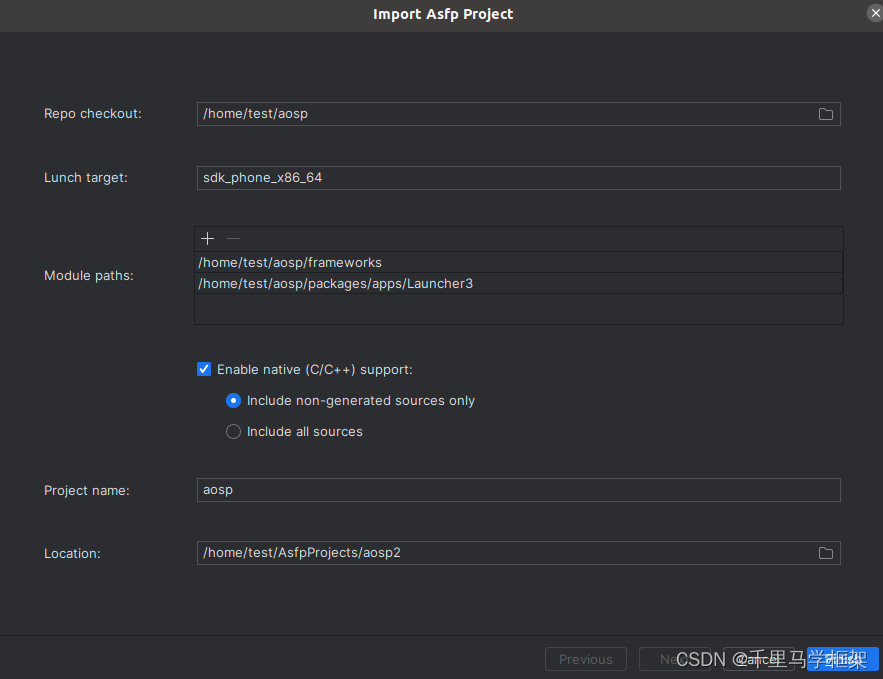
    Import your project by pointing to your repo checkout directory, specifying a lunch target, and selecting which modules you want to build.
    Click Finish and your project will begin syncing.
    Request to join our external group for user support.

这里我们就直接自己转化把
1、下载好工具,安装好即可以(限制在ubuntu)
在这里插入图片描述
在这里插入图片描述
可以直接点击安装的

2、启动工具
在terminator下面输入如下命令:
/opt/android-studio-for-platform/bin/studio.sh
就会启动工具

3、导入需要模块
导入AOSP选项
这里导入了Launcher和framework
在这里插入图片描述
在这里插入图片描述

同步完成就一切都好了即可以查看相关代码和跳转。

ps使用的注意点:

1、跳转framework的类时候会跳到对应jar包的class文件,不是java文件,解决如下
在这里插入图片描述

2、KeyMap如果习惯eclipse的可以切换

3、如果导入c++相关开发建议以下3个文件夹:
frameworks
system
packages

导入越多整体就慢

总结体验:

整体体验和以前android studio没有大的差别
1、不过说实话单独java部分的代码开发的话,体验还不如以前的android studio轻量,反而依赖的东西太多,对于跳转等,查找代码还没有以前方便,针对java部分的话,这个建议可以先观望等更多版本更新稳定

2、c++部分的native代码,来说简直就利器,非常好用,跳转准确,非常值的推荐

google官方教学视频教程地址:
https://www.bilibili.com/video/BV1UV411P7nf/?vd_source=a8c604ee3ce4999324264828f8fd99d8

生成桌面图标

生成桌面图标

修改配置文件

修改配置文件后进行sync

主要分析一下SystemServer启动过后的内部逻辑,特别说明一下AMS,WMS都属于SystemServer进程,属于同一个进程

一. SystemServer进程启动流程

基于Android13的系统启动流程分析(五)之Zygote和SystemServer启动流程这篇文章有详细讲解,这里再简单的过一下如何启动的SystemServer

在zygote进程创建过后,会调用forkSystemServer()来孵化出SystemServer进程,当前该进程创建成功后会反射调用到SystemServer.java的main函数,从而启动完成SystemServer

二. SystemServer主函数分析

main函数会被ZygoteInit的子方法handleSystemServerProcess反射调用到
frameworks/base/services/java/com/android/server/SystemServer.java

public static void main(String[] args) {
        new SystemServer().run();
}

继续看看run方法

1
2
3
4
5
6
7
8
9
10
11
12
13
14
15
16
17
18
19
20
21
22
23
24
25
26
27
28
29
30
31
32
33
34
35
36
37
38
39
40
41
42
43
44
45
46
47
48
49
50
51
52
53
54
55
56
57
58
59
60
61
62
63
64
65
66
67
68
69
70
71
72
73
74
75
76
77
78
79
80
81
82
83
84
85
86
87
88
89
90
91
92
93
94
95
96
97
98
99
100
private void run() {
...
try {
...
// 设置系统语言,国家,时区相关
if (!SystemProperties.get("persist.sys.language").isEmpty()) {
final String languageTag = Locale.getDefault().toLanguageTag();
SystemProperties.set("persist.sys.locale", languageTag);
SystemProperties.set("persist.sys.language", "");
SystemProperties.set("persist.sys.country", "");
SystemProperties.set("persist.sys.localevar", "");
}
...
// Prepare the main looper thread (this thread).
// 设置main线程的优先级,有此可得主线程就是:SystemServer进程下的其中线程
android.os.Process.setThreadPriority(
android.os.Process.THREAD_PRIORITY_FOREGROUND);
android.os.Process.setCanSelfBackground(false);
// 开始主线程的运行,和Looper.loop配对使用
// 运行在 Looper.prepareMainLooper()~Looper.loop()
// 之间的就是运行在主线程中
Looper.prepareMainLooper();
Looper.getMainLooper().setSlowLogThresholdMs(
SLOW_DISPATCH_THRESHOLD_MS, SLOW_DELIVERY_THRESHOLD_MS);
...
// 初始化native services,加载android_servers库(libandroid_servers.so)
System.loadLibrary("android_servers");
...
// 通过ActivityThread来创建system上下文
createSystemContext();

// Call per-process mainline module initialization.
// 初始化ActivityThread
// 创建TelephonyServiceManager,StatsServiceManager,MediaServiceManager
ActivityThread.initializeMainlineModules();

// 将SystemServer加入ServiceManager(binder线程池)
// 每个继承自SystemServer 或属于SystemServer进程的服务都将加入到
// ServiceManager中的线程池中
ServiceManager.addService("system_server_dumper", mDumper);
mDumper.addDumpable(this);

// 每个server基本上对应了一个manager,对外提供的API也是只能获取到manager
// 创建SystemServiceManager,它会对系统的服务进行创建、启动和生命周期管理,启动系统的各种服务
mSystemServiceManager = new SystemServiceManager(mSystemContext);
mSystemServiceManager.setStartInfo(mRuntimeRestart,
mRuntimeStartElapsedTime, mRuntimeStartUptime);
mDumper.addDumpable(mSystemServiceManager);
// LocalServices是system_server进程中各个服务提供的本地服务
// system_server进程中每个服务都可以往LocalServices放对象
// 有些核心服务是继承自SystemServer,LocalServices是公开缓存池目的是:解耦
LocalServices.addService(SystemServiceManager.class, mSystemServiceManager);
...
// Start services.
try {
t.traceBegin("StartServices");
// 启动系统启动所需的一系列关键服务:AMS,P(power/package)MS,SensorService,DisplayManagerService,LightService等
startBootstrapServices(t);
// 启动核心服务:BatteryService,GpuService等
startCoreServices(t);
// 启动其他服务:VibratorManagerService,闹钟服务,相机服务,网络服务,输入法服务,存储服务等
startOtherServices(t);
// 以上的所有服务都由mSystemServiceManager来启动,所以都是继承自SystemServer
// 分别是引导服务、核心服务和其他服务
// [引导服务]
// Installer 系统安装apk时的一个服务类,启动完成Installer服务之后才能启动其他的系统服务
//ActivityManagerService 负责四大组件的启动、切换、调度。
//PowerManagerService 计算系统中和Power相关的计算,然后决策系统应该如何反应
//LightsService 管理和显示背光LED
//DisplayManagerService 用来管理所有显示设备
//UserManagerService 多用户模式管理
//SensorService 为系统提供各种感应器服务
//PackageManagerService 用来对apk进行安装、解析、删除、卸载等等操作
// [核心服务]
//BatteryService 管理电池相关的服务
//UsageStatsService 收集用户使用每一个APP的频率、使用时常
//WebViewUpdateService WebView更新服务
// [其他服务]
//CameraService 摄像头相关服务
//AlarmManagerService 全局定时器管理服务
//InputManagerService 管理输入事件
//WindowManagerService 窗口管理服务
//VrManagerService VR模式管理服务
//BluetoothService 蓝牙管理服务
//NotificationManagerService 通知管理服务
//DeviceStorageMonitorService 存储相关管理服务
//LocationManagerService 定位管理服务
//AudioService 音频相关管理服务
} catch (Throwable ex) {
...
} finally {
...
}

...
Looper.loop();// 主线程
// 若执行到这里说明主线程意外退出了
// 主线程:Looper.prepareMainlooper~ Looper.loop之间
throw new RuntimeException("Main thread loop unexpectedly exited");
}

以上方法可以看出来关于其他服务的启动都是运行在主线程中的Looper.prepareMainlooper~ Looper.loop之间,每个SystemServer中的服务都有一个binder,会加入到ServiceManager的binder线程池中统一管理,这样拿到全局的ServiceManager,根据AIDL 获取到每Service了

  • startBootstrapServices(t)
    启动系统启动所需的一系列关键服务:
    AMS,P(power/package)MS,SensorService,DisplayManagerService,LightService等
  • startCoreServices(t)
    启动核心服务:BatteryService,GpuService等
  • startOtherServices(t)
    启动其他服务:VibratorManagerService,闹钟服务,相机服务,网络服务,输入法服务,存储服务等

在这些启动的服务里(调用了onStart启动服务),都会将服务存入ServiceManager 用来管理系统中的各种Service,用于系统C/S架构中的Binder机制通信:Client端要使用某个Service,则需要先到ServiceManager查询Service的相关信息,然后根据Service的相关信息与Service所在的Server进程建立通讯通路,这样Client端就可以使用Service了

image-20231129172417054

image-20231129172431908

1. startBootstrapServices

1
2
3
4
5
6
7
8
9
10
11
12
13
14
15
16
17
18
19
20
21
22
23
24
25
26
27
28
29
30
31
32
33
34
35
36
37
38
39
40
41
42
43
44
45
46
47
48
49
50
51
52
53
54
55
56
57
58
59
60
61
62
63
64
65
66
67
68
  private void startBootstrapServices(@NonNull TimingsTraceAndSlog t) {
// 尽早启动看门狗,以便在早期启动过程中出现死锁时使系统服务器崩溃
t.traceBegin("StartWatchdog");
// 启动看门狗,看门狗需要定时喂狗,若喂狗超时则会触发重启,以便知道进程和服务是否正常运行
final Watchdog watchdog = Watchdog.getInstance();
watchdog.start();
t.traceEnd();
...
t.traceBegin("StartInstaller");
// 通过mSystemServiceManager来启动Installer服务,管理应用的安装与卸载
Installer installer = mSystemServiceManager.startService(Installer.class);
t.traceEnd();
...
// 通过mSystemServiceManager来启动UriGrantsManagerService,管理Uri
t.traceBegin("UriGrantsManagerService");
mSystemServiceManager.startService(UriGrantsManagerService.Lifecycle.class);
t.traceEnd();

// 通过mSystemServiceManager来启动PowerStatsService,管理电源状态
t.traceBegin("StartPowerStatsService");
mSystemServiceManager.startService(PowerStatsService.class);
t.traceEnd();
...
t.traceBegin("StartActivityManager");
// 通过mSystemServiceManager来启动ActivityTaskManagerService,管理Activity任务栈
ActivityTaskManagerService atm = mSystemServiceManager.startService(
ActivityTaskManagerService.Lifecycle.class).getService();
// 启动ActivityManagerService,管理Activity等
mActivityManagerService = ActivityManagerService.Lifecycle.startService(
mSystemServiceManager, atm);
// 让ActivityManagerService拿到systemServer,例如可以通过mSystemServiceManager来判断系统是否启动完成
mActivityManagerService.setSystemServiceManager(mSystemServiceManager);
mActivityManagerService.setInstaller(installer);
mWindowManagerGlobalLock = atm.getGlobalLock();
t.traceEnd();

...
// 启用PowerManagerService服务,电源管理服务
t.traceBegin("StartPowerManager");
mPowerManagerService = mSystemServiceManager.startService(PowerManagerService.class);
t.traceEnd();
...
// 启动屏幕亮度服务,比如亮度调整
t.traceBegin("StartLightsService");
mSystemServiceManager.startService(LightsService.class);
t.traceEnd();

// 启动屏幕显示服务
t.traceBegin("StartDisplayManager");
mDisplayManagerService = mSystemServiceManager.startService(DisplayManagerService.class);
t.traceEnd();

...
// 启动PMS,包管理服务
mPackageManagerService = PackageManagerService.main(mSystemContext, installer,
domainVerificationService, mFactoryTestMode != FactoryTest.FACTORY_TEST_OFF,
mOnlyCore);
} finally {
Watchdog.getInstance().resumeWatchingCurrentThread("packagemanagermain");
}

...
// 启动传感器服务
t.traceBegin("StartSensorService");
mSystemServiceManager.startService(SensorService.class);
t.traceEnd();
t.traceEnd(); // startBootstrapServices
}

可以看到大多数服务都是通过mSystemServiceManager.startService来启动,核心服务和其他服务都是一样的,就不过多分析了
可以先看看startService方法内容

1
2
3
4
5
6
7
8
9
10
11
12
13
14
15
16
17
18
19
20
21
22
23
24
25
26
27
28
29
30
31
 public <T extends SystemService> T startService(Class<T> serviceClass) {
try {
final String name = serviceClass.getName();
...
final T service;
try {
// 反射拿到该java类
Constructor<T> constructor = serviceClass.getConstructor(Context.class);
service = constructor.newInstance(mContext);
} ...
// 将当前服务(java类)加入SystemService服务队列中,统一管理
startService(service);
return service;
} finally {
Trace.traceEnd(Trace.TRACE_TAG_SYSTEM_SERVER);
}
}

public void startService(@NonNull final SystemService service) {
// 将当前服务加入mServices队列中
mServices.add(service);
// Start it.
long time = SystemClock.elapsedRealtime();
try {
// 调用当前服务的onStart来启动服务
service.onStart();
} catch (RuntimeException ex) {
...
}
warnIfTooLong(SystemClock.elapsedRealtime() - time, service, "onStart");
}

可以看到startService方法就是反射拿到服务类,然后加入队列中,调用其onStart方法进行启动

2. ServiceManager服务管理

每个属于SystemServer的服务都将加入到ServiceManager的binder线程池中,以供后续直接获取和管理
就拿BatteryService服务来讲解

1
mSystemServiceManager.startService(BatteryService.class);

已知startService后会调用BatteryService服务的onStart方法,继续看看onStart内部

1
2
3
4
5
6
7
8
9
10
11
12
@Override
public void onStart() {
...
mBinderService = new BinderService();
// 将BinderService服务加入ServiceManager中
publishBinderService("battery", mBinderService);
mBatteryPropertiesRegistrar = new BatteryPropertiesRegistrar();
// 将batteryproperties服务加入ServiceManager中
publishBinderService("batteryproperties", mBatteryPropertiesRegistrar);
// 将BinderService服务加入到LocalServices中
publishLocalService(BatteryManagerInternal.class, new LocalService());
}

继续看看mBinderService具体是什么,又是如何加入到ServiceManager中的

1
2
3
private final class BinderService extends Binder {
...
}

可以看到mBinderService就是一个Binder,然后调用publishBinderService加入到ServiceManager中的binder线程池中

1
2
3
protected final void publishBinderService(...) {
ServiceManager.addService(name, service, allowIsolated, dumpPriority);
}

调用ServiceManager.addService加入到binder线程池中(ServiceManager暂不深究,只知其内部维护了binder线程池),而ServiceManager服务早就在rc文件中作为核心服务启动了,所以具体实现都是c++代码

1
2
3
4
5
6
7
8
9
10
11
12
13
service servicemanager /system/bin/servicemanager
class core animation
user system
group system readproc
critical
onrestart restart apexd
onrestart restart audioserver
onrestart restart gatekeeperd
onrestart class_restart main
onrestart class_restart hal
onrestart class_restart early_hal
writepid /dev/cpuset/system-background/tasks
shutdown critical

三. 总结

其实SystemServer是通过init fork出来的,父进程就是zygote,而zygote父进程就是init进程。
SystemServer内部逻辑主要就是创建了核心服务,引导服务,其他服务,例如WMS,PMS,电池服务,蓝牙服务等。这些服务都不是单独的进程,而是都属于SystemServer进程,启动这些服务过后会将这些服务加入ServiceManager的binder线程池中,因为这些服务内部都创建了Binder实例,再加入到了ServiceManager的binder线程池中,以便与随时获取服务与只通信

参考文章:Android系统启动流程(三)解析SyetemServer进程启动过程

##一. Android系统启动流程

  1. 基于Android13的系统启动流程分析(一)之SeLinux权限介绍
  2. 基于Android13的系统启动流程分析(三)之FirstStageMain阶段
  3. 基于Android13的系统启动流程分析(四)之SecondStageMain阶段
  4. 基于SecondStageMain阶段解析rc文件后会启动zygote进程
  5. zygote进程启动过后会通过JNI方式回调到上层再调回到底层的fork函数创建出SystemServer

二. Zygote服务创建源码分析

在init.rc文件中会执行class_start main来启动zygote,代码如下

# 启动zygote
on nonencrypted
    class_start main
    class_start late_start

这个main就是zygote,可以通过init.{zygote64}.rc来查看,代码如下

1
2
3
4
5
6
7
8
9
10
11
12
13
14
15
16
17
18
19
20
21
22
23
24
service zygote /system/bin/app_process64 -Xzygote /system/bin --zygote --start-system-server
# class : 给服务指定一个类属
class main
priority -20
# user 在执行此服务之前先切换用户名。当前默认为root.
user root
# 切换组名
group root readproc reserved_disk
# 在/dev/socket/下创建一个socket,并传递创建的文件描述符fd给服务进程
# 其中type必须为dgram或stream,seqpacket.用户名和组名默认为0
socket zygote stream 660 root system
socket usap_pool_primary stream 660 root system
onrestart exec_background - system system -- /system/bin/vdc volume abort_fuse
onrestart write /sys/power/state on
onrestart restart audioserver
onrestart restart cameraserver
onrestart restart media
onrestart restart netd
onrestart restart wificond
writepid /dev/cpuset/foreground/tasks
# oneshot : 当此服务退出时不会自动重启.
# disabled:服务不会自动运行,必须显式地通过服务器来启动
# 据设备相关的关键服务,如果在4分钟内,此服务重复启动了4次,那么设备将会重启进入还原模式。
critical window=${zygote.critical_window.minute:-off} target=zygote-fatal

第二个参数就是服务进程的名称,通过class指定函数入口,并且位于:/system/bin/app_process64,可以看到audioservercameraservermedianetdwificond这些进程都隶属于zygote进程中,那就代表着

1
2
1.如果zygote挂了,这些进程将一起died
2.如果这些进程挂了,并不会影响zygote died

如果zygote挂了将会捕获到进程异常信号,将zygote进程进行重启,zygote main入口位置: frameworks/base/cmds/app_process/app_main.cpp

1. app_main.cpp源码分析

int main(int argc, char* const argv[])
{
    ...
    AppRuntime runtime(argv[0], computeArgBlockSize(argc, argv));
    ...

    // 如果zygote为true则代表即将创建该进程
    // 如果startSystemServer为true则代表创建zygote时也会创建SystemServer
    // 系统正常启动都会将这两个bool默认给到true
    // 因为rc启动main后携带了--zygote和--start-system-server两个参数
    bool zygote = false;
    bool startSystemServer = false;
    bool application = false;
    String8 niceName;
    String8 className;
            
    ++i;  // Skip unused "parent dir" argument.
    while (i < argc) {
        const char* arg = argv[i++];
        if (strcmp(arg, "--zygote") == 0) {// zygote将为true,名称就叫:zygote
            zygote = true;
            niceName = ZYGOTE_NICE_NAME;
        } else if (strcmp(arg, "--start-system-server") == 0) {// startSystemServer将为true
            startSystemServer = true;
        } else if (strcmp(arg, "--application") == 0) {
            application = true;
        } else if (strncmp(arg, "--nice-name=", 12) == 0) {
            niceName.setTo(arg + 12);
        } else if (strncmp(arg, "--", 2) != 0) {
            className.setTo(arg);
            break;
        } else {
            --i;
            break;
        }
    }

    Vector<String8> args;
    if (!className.isEmpty()) {
       ...
    } else {
        // 进入创建zygote模式
        // 创建/data/dalvik-cache,为后续会创建Dalvik虚拟机做准备
        maybeCreateDalvikCache();

        // 如果startSystemServer为true的话(默认为true)
        // 将”start-system-server”放入启动的参数args
        if (startSystemServer) {
            args.add(String8("start-system-server"));
        }

        char prop[PROP_VALUE_MAX];
        ...
        // 将所有剩余参数传递给args,例如application或tool或start-system-server或abi
        // 这些启动参数将会传递到其他进程中,后续取出参数决定是否启动systemServer等操作
        for (; i < argc; ++i) {
            args.add(String8(argv[i]));
        }
    }
    ...

    // zygote为真,将创建zygote,该args启动参数会包含start-system-server
    // 调用runtime(AppRuntime)的start来启动zygote,将args传入,因为args包含了启动SystemServer的标志
    if (zygote) {
        runtime.start("com.android.internal.os.ZygoteInit", args, zygote);
    } else if (className) {
        runtime.start("com.android.internal.os.RuntimeInit", args, zygote);
    } else {
        fprintf(stderr, "Error: no class name or --zygote supplied.\n");
        app_usage();
        LOG_ALWAYS_FATAL("app_process: no class name or --zygote supplied.");
    }
}

以上代码就是启动zygote和将start-system-server放入启动参数,后续会读取参数启动SystemServer,继续分析一下runtime.start的com.android.internal.os.ZygoteInit"进程,位于:frameworks/base/core/jni/AndroidRuntime.cpp

2. AndroidRuntime.cpp源码分析

Vector<**String8**>& options就是包含了start-system-server的启动参数,通过app_main传递过来的

//frameworks/base/core/jni/AndroidRuntime.cpp
void AndroidRuntime::start(const char* className, const Vector<String8>& options, bool zygote)
{
    ALOGD(">>>>>> START %s uid %d <<<<<<\n",
            className != NULL ? className : "(unknown)", getuid());
    // 默认会启动SystemServer
    static const String8 startSystemServer("start-system-server");
    // 是否私有,如果SystemServer会被创建时,将会设置为私有
    bool primary_zygote = false;
            
    for (size_t i = 0; i < options.size(); ++i) {
        // options就是传递过来的args,默认是包含了start-system-server
        if (options[i] == startSystemServer) {
            primary_zygote = true;
           ...
        }
    }

    // 获取环境变量,这里第一次执行时默认为空,所以rootDir不存在
    // = 将直接拿到/system作为rootDir并设置环境变量
    const char* rootDir = getenv("ANDROID_ROOT");
    if (rootDir == NULL) {
        rootDir = "/system";
        if (!hasDir("/system")) {
            LOG_FATAL("No root directory specified, and /system does not exist.");
            return;
        }
        setenv("ANDROID_ROOT", rootDir, 1);
    }
    ...

    /* start the virtual machine */
    // 这里就开始启动虚拟机了
    // JNI功能初始化
    JniInvocation jni_invocation;
    jni_invocation.Init(NULL);
    JNIEnv* env;
    // 创建Dalvik虚拟机(这里-->DVM==JavaVM)
    if (startVm(&mJavaVM, &env, zygote, primary_zygote) != 0) {
        return;
    }
    onVmCreated(env);

    // 调用startReg函数用来为DVM注册JNI
    if (startReg(env) < 0) {
        ALOGE("Unable to register all android natives\n");
        return;
    }

    jclass stringClass;
    jobjectArray strArray;
    jstring classNameStr;
    // 通过反射拿到String类型
    stringClass = env->FindClass("java/lang/String");
    assert(stringClass != NULL);
    //options就是app_main.cpp传递过来的args,包含了start-system-server
    // 将options转换为array list对象
    strArray = env->NewObjectArray(options.size() + 1, stringClass, NULL);
    assert(strArray != NULL);
    //从app_main的main函数得知className为com.android.internal.os.ZygoteInit
    classNameStr = env->NewStringUTF(className);
    assert(classNameStr != NULL);
    // 将数据转换给java类型的array 数组
    env->SetObjectArrayElement(strArray, 0, classNameStr);

    for (size_t i = 0; i < options.size(); ++i) {
        jstring optionsStr = env->NewStringUTF(options.itemAt(i).string());
        assert(optionsStr != NULL);
        env->SetObjectArrayElement(strArray, i + 1, optionsStr);
    }

    /*
     * Start VM.  This thread becomes the main thread of the VM, and will
     * not return until the VM exits.
     */
     // 启动com.android.internal.os.ZygoteInit,该线程成为JVM的主进程,在VM退出之前不会返回
    char* slashClassName = toSlashClassName(className != NULL ? className : "");
    jclass startClass = env->FindClass(slashClassName);
    if (startClass == NULL) {
       ...
    } else {
        // 通过反射的方式,找到ZygoteInit的main函数
        // 若获取到内容则执行else
        jmethodID startMeth = env->GetStaticMethodID(startClass, "main",
            "([Ljava/lang/String;)V");
        if (startMeth == NULL) {
            ALOGE("JavaVM unable to find main() in '%s'\n", className);
            /* keep going */
        } else {
            // 通过JNI调用ZygoteInit的main函数,将args(strArray)传递到java层
            // 因为ZygoteInit的main函数是Java编写的,因此需要通过JNI调用
            // 所以这里继续跟到java层面:ZygoteInit.java
            env->CallStaticVoidMethod(startClass, startMeth, strArray);
            ...
        }
    }
    // 若执行到这里,则会结束zygote创建,关闭jvm
    free(slashClassName);
    ALOGD("Shutting down VM\n");
    if (mJavaVM->DetachCurrentThread() != JNI_OK)
        ALOGW("Warning: unable to detach main thread\n");
    if (mJavaVM->DestroyJavaVM() != 0)
        ALOGW("Warning: VM did not shut down cleanly\n");
}

可以看到以上的代码主要就是初始化了JNI(c++与Java交互)功能并创建并启动了JVM虚拟机,通过反射的方式去启动ZygoteInit.java的main方法,并将args参数(包含了是否启动SystemServer的参数)传递过去。
JVM虚拟机进程就是:com.android.internal.os.ZygoteInit,而ZygoteInit进程位于:
frameworks/base/core/java/com/android/internal/os/ZygoteInit.java

3. ZygoteInit.java源码分析

 public static void main(String[] argv) {
        ZygoteServer zygoteServer = null;
        // 标记zygote开始了
        ZygoteHooks.startZygoteNoThreadCreation();
        // 设置zygote自己的用户组pid
        try {
            Os.setpgid(0, 0);
        } catch (ErrnoException ex) {
            throw new RuntimeException("Failed to setpgid(0,0)", ex);
        }

        Runnable caller;
        try {
           // 读取系统是否已经启动完成
            final long startTime = SystemClock.elapsedRealtime();
            final boolean isRuntimeRestarted = "1".equals(
                    SystemProperties.get("sys.boot_completed"));

            // 将行为写入trace log 标记目前正处于ZygoteInit阶段
            String bootTimeTag = Process.is64Bit() ? "Zygote64Timing" : "Zygote32Timing";
            TimingsTraceLog bootTimingsTraceLog = new TimingsTraceLog(bootTimeTag,
                    Trace.TRACE_TAG_DALVIK);
            bootTimingsTraceLog.traceBegin("ZygoteInit");
            RuntimeInit.preForkInit();

            boolean startSystemServer = false;
            // zygote进程就是一个socket,名称就叫zygote
            String zygoteSocketName = "zygote";
            String abiList = null;
            boolean enableLazyPreload = false;
            for (int i = 1; i < argv.length; i++) {
                // 从AndroidRuntime.cpp中传递上来,已经包含了start-system-server
                // 所以startSystemServer = true
                if ("start-system-server".equals(argv[i])) {
                    startSystemServer = true;
                } ...
            }
            // 为true,是私有zygote
            final boolean isPrimaryZygote = zygoteSocketName.equals(Zygote.PRIMARY_SOCKET_NAME);
            ...
            // 记录的trace log,只记录到这个地方
            bootTimingsTraceLog.traceEnd(); // ZygoteInit
            // 初始化socket,从环境中获取套接字FD(ANDROID_SOCKET_zygote)
            // 若获取不到则创建一个用于和systemServer通信的socket,当systemServer fork出来后socket进程将关闭
            Zygote.initNativeState(isPrimaryZygote);
              ...

            // 根据环境变量(LocalServerSocket)获取zygote文件描述符并重新创建一个socket,可以从这里看到zygote其实就是一个socket
            // 这个name为”zygote”的Socket用来等待ActivityManagerService来请求Zygote来fork出新的应用程序进程
            // 所以ActivityManagerService里启动应用程序(APP),都是由该zygote socket进行处理并fork出的子进程
            zygoteServer = new ZygoteServer(isPrimaryZygote);
            // 默认为true,将启动systemServer
            if (startSystemServer) {
                // zygote就是一个孵化器,所以这里直接fork(分叉,派生)出来SystemServer
                Runnable r = forkSystemServer(abiList, zygoteSocketName, zygoteServer);
                ...
                // 让SystemServer子进程运行起来
                if (r != null) {
                    r.run();
                    return;
                }
            }

            Log.i(TAG, "Accepting command socket connections");

            // 让zygote socket(注意不是systemServer zygote)循环运行
            // 等待client进程来请求调用,请求创建子进程(fork出子进程(例如等待AMS的请求))
            caller = zygoteServer.runSelectLoop(abiList);
        } catch (Throwable ex) {
           ...
        } finally {
            if (zygoteServer != null) {
                // 停止关于systemServer的socket,保留和AMS通信的socket
                // 在initNativeState阶段创建了一个和systemServer通信的socket
                // 接着拿到systemServer socket文件描述符重新创建了一个可以和AMS通信的socket(/dev/socket/zygote)
                zygoteServer.closeServerSocket();
            }
        }
        ...
    }
  • 以上代码讲述了SystemServer socket的创建,将行为写入到trace log日志系统中,并通过JNI调用到底层的fork函数,孵化出SystemServer进程,如果SystemServer创建成功并已经运行了就会将当前socket进行close
  • 期间会创建一个zygote socket,用于等待其他子进程来连接,例如等待AMS(activity manager service)来连接该socket,然后继续fork出子进程(也就是应用程序,所以应用程序就是通过zygote来fork出来的)
  • 创建了2个socket,一个是systemServer socket(Zygote.initNativeState(isPrimaryZygote)来创建),一个是zygote socket(new ZygoteServer来创建),注意区分

继续来看一下zygoteServer = new ZygoteServer(isPrimaryZygote);

3.1 ZygoteInit.java#ZygoteServer(zygote socket)分析
 //frameworks/base/core/java/com/android/internal/os/ZygoteServer.java
 ZygoteServer(boolean isPrimaryZygote) {
        mUsapPoolEventFD = Zygote.getUsapPoolEventFD();

        // 创建socket,名称为zygote,路径:/dev/sockets/zygote
        if (isPrimaryZygote) {
            mZygoteSocket = Zygote.createManagedSocketFromInitSocket(Zygote.PRIMARY_SOCKET_NAME);
           ...
        }
        ...
    }
    
static LocalServerSocket createManagedSocketFromInitSocket(String socketName) {
        //文件描述符通过ANDROID_socket_<socketName>环境变量共享
        int fileDesc;
        final String fullSocketName = ANDROID_SOCKET_PREFIX + socketName;

        try {
            String env = System.getenv(fullSocketName);
            // 拿到文件描述符内容
            fileDesc = Integer.parseInt(env);
        } catch (RuntimeException ex) {
            throw new RuntimeException("Socket unset or invalid: " + fullSocketName, ex);
        }

 try {
            // 生成文件描述符
            FileDescriptor fd = new FileDescriptor();
            fd.setInt$(fileDesc);
            return new LocalServerSocket(fd);  //frameworks/base/core/java/android/net/LocalServerSocket.java
        } catch (IOException ex) {
            throw new RuntimeException(
                "Error building socket from file descriptor: " + fileDesc, ex);
        }
    }
    
public LocalServerSocket(FileDescriptor fd) throws IOException
    {
        // 创建socket并持续监听(等待client来调用)
        impl = new LocalSocketImpl(fd);
        impl.listen(LISTEN_BACKLOG);
        localAddress = impl.getSockAddress();
    }

简单点来说就是创建了一个zygoye socket ,位于/dev/sockets/zygote,并调用了runSelectLoop让其循环运行,等待新进程发来的请求并进行连接zygoteServer.runSelectLoop(abiList)然后fork出子应用程序进程

 Runnable runSelectLoop(String abiList) {
        ArrayList<FileDescriptor> socketFDs = new ArrayList<>();
        ArrayList<ZygoteConnection> peers = new ArrayList<>();

        // 拿到socket的文件描述符
        socketFDs.add(mZygoteSocket.getFileDescriptor());
        ...
        while (true) {
            ...
            if (pollReturnValue == 0) {
            ...
            } else {
                boolean usapPoolFDRead = false;

                while (--pollIndex >= 0) {
                    if ((pollFDs[pollIndex].revents & POLLIN) == 0) {
                        continue;
                    }

                    if (pollIndex == 0) {
                        // Zygote server socket
                        // acceptCommandPeer函数得到ZygoteConnection类并添加到Socket连接列表peers中,
                        // 接着将该ZygoteConnection的文件描述符添加到fd列表fds中,以便可以接收到ActivityManagerService发送过来的请求
                        ZygoteConnection newPeer = acceptCommandPeer(abiList);
                        peers.add(newPeer);
                        socketFDs.add(newPeer.getFileDescriptor());
                    } 
               ...
            }
        }
    }

zygoteServer.runSelectLoop(abiList)持续等待进程来请求连接并fork出应用。

至此zygote socket已经启动完毕了,该socket会等待AMS进程发来的应用程序进程fork

继续看看systemServer是怎么被fork出来的
forkSystemServer(abiList, zygoteSocketName, zygoteServer);

3.2 ZygoteInit.java#forkSystemServer分析
 private static Runnable forkSystemServer(String abiList, String socketName,
            ZygoteServer zygoteServer) {
        ...
        // 创建args数组,这个数组用来保存启动SystemServer的启动参数,其中可以看出SystemServer进程的用户id和用户组id被设
        //置为1000;
        // 并且拥有用户组10011010,1018、1021、1032、30013010的权限;进程名为system_server;
        // 启动的类名为com.android.server.SystemServer
        String[] args = {
                "--setuid=1000",
                "--setgid=1000",
                "--setgroups=1001,1002,1003,1004,1005,1006,1007,1008,1009,1010,1018,1021,1023,"
                        + "1024,1032,1065,3001,3002,3003,3006,3007,3009,3010,3011,3012",
                "--capabilities=" + capabilities + "," + capabilities,
                "--nice-name=system_server",
                "--runtime-args",
                "--target-sdk-version=" + VMRuntime.SDK_VERSION_CUR_DEVELOPMENT,
                "com.android.server.SystemServer",
        };
        ZygoteArguments parsedArgs;

        int pid;
        try {
            ...
            // 通过JNI形式去调用init进程下的fork函数,派生出systemServer进程
            pid = Zygote.forkSystemServer(
                    parsedArgs.mUid, parsedArgs.mGid,
                    parsedArgs.mGids,
                    parsedArgs.mRuntimeFlags,
                    null,
                    parsedArgs.mPermittedCapabilities,
                    parsedArgs.mEffectiveCapabilities);
        } catch (IllegalArgumentException ex) {
            throw new RuntimeException(ex);
        }

        // pid == 0代表已经运行在子进程(SystemServer)上了
        // 代表SystemServer创建成功,创建成功后会关闭该socket
        if (pid == 0) {
            ...
            // 销毁zygoteServer,保留和AMS通信的socket(runSelectLoop)
            // 当SystemServer创建过后,zygoteServerSocket就没有用处了,进行关闭
            zygoteServer.closeServerSocket();
            // 处理 system server 进程初始化工作并启动SystemServer进程
            // 并启动了一个 binder 线程池供system server 进程和其他进程通信使用
            // 最后调用 RuntimeInit.applicationInit() 执行进程启动自身初始化工作
            // applicationInit()最后是通过反射调用了 SystemServer.java 中的 main() 方法
            return handleSystemServerProcess(parsedArgs);
        }
        return null;
    }

Zygote.forkSystemServer就是调用了底层的fork函数,不再进一步分析了。以上代码已知SystemServer子进程已经创建成功,将调用handleSystemServerProcess来启动SystemServer.java的入口
handleSystemServerProcess会一直调用到RuntimeInit.java#findStaticMain方法中

    protected static Runnable findStaticMain(String className, String[] argv,
            ClassLoader classLoader) {
        Class<?> cl;

        try {
            // className:com.android.server.SystemServer
            // 反射拿到SystemServer类
            cl = Class.forName(className, true, classLoader);
        } catch (ClassNotFoundException ex) {
           ...
        }

        Method m;
        try {
            // 反射拿到SystemServer.java的main函数,并启动
            m = cl.getMethod("main", new Class[] { String[].class });
        } catch (NoSuchMethodException ex) {
           ...
        } catch (SecurityException ex) {
           ...
        }
        ...
        return new MethodAndArgsCaller(m, argv);
    }

可以看到handleSystemServerProcess下面的子方法去调用了com.android.server.SystemServer的main方法,至此SystemServer就创建和启动完毕了

至此SystemServer 已经创建并启动完毕了,那么SystemServer socket就会销毁并关闭

三. 总结

可以知道zygote是从rc中启动的,zygote本质上就是一个socket,不会关闭和销毁,而创建zygote时携带的StartSystemServer参数(必须携带此参数),会启动SystemServer子进程,SystemServer也是通过fork出来的,而底层和上层的交互是通过JNI实现的,SystemServer的启动是由zygoteInit通过反射的方式启动SystemServer的main方法

zygote启动时创建了服务端socket,用于SystemServer的创建,当SystemServer创建完成后则会关闭连接,期间已经调用了runSelectLoop来循环等待AMS及其他进程来请求连接,从而fork出应用程序的socket
服务端 socket会在SystemServer进程创建完毕后就会关闭,已经没有用处了,等待AMS发来连接将采用runSelectLoop方法进行循环等待

一. Android系统启动基本介绍

基于Android13的系统启动流程分析(三)之FirstStageMain阶段已经讲解过android系统启动的基本介绍了,这里不再单独介绍了

二. SecondStageMain源码分析

我们先看是怎么进入该阶段的,仍然是由用户空间层main.cpp调用,先简单的说一下第二阶段主要是干什么的:

  1. 设置init进程优先级并创建/dev/.booting设备块代表init正在初始化执行中

  2. 初始化属性服务,也就是会读取property_contexts文件内容以及读取build.prop内容通过MMAP映射到全局内存中,也就是对所有进程共享该资源

  3. 启动属性服务并创建socket_service,等待新链接去更新或新增属性值

  4. 挂载/apex,vendor_overlay等其他分区

  5. 检查设备是否被unlock解锁

  6. 持续监控/proc/mounts设备文件,解析文件中每一行数据,获取挂载点,挂载分区,文件类型,权限等。将解析内容生成实体类追加到要挂载的mounts_中并进行挂载

  7. 将根目录下所有的目录设置为全局共享,例如对/data设置为根目录下的全局共享

  8. 解析init.rc以及其他import了的rc文件,主要解析rc中的:service,on(action),Import,而zygote进程正是从解析rc文件中创建的,然后根据zygote(本质上就是一个socket),通过JNI调用到上层代码,再fork出systemServer.java

  9. 让init进程无限循环,因为主进程不能退出,退出即代表发生异常

  10. 处理sm(ServiceList)中服务超时重启相关(init.rc中的service),若rc中启动的服务启动超时则会让其服务重新启动

    1
    2
    3
    4
    5
    6
    7
    8
    9
    ...
    if (argc > 1) {
    ...
    if (!strcmp(argv[1], "second_stage")) {
    return SecondStageMain(argc, argv);//第二阶段执行
    }
    }
    return FirstStageMain(argc, argv); //第一阶段执行
    }

1. int SecondStageMain(int argc, char** argv)分析

位于/system/core/init/init.cpp,直接上代码,代码注释中分步骤来分析

int SecondStageMain(int argc, char** argv) {
    if (REBOOT_BOOTLOADER_ON_PANIC) {
        // 针对产生异常的进程进行信号处理,确保子进程能重启,如果主进程pid=1发生异常则触发crash
        // 已经在上个文章分析过该函数
        InstallRebootSignalHandlers();
    }
     ...
    // 初始化kernel log,所有的kernel log均输出在/dev/kmsg设备节点上
    SetStdioToDevNull(argv);
    InitKernelLogging(argv);
    LOG(INFO) << "init second stage started!";
    ...
    // Init不应该因为依赖于任何其他进程而崩溃,因此我们忽略主进程的信号管道信息
    // 但我们不想忽略子进程的SIGPIPE(信号管道),因此我们为信号处理程序设置了一个no op函数
    // SIGPIPE信号产生的场景举例
    // ① 初始时,C、S连接建立,若某一时刻,C端进程宕机或者被KILL而终止(终止的C端进程将会关闭打开的文件描述符,即向S端发送FIN段),S端收到FIN后,响应ACK
    // ② 假设此时,S端仍然向C端发送数据:当第一次写数据后,S端将会收到RST分节; 当收到RST分节后,第二次写数据后,S端将收到SIGPIPE信号(S端进程被终止)
    {
        struct sigaction action = {.sa_flags = SA_RESTART};
        action.sa_handler = [](int) {};
        // sigaction是一个函数,可以用来查询或设置信号处理方式
        sigaction(SIGPIPE, &action, nullptr);
    }

    //  MIN_OOM_SCORE_ADJUST = -1000;
    //  MAX_OOM_SCORE_ADJUST = 1000;
    //  设置进程的优先级,例如APK优先级是AMS计算出来并下发到/proc/1/oom_score_adj
    //  统一由init进程设置/proc/**/oom_score_adj为-1000优先级
    if (auto result =
                WriteFile("/proc/1/oom_score_adj", StringPrintf("%d", DEFAULT_OOM_SCORE_ADJUST));
        !result.ok()) {
        LOG(ERROR) << "Unable to write " << DEFAULT_OOM_SCORE_ADJUST
                   << " to /proc/1/oom_score_adj: " << result.error();
    }

      ...
    // 创建 /dev/.booting 文件,就是个标记,表示booting进行中
    // is_booting()函数会依靠空文件".booting"来判断是否进程处于初始化中,初始化结束后,这个文件会被删除
    close(open("/dev/.booting", O_WRONLY | O_CREAT | O_CLOEXEC, 0000));
    
    // 当设备解锁时,允许adb root
    // 如果设备unlocked(解锁了),则会修改selinux规则,放大用户权限,这一点在第一阶段已经完成了
    // 并设置了INIT_FORCE_DEBUGGABLE环境变量,这里只是根据环境变量获取第一阶段的内容
    const char* force_debuggable_env = getenv("INIT_FORCE_DEBUGGABLE");
    bool load_debug_prop = false;
    if (force_debuggable_env && AvbHandle::IsDeviceUnlocked()) {
        load_debug_prop = "true"s == force_debuggable_env;
    }
    unsetenv("INIT_FORCE_DEBUGGABLE");
    
    // 如果设备未unlock,则卸载关于debug版本的/debug_ramdisk
    // 让属性值读取/ramdisk而不是/debug_ramdisk,因为非unlock,不需要debug ramdisk
    if (!load_debug_prop) {
        // setup 1
        UmountDebugRamdisk();
    }

    // 初始化属性服务
    // 获取system/build.prop,vendor/build.prop,/odm/build.prop,/product/build.prop,等其他build.prop并加载到properties map结构中
    // 然后会将该properties结构,通过MMAP映射到全局内存中,供所有进程调用,主要ro是只读,只能够写一次,即初始化时给的一次值
    // 注意build.prop有优先级,product下的优先级最高,因为是map结构,针对key相同的属性值时,会覆盖
    // setup 2
    PropertyInit();

    // Umount second stage resources after property service has read the .prop files.
    // 在属性服务读取.prop文件后,将卸载/second_stage_resources,因为已经用不到了,已经将属性值加载到内存当中了
    UmountSecondStageRes();

    // Umount the debug ramdisk after property service has read the .prop files when it means to.
    // 若是debug版本,已经获取了属性值过后,也将卸载/debug_ramdisk
    if (load_debug_prop) {
        UmountDebugRamdisk();
    }

    // 挂载第二阶段(该阶段)的文件系统,第一阶段已经挂载了很多基本的文件系统了以及重要的分区
    // 挂载/apex:简单点说apex为了解决性能而产生的机制,APK可以通过内置升级,但系统升级可是个大问题
    // setup 3
    MountExtraFilesystems();
    ...
    // 之前初始化了属性服务,这里将开始属性服务,其实它就是一个socket
    // 创建socket,处理客户端发来的请求,决定是更新属性值还是新增属性值
    // setup 4
    StartPropertyService(&property_fd);
    ...
    // 根据ro.vndk.version 版本号,将/system/vendor_overlay和/product/vendor_overlay挂载在vendor上
    // 也就是会覆盖vendor分区内容
    // setup 5
    fs_mgr_vendor_overlay_mount_all();
    // 根据ro.oem_unlock_supported属性值来决定是否可以对设备进行unlock(解锁)
    // 若ro.oem_unlock_supported:「1」则代表 设备支持刷写unlock,若不支持该值为0
    // 如果设备支持刷写解锁,ro.boot.verifiedbootstate则会为orange,根据orange状态,把androidboot.flash.locked设置为1
    // 如果设备不支持刷新解锁,ro.boot.verifiedbootstate则会为green,根据orange状态,把androidboot.flash.locked设置为0
    // androidboot.flash.locked在系统启动完成后会形成属性值
    // (或 /firmware/android/flash.locked DT 属性)设置为“1”(如果已锁定)或“0”(如果已解锁)来指示锁定状态。
    export_oem_lock_status();
    // 持续监控/proc/mounts 节点(fopen("/proc/mounts", "re")),主要是解析该文件
    // 解析文件中每一行数据,获取挂载点,挂载分区,文件类型,权限等(空格分割/dev/block/dm-33 /mnt/pass_through/0/emulated ext4 rw)
    // 将解析内容生成实体类追加到要挂载的mounts_中,主要就是对mounts文件解析,更新mounts_中的信息
    // setup 6
    MountHandler mount_handler(&epoll);
    ...
    // 将根目录下所有的目录设置为全局共享
    // 将根目录/{分区}类型设置为共享,以便默认情况下所有进程都可以看到任何装载事件(例如/data)
    if (!SetupMountNamespaces()) {
        PLOG(FATAL) << "SetupMountNamespaces failed";
    }

    ...
    // setup 7
    // 创建ActionManager对象和ServiceList对象
    ActionManager& am = ActionManager::GetInstance();
    ServiceList& sm = ServiceList::GetInstance();
    // 加载rc文件,保存到action manager和service list中
    // rc文件中:action 使用 ActionParser,而 service 使用 ServiceParser 解析
    // 主要解析rc中的:service,on,Import,包含了zygote.rc,路径:/system/bin/app_process64
    // 在文件系统挂载的第一阶段,system/vendor分区已经成功挂载,而其它分区的挂载则通过rc来挂载
    // 后面主要分析一下on early-init和on init和zygote
    LoadBootScripts(am, sm);
    ...
    // setup 8
    // 构建action和触发器(on early-init),放到event_queue,等待执行函数
    am.QueueBuiltinAction(SetupCgroupsAction, "SetupCgroups");
    am.QueueBuiltinAction(SetKptrRestrictAction, "SetKptrRestrict");
    am.QueueBuiltinAction(TestPerfEventSelinuxAction, "TestPerfEventSelinux");
    am.QueueEventTrigger("early-init");

    // Queue an action that waits for coldboot done so we know ueventd has set up all of /dev...
    am.QueueBuiltinAction(wait_for_coldboot_done_action, "wait_for_coldboot_done");
    // ... so that we can start queuing up actions that require stuff from /dev.
    am.QueueBuiltinAction(SetMmapRndBitsAction, "SetMmapRndBits");
    Keychords keychords;
    am.QueueBuiltinAction(
            [&epoll, &keychords](const BuiltinArguments& args) -> Result<void> {
                for (const auto& svc : ServiceList::GetInstance()) {
                    keychords.Register(svc->keycodes());
                }
                keychords.Start(&epoll, HandleKeychord);
                return {};
            },
            "KeychordInit");

    // Trigger all the boot actions to get us started.
    // 构建action和触发器(on init),放到event_queue,等待执行函数
    am.QueueEventTrigger("init");

    // Don't mount filesystems or start core system services in charger mode.
    // 如果是充电模式则不需要挂载文件系统和不要启动核心服务
    std::string bootmode = GetProperty("ro.bootmode", "");
    if (bootmode == "charger") {
        am.QueueEventTrigger("charger");
    } else {
        am.QueueEventTrigger("late-init");
    }

    // Run all property triggers based on current state of the properties.
    // 运行所有属性触发器(action),例如 on property
    am.QueueBuiltinAction(queue_property_triggers_action, "queue_property_triggers");

    // Restore prio before main loop
    // 设置进程优先级,主进程不能被销毁和退出,循环处理rc中的服务相关
    setpriority(PRIO_PROCESS, 0, 0);
    while (true) {
        // By default, sleep until something happens.
        auto epoll_timeout = std::optional<std::chrono::milliseconds>{};

        auto shutdown_command = shutdown_state.CheckShutdown();
        if (shutdown_command) {
            LOG(INFO) << "Got shutdown_command '" << *shutdown_command
                      << "' Calling HandlePowerctlMessage()";
            HandlePowerctlMessage(*shutdown_command);
            shutdown_state.set_do_shutdown(false);
        }

        if (!(prop_waiter_state.MightBeWaiting() || Service::is_exec_service_running())) {
            // 执行队列中的action
            // 队列中依次执行每个action中携带command对应的执行函数
            am.ExecuteOneCommand();
        }
        if (!IsShuttingDown()) {
            // 处理sm(ServiceList)中服务超时重启相关(init.rc中的service)
            auto next_process_action_time = HandleProcessActions();
            if (next_process_action_time) {
                epoll_timeout = std::chrono::ceil<std::chrono::milliseconds>(
                        *next_process_action_time - boot_clock::now());
                if (*epoll_timeout < 0ms) epoll_timeout = 0ms;
            }
        }
...

    return 0;
}

2. SecondStageMain(int argc, char** argv)—–>setup 1步骤

先贴一下setup 1的代码块,主要分析UmountDebugRamdisk函数

    if (!load_debug_prop) {
        // setup 1
        UmountDebugRamdisk();
    }
    
static void UmountDebugRamdisk() {
    if (umount("/debug_ramdisk") != 0) {
        PLOG(ERROR) << "Failed to umount /debug_ramdisk";
    }
}    

如果设备未unlock,则卸载关于debug版本的/debug_ramdisk,让属性值读取/ramdisk而不是/debug_ramdisk

3. SecondStageMain(int argc, char** argv)—–>setup 2步骤

该步骤主要作用是初始化属性值服务,这里只是一个初始化的动作

    // setup 2
    PropertyInit();
  • 初始化属性服务,获取system/build.prop,vendor/build.prop,/odm/build.prop,/product/build.prop,等其他build.prop并加载到properties map结构中,然后会将该properties结构,通过MMAP映射到全局内存中,供所有进程调用,主要ro是只读,只能够写一次,即初始化时给的一次值,注意build.prop有优先级,product下的优先级最高,因为是map结构,针对key相同的属性值时,会覆盖

  • PropertyInit位于/system/core/init/property_service.cpp

    1
    2
    3
    4
    5
    6
    7
    8
    9
    10
    11
    12
    13
    14
    15
    16
    17
    18
    19
    20
    21
    22
    23
    24
    25
    26
    27
    28
    29
    30
    31
    32
    33
    34
    void PropertyInit() {
    ...
    // 建立属性服务设备文件(linux思想,万物皆文件系统)
    mkdir("/dev/__properties__", S_IRWXU | S_IXGRP | S_IXOTH);
    // 创建序列化过后的propertyInfo实体,主要就是读取property_contexts文件
    CreateSerializedPropertyInfo();
    // 这里主要步骤是:通过mmap映射,将文件(/dev/__properties__/{..})映射进内存(初始化属性内存映射文件)
    // 这里将文件映射进内存,用于后续对__prooerties__目录(也可以说是文件,将代码块映射为file类型)进行内存共享
    if (__system_property_area_init()) {
    LOG(FATAL) << "Failed to initialize property area";
    }
    // 加载/dev/__properties__/property_info,此文件是序列化过的,无法直接查看内容
    if (!property_info_area.LoadDefaultPath()) {
    LOG(FATAL) << "Failed to load serialized property info file";
    }

    // 读取/proc/device-tree/firmware/android/目录下的文件,生成ro.boot.xxx属性值
    // 这三个函数主要就是生成ro.boot.xx属性值,这里不详细研究
    ProcessKernelDt();
    ProcessKernelCmdline();
    ProcessBootconfig();

    // 初始化ro.xx,将ro.boot.xx的属性值复制给ro.xxx
    // { "ro.boot.serialno", "ro.serialno", UNSET, },
    // { "ro.boot.mode", "ro.bootmode", "unknown", },
    // { "ro.boot.baseband", "ro.baseband", "unknown", },
    // { "ro.boot.bootloader", "ro.bootloader", "unknown", },
    // { "ro.boot.hardware", "ro.hardware", "unknown", },
    // { "ro.boot.revision", "ro.revision", "0", },
    ExportKernelBootProps();

    // 读取{system/vendor/odm/product}/build.prop等...
    // 将build.prop通过MMAP映射到全局内存中,供所有进程访问
    PropertyLoadBootDefaults();

    调用__system_property_area_init通过mmap映射,将文件(/dev/properties/{包含了上下文和propertys_info实体:保存了property_contexts文件内容})映射进内存(初始化属性内存映射文件), 这里将文件映射进内存,用于后续对__prooerties__目录(也可以说是文件,将代码块映射为file类型)进行内存共享

  • CreateSerializedPropertyInfo:

    创建序列化过后的属性值信息(既然序列化了,那肯定是要跨进程通信)
    (1).读取{system_ext,vendor,product,odm,system}_property_contexts属性值安全上下文并赋值给:property_infos
    (2).property_infos属于容器类型,读取不同的property_contexts将会追加到末尾,而不是覆盖原本内容
    (3).将property_infos实体序列化,使其可以跨进程传递消息
    (4).将property_infos实体写入/dev/properties/property_info驱动节点中

  • PropertyLoadBootDefaults
    这里会将属性值全部写入build.prop里,分为:system/build.prop,vendor/build.prop,/odm/build.prop,/product/build.prop,注意是有优先级顺序的,按先后顺序覆盖,获取build.prop分别是直接从指定文件里获取和从指定分区中获取,这两个方式作用都一样,只不过第二种需要区分出分区里是否存在{partition}/{etc}/build.prop,有的分区是不存在{partition}/etc/build.prop这个文件,而是直接存在于{partition}/build.prop

一切都写到了注释里,继续分析比较重要的2个函数CreateSerializedPropertyInfoPropertyLoadBootDefaults

3.1 CreateSerializedPropertyInfo
void CreateSerializedPropertyInfo() {
    auto property_infos = std::vector<PropertyInfoEntry>();
    //判断文件是否存在,并判断文件是否可写(属性服务的安全上下文,之前有提过设备节点,服务,属性值都要遵守selinux规则)
    if (access("/system/etc/selinux/plat_property_contexts", R_OK) != -1) {
        // 加载property_contexts文件,该文件内容都是配置的属性值上下文,属于selinux相关知识
        // 通过ParsePropertyInfoFile解析该文件,得到property_infos
        if (!LoadPropertyInfoFromFile("/system/etc/selinux/plat_property_contexts",
                                      &property_infos)) {
            return;
        }
        // 如果这里system_ext/vendor/product没有挂载上(例如在恢复的情况下,vendor分区将不会安装),则无法继续加载该上下文,该分区会在第一阶段挂载
        // 从下面的代码可以看出来,property_infos的是容器类型vector<PropertyInfoEntry>()
        // 所以这里并没有优先级也没有以哪个property_contexts为准,而是根据是否存在对应的分区而append加载
        // 也就是在对应后面追加内容,而不是覆盖:property_infos->emplace_back(property_info_entry);
        if (access("/system_ext/etc/selinux/system_ext_property_contexts", R_OK) != -1) {
            LoadPropertyInfoFromFile("/system_ext/etc/selinux/system_ext_property_contexts",
                                     &property_infos);
        }
        if (!LoadPropertyInfoFromFile("/vendor/etc/selinux/vendor_property_contexts",
                                      &property_infos)) {
            // Fallback to nonplat_* if vendor_* doesn't exist.
            LoadPropertyInfoFromFile("/vendor/etc/selinux/nonplat_property_contexts",
                                     &property_infos);
        }
        if (access("/product/etc/selinux/product_property_contexts", R_OK) != -1) {
            LoadPropertyInfoFromFile("/product/etc/selinux/product_property_contexts",
                                     &property_infos);
        }
        if (access("/odm/etc/selinux/odm_property_contexts", R_OK) != -1) {
            LoadPropertyInfoFromFile("/odm/etc/selinux/odm_property_contexts", &property_infos);
        }
     // 若/system/etc/selinux/plat_property_contexts无法读取,则else
    } else {
        // 由于system下的安全上下文未创建,则可能是system出现异常未挂载上,或者供应商修改过plat_property_contexts
        // 一般供应商都是复写,而不会直接更改文件名称
        // 若找不到该文件,则加载根目录下的这些属性值安全上下文
        if (!LoadPropertyInfoFromFile("/plat_property_contexts", &property_infos)) {
            return;
        }
        LoadPropertyInfoFromFile("/system_ext_property_contexts", &property_infos);
        if (!LoadPropertyInfoFromFile("/vendor_property_contexts", &property_infos)) {
            // Fallback to nonplat_* if vendor_* doesn't exist.
            LoadPropertyInfoFromFile("/nonplat_property_contexts", &property_infos);
        }
        LoadPropertyInfoFromFile("/product_property_contexts", &property_infos);
        LoadPropertyInfoFromFile("/odm_property_contexts", &property_infos);
    }

    // 序列化property_infos实体,使其可以跨进程传递
    auto serialized_contexts = std::string();
    auto error = std::string();
    if (!BuildTrie(property_infos, "u:object_r:default_prop:s0", "string", &serialized_contexts,
                   &error)) {
        LOG(ERROR) << "Unable to serialize property contexts: " << error;
        return;
    }


​ // 将property_infos写入/dev/properties/property_info设备文件中
​ constexpr static const char kPropertyInfosPath[] = “/dev/properties/property_info”;
​ if (!WriteStringToFile(serialized_contexts, kPropertyInfosPath, 0444, 0, 0, false)) {
​ PLOG(ERROR) << “Unable to write serialized property infos to file”;
​ }
​ selinux_android_restorecon(kPropertyInfosPath, 0);
​ }

以上的步骤都是对property_infos变量进行赋值,数据就是property_contexts文件内容,而property_infos是属于vector<**PropertyInfoEntry**>()容器类型,而每次加载property_infos时都是调用的property_infos->emplace_back(property_info_entry);在容器后面追加数据,不会覆盖原有的数据

读取property_contexts文件内容,将内容传递给property_infos实体

3.2 PropertyLoadBootDefaults
void PropertyLoadBootDefaults() {
    std::map<std::string, std::string> properties;
    // 如果是恢复模式则加载/prop.default
    if (IsRecoveryMode()) {
        load_properties_from_file("/prop.default", nullptr, &properties);
    }

    // 这里还没执行,只是一个未执行的代码块,从分区里读取build.prop文件
    const auto load_properties_from_partition = [&properties](const std::string& partition,
                                                              int support_legacy_path_until) {
        // 加载{system_ext,product等分区}/etc/build.prop文件
        // 以后代码上获取的属性值就是从该文件中获取的
        auto path = "/" + partition + "/etc/build.prop";
        if (load_properties_from_file(path.c_str(), nullptr, &properties)) {
            return;
        }
        ...
    }
    // 获取第一阶段生成的second_stage_resources/system/etc/ramdisk/build.prop
    // 并追加到properties中(这里是map结构,注意会覆盖内容)
    LoadPropertiesFromSecondStageRes(&properties);
    // 先读取的/system/build.prop,然后赋值给properties(这里是map结构,注意会覆盖内容)
    load_properties_from_file("/system/build.prop", nullptr, &properties);
    // 获取/system_ext分区下的build.prop/default.prop,赋值给然后赋值给propertiess(这里是map结构,注意会覆盖内容)
    load_properties_from_partition("system_ext", /* support_legacy_path_until */ 30);
     // 继续读取的/vendor/default.prop,然后赋值给properties(这里是map结构,注意会覆盖内容)
    load_properties_from_file("/vendor/default.prop", nullptr, &properties);
    // }
    // 继续读取的/vendor/build.prop,然后赋值给properties(这里是map结构,注意会覆盖内容)
    load_properties_from_file("/vendor/build.prop", nullptr, &properties);
    // 继续读取的/vendor_dlkm/etc/build.prop,然后赋值给properties(这里是map结构,注意会覆盖内容)
    load_properties_from_file("/vendor_dlkm/etc/build.prop", nullptr, &properties);
    // 继续读取的/odm_dlkm/etc/build.prop,然后赋值给properties(这里是map结构,注意会覆盖内容)
    load_properties_from_file("/odm_dlkm/etc/build.prop", nullptr, &properties);
    // 获取/{odm,product}.prop/default.prop,赋值给然后赋值给propertiess(这里是map结构,注意会覆盖内容)
    load_properties_from_partition("odm", /* support_legacy_path_until */ 28);
    load_properties_from_partition("product", /* support_legacy_path_until */ 30);
    // 因为propertiess是map结构,如果key一样则会覆盖内容,所以以上代码的顺序不能调换,优先级最高的是/product下的build.prop
    // /system->/system_ext->/vendor->/omd->/product

    // 如果"/debug_ramdisk/adb_debug.prop"存在,说明设备已经unlock过了,则加载unlock过后的属性值,例如ro.debugger=1,则是开启了调试模式
    if (access(kDebugRamdiskProp, R_OK) == 0) {
        LOG(INFO) << "Loading " << kDebugRamdiskProp;
        load_properties_from_file(kDebugRamdiskProp, nullptr, &properties);
    }

    // 将从build.prop,default.prop获取的properties,循环设置属性值
    // 这里是把.prop文件里的属性值通过mmap映射到内存中,使得所有进程可以访问(全局)
    for (const auto& [name, value] : properties) {
        std::string error;
        // 如果是ro则是只读,只能设置一次,再次设置会无效,如果存在相同的key,则会调用update更新
        if (PropertySet(name, value, &error) != PROP_SUCCESS) {
            LOG(ERROR) << "Could not set '" << name << "' to '" << value
                       << "' while loading .prop files" << error;
        }
    }
    ...
    // 设置persist.sys.usb.config属性值来决定是否开启调试模式(adb或none)
    update_sys_usb_config();
}

以上代码主要做的一个动作:读取各个分区里的build.prop或直接从指定目录下读取build.prop并调用PropertySet设置到全局内存中,让所有进程访问

主要的两个函数:load_properties_from_partitionload_properties_from_file,分别从分区里读取和从指定文件读取,为什么这么做呢?因为有的分区下是没有/etc目录的,无法直接指定文件位置,所以通过调用 "/" + partition + "/etc/build.prop"来读取,若不存在该文件则直接return。
注意这里读取了{system,system_ext,vendor,vendor_dlkm,odm_dlkm,odm,product}/build.prop,由于properties属于map结构,如果key相同是会覆盖原有的值,所以这里是有优先级排序的:

  1. /system/build.prop
  2. /system_ext/{etc}/build.prop
  3. /vendor/default.prop
  4. /vendor/build.prop
  5. /vendor_dlkm/etc/build.prop
  6. /odm_dlkm/etc/build.prop
  7. /odm/{etc}/build.prop
  8. /product/{etc}/build.prop

如果在system中自定义了属性值,又在product自定义了一样的属性值,那么是以product为准

这里只是init初始化过程,读取build.prop并解析出来每一行属性值并调用PropertySet设置到全局内存中

继续分析一下PropertySet函数,该函数比较简单

static uint32_t PropertySet(const std::string& name, const std::string& value, std::string* error) {
    ...
    // 找到该属性值
    prop_info* pi = (prop_info*) __system_property_find(name.c_str());
    if (pi != nullptr) {
        // 如果是以ro开头则代表只读,禁止写入,返回error
        if (StartsWith(name, "ro.")) {
            *error = "Read-only property was already set";
            return PROP_ERROR_READ_ONLY_PROPERTY;
        }
        // 若存在该属性值且非ro 则更新属性值
        __system_property_update(pi, value.c_str(), valuelen);
    } else {
        // 若找不到该属性值则新增
        int rc = __system_property_add(name.c_str(), name.size(), value.c_str(), valuelen);
        if (rc < 0) {
            *error = "__system_property_add failed";
            return PROP_ERROR_SET_FAILED;
        }
    }

    // 如果是以persist.开头,则会全部写进/data/property/persistent_properties
    // 属于一个缓存机制
    // std::string persistent_property_filename = "/data/property/persistent_properties";
    if (persistent_properties_loaded && StartsWith(name, "persist.")) {
        WritePersistentProperty(name, value);
    }
    ...
    return PROP_SUCCESS;
}

以上代码就是若存在属性值则更新,若不存在则新增。如果是ro开头的属性值则代表只读,只能初始化的时候给默认值,后续不允许修改值,如果是persist开头的则会全部缓存进/data/property/persistent_properties,persist开头的属性值是可改的,如果用户修改过了persist开头的属性值相当于修改了/data/property/persistent_properties里的属性值,那么重启后仍然生效,并不会还原默认值。这样即不影响属性值的原子性(原有的属性值),又给了开发者/用户操作的空间,如果是刷机或恢复出厂则会还原

如果是系统开发者自定义了属性值,但是发现默认定义的时候属性值无法写入,则可能是property_contexts安全上下文影响,可以直接修改这里的代码,__system_property_add强行调用该方法即可

4. SecondStageMain(int argc, char** argv)—–>setup 3步骤

setup 4
MountExtraFilesystems();

static void MountExtraFilesystems() {
#define CHECKCALL(x) \
    if ((x) != 0) PLOG(FATAL) << #x " failed.";

    // /apex is used to mount APEXes
    CHECKCALL(mount("tmpfs", "/apex", "tmpfs", MS_NOEXEC | MS_NOSUID | MS_NODEV,
                    "mode=0755,uid=0,gid=0"));

    // /linkerconfig is used to keep generated linker configuration
    CHECKCALL(mount("tmpfs", "/linkerconfig", "tmpfs", MS_NOEXEC | MS_NOSUID | MS_NODEV,
                    "mode=0755,uid=0,gid=0"));
#undef CHECKCALL
}

可以看到MountExtraFilesystems主要就挂载了/apex和/linkerconfig并归属于tmpfs文件系统(运行在内存的文件系统,运行速度较快),这里主要探讨一下APEX.
应用程序可以通过更新APK来升级,供应商客制化系统后可以通过OTA进行系统升级,而针对google 开发者来修复原生的系统bug该如何更新呢?那就是通过google发布的安全patch和更新manline以及apex来解决

  • 简单点说apex为了解决性能而产生的机制,APK可以通过内置升级,但系统升级可是个大问题
  • apex可以将系统内部的各个功能打包成模块,然后针对这些模块单独升级
  • apk是应用程序的载体,对应用开发者而言,可以apk方式对应用功能进行升级
  • apex是系统功能的载体,对系统开发者(目前看主要是谷歌)而言,可以apex方式对系统功能进行升级
  • 一般是google开发者通过playstore发布,然后供我们下载更新,而对应ODM第三方供应商,则需要通过OTA升级
  • apex相当于对系统功能进行了更细粒度的划分,可以独立升级这些功能,可以把apex看成是一个一个的系统升级包

5. SecondStageMain(int argc, char** argv)—–>setup 4步骤

    // setup 4
    StartPropertyService(&property_fd);

在setup2中初始化了property,获取了build.prop和property_contexts并设置为内存中全局共享

void StartPropertyService(int* epoll_socket) {
    // 在init阶段version=1,这里已经升级到2了
    InitPropertySet("ro.property_service.version", "2");

    // 创建sockets,套接字,可以用于网络通信,也可以用于本机内的进程通信
    // socketpair()函数用于创建一对无名的,相互连接的套接字
    // 如果函数创建成功,则返回0,创建好的套接字分别是sv[0]和sv[1];否则返回-1
    int sockets[2];
    // 参数1:表示协议族AF_UNIX
    // 参数2:表示协议,SOCK_SEQPACKET提供连续可靠的数据包连接
    // SOCK_CLOEXEC:当文件描述符设置了O_CLOEXEC属性后,在调用exec函数族时,文件描述符就会自动关闭,无需手动关闭
    // 而SOCK_DGRAM是基于UDP的
    // 参数3:表示类型,只能为0
    // 参数4:套节字柄,该两个句柄作用相同,均能进行读写双向操作
    if (socketpair(AF_UNIX, SOCK_SEQPACKET | SOCK_CLOEXEC, 0, sockets) != 0) {
        PLOG(FATAL) << "Failed to socketpair() between property_service and init";
    }
    ...
    // PROP_SERVICE_NAME:/dev/socket/property_service,创建socket
    if (auto result = CreateSocket(PROP_SERVICE_NAME, SOCK_STREAM | SOCK_CLOEXEC | SOCK_NONBLOCK,
                                   false, 0666, 0, 0, {});
        result.ok()) {
        property_set_fd = *result;
    } else {
        LOG(FATAL) << "start_property_service socket creation failed: " << result.error();
    }

    // 监听socket:/dev/socket/property_service,最大连接:8
    listen(property_set_fd, 8);

    // 开启线程处理socket
    auto new_thread = std::thread{PropertyServiceThread};
    property_service_thread.swap(new_thread);
}

这里就是创建了socket,而属性值服务的本质就是一个socket(/dev/socket/property_service),最大连接为:8,持续等待连接,连接成功后决定是更新还是新增属性值,仍然是调用的PropertySet,继续分析一下PropertyServiceThread,该函数里调用了handle_property_set_fd函数,来看看具体实现

static void handle_property_set_fd() {
    // 设置超时:2s
    static constexpr uint32_t kDefaultSocketTimeout = 2000; /* ms */

    // 可以设置四个参数,所以用的是accept4,而当启用了SOCK_CLOEXEC参数后,进程在调用exec函数族时,文件描述符就会自动关闭,无需手动关闭
    int s = accept4(property_set_fd, nullptr, nullptr, SOCK_CLOEXEC);
    if (s == -1) {
        return;
    }
    ...
    
    switch (cmd) {
    case PROP_MSG_SETPROP: {
        char prop_name[PROP_NAME_MAX];
        char prop_value[PROP_VALUE_MAX];
        ...
        prop_name[PROP_NAME_MAX-1] = 0;
        prop_value[PROP_VALUE_MAX-1] = 0;
        ...
        // 当收到客户端发来的请求,去更新或新增属性值时会调用HandlePropertySet去处理
        const auto& cr = socket.cred();
        std::string error;
        uint32_t result =
                HandlePropertySet(prop_name, prop_value, source_context, cr, nullptr, &error);
        if (result != PROP_SUCCESS) {
            LOG(ERROR) << "Unable to set property '" << prop_name << "' from uid:" << cr.uid
                       << " gid:" << cr.gid << " pid:" << cr.pid << ": " << error;
        }

        break;
      }
     ...
    }
}

可以看到设置了连接超时时间为2000ms,执行 case PROP_MSG_SETPROP,获取属性值的名称和值,调用HandlePropertySet里的PropertySet进行更新属性值或新增。PropertySet已经分析过了

至此属性值相关就分析完毕了,简单的来说就是读取build.prop属性值共享到全局内存中让所有进程获取,然后创建属性值服务(socket),持续监听客户端(哪个进程去调用更新属性值就是当前客户端)发来的请求,最大只能同时受理8个来自客户端的请求,若有客户端请求则去更新属性值或新增属性值

6. SecondStageMain(int argc, char** argv)—–>setup 5步骤

    // setup 5
    fs_mgr_vendor_overlay_mount_all();

这里的代码只要是针对如果有vendor_overlay分区,则覆盖/vendor分区,主要看供应商的客制化

const std::vector<const std::string> kVendorOverlaySourceDirs = {
        "/system/vendor_overlay/",
        "/product/vendor_overlay/",
};

bool fs_mgr_vendor_overlay_mount_all() {
    ...
    // 获取 "/system/vendor_overlay/","/product/vendor_overlay/"下的所有子目录
    // 将vendor_overlay挂载到vendor上,若存在该覆盖分区则会覆盖之前的vendor分区
    const auto vendor_overlay_dirs = fs_mgr_get_vendor_overlay_dirs(vndk_version);
    if (vendor_overlay_dirs.empty()) return true;
    if (fs_mgr_overlayfs_valid() == OverlayfsValidResult::kNotSupported) {
        LINFO << "vendor overlay: kernel does not support overlayfs";
        return false;
    }

    // Mount each directory in /(system|product)/vendor_overlay/<ver> on /vendor
    // 挂载vendor_overlay到/vendor分区上
    auto ret = true;
    for (const auto& vendor_overlay_dir : vendor_overlay_dirs) {
        if (!fs_mgr_vendor_overlay_mount(vendor_overlay_dir)) {
            ret = false;
        }
    }
    return ret;
}

7. SecondStageMain(int argc, char** argv)—–>setup 6步骤

    // setup 6
    MountHandler mount_handler(&epoll);

该函数主要功能:持续监控/proc/mounts 节点(fopen("/proc/mounts", "re")),主要是解析文件中每一行数据,获取挂载点,挂载分区,文件类型,权限等, 将解析内容生成实体类追加到要挂载的mounts_中,主要就是对mounts文件解析,更新mounts_中的信息,挂载mounts信息里的分区
位置:/system/core/init/mount_handler.cpp

MountHandler::MountHandler(Epoll* epoll) : epoll_(epoll), fp_(fopen("/proc/mounts", "re"), fclose) {
    if (!fp_) PLOG(FATAL) << "Could not open /proc/mounts";
    auto result = epoll->RegisterHandler(
            fileno(fp_.get()), [this]() { this->MountHandlerFunction(); }, EPOLLERR | EPOLLPRI);
    if (!result.ok()) LOG(FATAL) << result.error();
}

继续看一下MountHandlerFunction函数

void MountHandler::MountHandlerFunction() {
    rewind(fp_.get());
    std::vector<MountHandlerEntry> touched;
    auto untouched = mounts_; //容器类型
    char* buf = nullptr;
    size_t len = 0;
    // 循环读取文件内容中的每一行
    while (getline(&buf, &len, fp_.get()) != -1) {
        auto buf_string = std::string(buf);
        // /proc/mounts文件下存在一系列代码
        // 若读取到/0/emulated则跳过
        if (buf_string.find("/emulated") != std::string::npos) {
            continue;
        }
        // 根据读取的文件内容,来解析分区以及device path,type等
        auto entry = ParseMount(buf_string);
        auto match = untouched.find(entry);
        // 若这一行解析到底了仍然没有匹配的信息,则这一条记录追加到touched中
        // entry:举例--->对文件内容/dev/block/dm-33 /data_mirror/data_ce/null ext4 解析过后的实体
        if (match == untouched.end()) {
            touched.emplace_back(std::move(entry));
        } else {
            // 若找到了匹配的信息则移除
            untouched.erase(match);
        }
    }
    free(buf);
    // 将匹配到的entry进行移除,并记录Mount属性值
    for (auto& entry : untouched) {
        SetMountProperty(entry, false);
        mounts_.erase(entry);
    }
    // 将未匹配到的entry追加到mounts_,并记录Mount属性值
    for (auto& entry : touched) {
        SetMountProperty(entry, true);
        // emplace是更具有性能的 更新或追加
        mounts_.emplace(std::move(entry));
    }
}
  1. 读取/proc/mounts,解析文件中每一行数据,获取挂载点,挂载分区,文件类型,权限等
  2. 若解析到/0/emulated则跳过,不处理
  3. 根据mounts_,当entry(解析后的内容)可以在其中找到则移除
  4. 若entry未在mounts_找到,则追加到mounts_中
  5. 相当于移除旧的entry,将新的entry追加到mounts_

再看看是如何解析文件内容的auto entry = ParseMount(buf_string),解析文件内容

MountHandlerEntry ParseMount(const std::string& line) {
    auto fields = android::base::Split(line, " ");
    while (fields.size() < 3) fields.emplace_back("");
    if (fields[0] == "/dev/root") {
        auto& dm = dm::DeviceMapper::Instance();
        std::string path;
        // 根据名称获取system分区目录路径,若根据名称找不到则直接获取根目录/
        // 若找到根目录则继续找/system,若找到则拿到device path
        // 例如/system就是挂载在/dev/block/dm-1上,那么获取的就是这个玩意
        // /dev/block/dm-3 /vendor ext4 ro,seclabel,relatime 0 0
        if (dm.GetDmDevicePathByName("system", &path) || dm.GetDmDevicePathByName("vroot", &path)) {
            fields[0] = path;
        } else if (android::fs_mgr::Fstab fstab; android::fs_mgr::ReadDefaultFstab(&fstab)) {
            auto entry = GetEntryForMountPoint(&fstab, "/");
            if (entry || (entry = GetEntryForMountPoint(&fstab, "/system"))) {
                fields[0] = entry->blk_device;
            }
        }
    }
    // 获取所有/dev目录下的device
    // readlink 是Linux系统中的一个常用命令,主要用来找出符号链接所指向的位置
    // 也就是找到devcie path:/dev/block/dm-33
    if (android::base::StartsWith(fields[0], "/dev/")) {
        if (std::string link; android::base::Readlink(fields[0], &link)) {
            fields[0] = link;
        }
    }
    // fields0:/dev/block/dm-33(blk_device)
    // fields1:挂载在device上的分区/文件路径:/data_mirror/cur_profiles(mount_point)
    // fields2:该分区的type类型,例如可能是ext4(fs_type)
    return MountHandlerEntry(fields[0], fields[1], fields[2]);
}

让我们再来看看这个文件内容
在这里插入图片描述
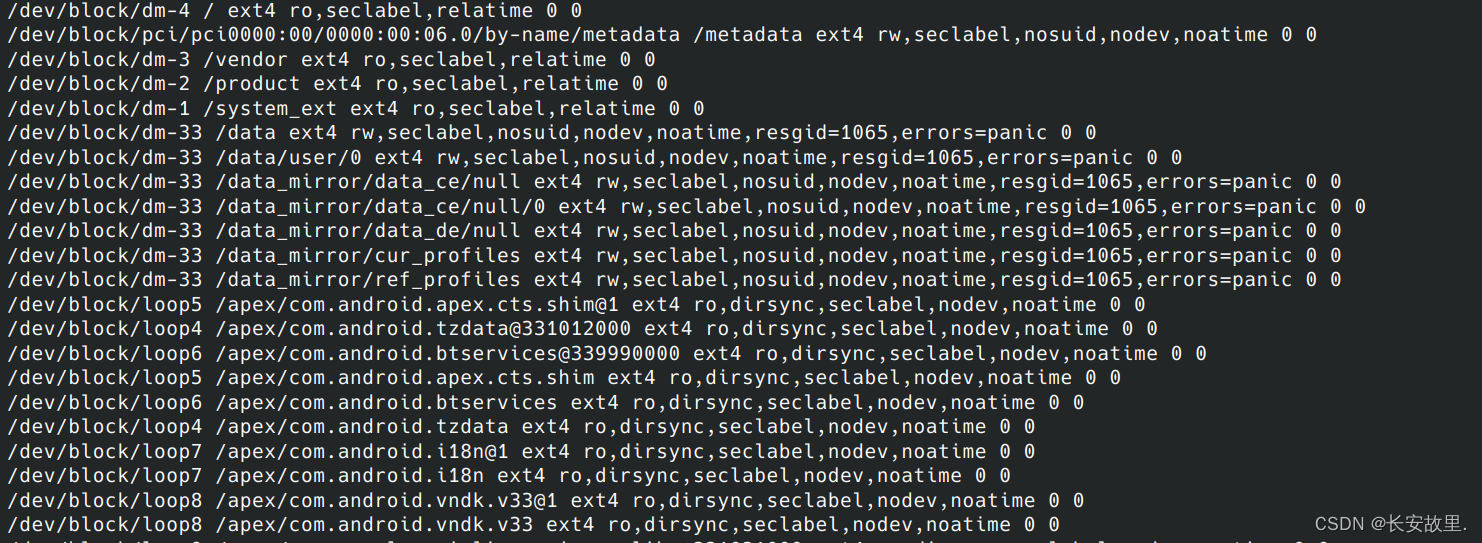
可以看出来第一列是分区挂载的位置,第二列是哪个分区,第三列属于分区格式
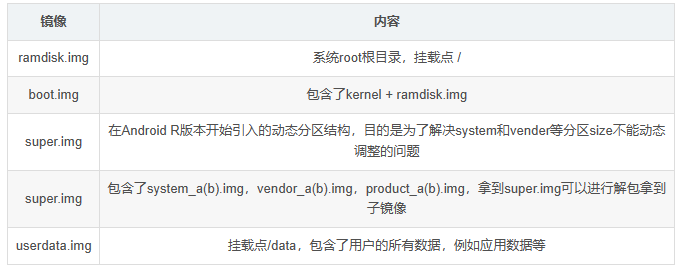
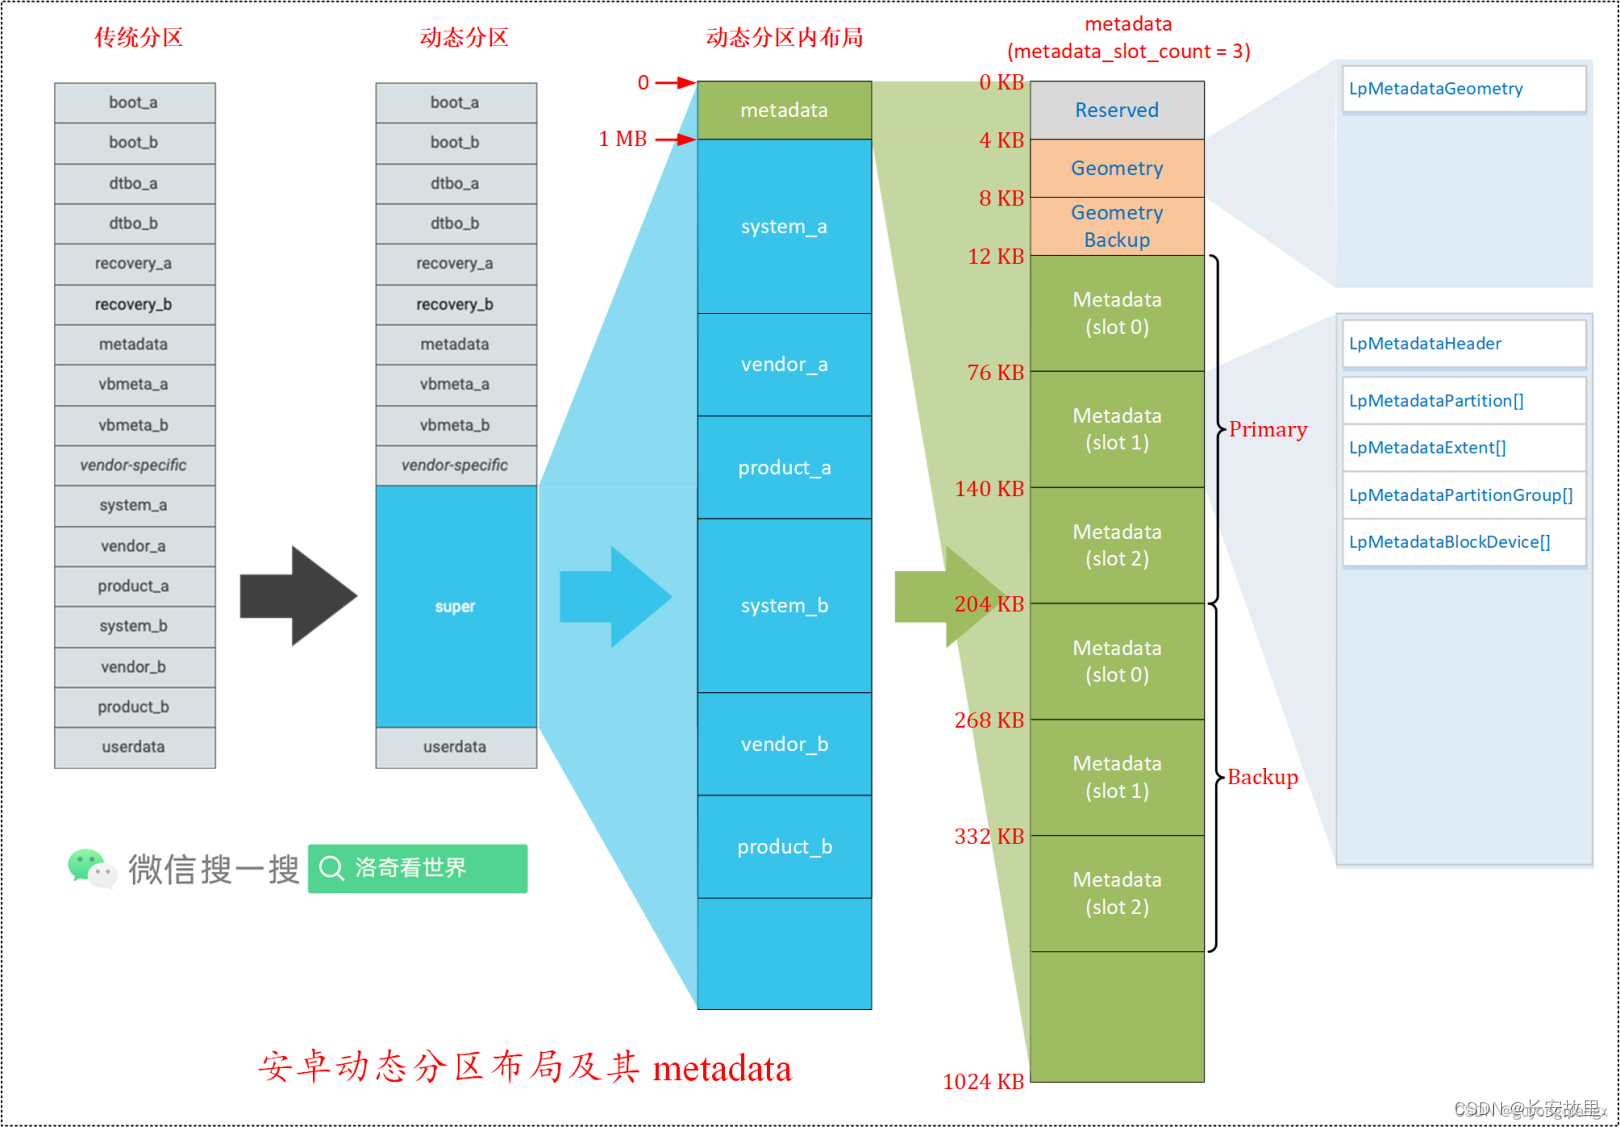
8. SecondStageMain(int argc, char** argv)—–>setup 7步骤

    // setup 7
    // 创建ActionManager对象和ServiceList对象
    ActionManager& am = ActionManager::GetInstance();
    ServiceList& sm = ServiceList::GetInstance();
    // 解析rc文件
    LoadBootScripts(am, sm);
  • 加载rc文件,保存到action manager和service list中

  • rc文件中:action 使用 ActionParser,而 service 使用 ServiceParser 解析

  • 主要解析rc中的:service,on,Import,包含了zygote.rc,路径:/system/bin/app_process64

  • 在文件系统挂载的第一阶段,system/vendor分区已经成功挂载,而其它分区的挂载则通过rc来挂载

  • rc中action的执行顺序:on early-initon initon late-initon property

    static void LoadBootScripts(ActionManager& action_manager, ServiceList& service_list) {
    // 创建解析器,只解析init.rc文件中的service,on,Import类型
    // action 使用 ActionParser,而 service 使用 ServiceParser 解析
    Parser parser = CreateParser(action_manager, service_list);
    // 获取ro.boot.init_rc属性值,此时该属性值应该是空的
    std::string bootscript = GetProperty(“ro.boot.init_rc”, “”);
    if (bootscript.empty()) {
    // 解析/system/core/rootdir/init.rc
    // 这里的路径就是将/system/core/rootdir/init.rc 拷贝到out目录下
    parser.ParseConfig(“/system/etc/init/hw/init.rc”);

    } else {
    parser.ParseConfig(bootscript);
    }
    }

    Parser CreateParser(ActionManager& action_manager, ServiceList& service_list) {
    Parser parser;

    parser.AddSectionParser(“service”, std::make_unique(
    &service_list, GetSubcontext(), std::nullopt));
    parser.AddSectionParser(“on”, std::make_unique(&action_manager, GetSubcontext()));
    parser.AddSectionParser(“import”, std::make_unique(&parser));

    return parser;
    }

可以看到只需要解析init.rc文件中的service,on,import类型

9. SecondStageMain(int argc, char** argv)—–>setup 8步骤

    // setup 8
    // 构建action和触发器(on early-init),放到event_queue,等待执行函数
   ...
    am.QueueEventTrigger("early-init");
    // 构建action和触发器(on init),放到event_queue,等待执行函数
    am.QueueEventTrigger("init");
    // 如果是充电模式则不需要挂载文件系统和不要启动核心服务
    std::string bootmode = GetProperty("ro.bootmode", "");
    if (bootmode == "charger") {
        am.QueueEventTrigger("charger");
    } else {
        am.QueueEventTrigger("late-init");
    }
    // 运行所有属性触发器(action),例如 on property
    am.QueueBuiltinAction(queue_property_triggers_action, "queue_property_triggers");

把action加入队列中按顺序依次执行,继续一下rc文件中做了什么动作, rc中action的执行顺序:on early-initon initon late-initon nonencrypted(启动zygote)on property

9.1. on early-init
on early-init
   ...
    mkdir /acct/uid
    # 挂载linkerconfig(动态链接器)
    mount none /linkerconfig/bootstrap /linkerconfig bind rec
    # 启动ueventd(位于/system/bin/ueventd),ueventd是init启动的第一个进程
    start ueventd
    # memory.pressure_level used by lmkd
    chown root system /dev/memcg/memory.pressure_level
    chmod 0040 /dev/memcg/memory.pressure_level
    # app mem cgroups, used by activity manager, lmkd and zygote
    mkdir /dev/memcg/apps/ 0755 system system
    mkdir /dev/memcg/system 0550 system system
    mkdir /dev/net 0755 root root
    symlink ../tun /dev/net/tun
    ...
    # 挂载tracefs,可以通过指定方式到处trace日志,分析CPU和内存相关等问题
    mount tracefs tracefs /sys/kernel/tracing gid=3012

    # create sys dirctory
    # 创建/sys目录并指定权限
    mkdir /dev/sys 0755 system system
    mkdir /dev/sys/fs 0755 system system
    mkdir /dev/sys/block 0755 system system

可以看到针对lmkd(Low Memory Killer Daemon)以及app 创建用户组,创建目录,挂载tracefs:可以通过指定方式到处trace日志,分析CPU和内存相关等问题。
第一个启动的核心服务是:start ueventd,位于/system/bin/ueventd,ueventd是init启动的第一个服务进程

9.2. on init
on init
    ...
    chmod 0775 /dev/cpuset/system-background
    chmod 0664 /dev/cpuset/foreground/tasks
    chmod 0664 /dev/cpuset/background/tasks
    chmod 0664 /dev/cpuset/system-background/tasks
    chmod 0664 /dev/cpuset/top-app/tasks
    chmod 0664 /dev/cpuset/restricted/tasks
    chmod 0664 /dev/cpuset/tasks
    chmod 0664 /dev/cpuset/camera-daemon/tasks
    # 挂载bpf
    mount bpf bpf /sys/fs/bpf nodev noexec nosuid
    mkdir /dev/fscklogs 0770 root system    
    ...
    # 允许system组读写电源状态
    chown system system /sys/power/state
    chown system system /sys/power/wakeup_count
    chmod 0660 /sys/power/state
    ...
    # 在运行其他进程之前需要先启动log服务,说明init中启动的服务,第一个启动的进程是ueventd
    start logd
    # 启用 Low Memory Killer Daemon(lmkd)
    # 1.基于Memory的CGroup进行进程的回收;2.作为frameworks与kernel的沟通桥梁传递参数与信息
    # Start lmkd before any other services run so that it can register them
    chown root system /sys/module/lowmemorykiller/parameters/adj
    chmod 0664 /sys/module/lowmemorykiller/parameters/adj
    chown root system /sys/module/lowmemorykiller/parameters/minfree
    chmod 0664 /sys/module/lowmemorykiller/parameters/minfree
    start lmkd

    # Start essential services.
    # 启用ServiceManager,管理各个服务,非常重要
    start servicemanager
    start hwservicemanager
    start vndservicemanager

可以看到第二个启动的核心服务是:start logd,日志系统。
第三个核心服务是:start lmkd,Low Memory Killer Daemon
作用:基于Memory的CGroup进行进程的回收,作为frameworks与kernel的沟通桥梁传递参数与信息。
接着启动了:servicemanagerhwservicemanagervndservicemanager,这些都属于核心服务
若核心服务未启动成功,那么其他服务将无法启动,系统将无法启动,其他服务必须依赖核心服务

9.3. on late-init
# 装载文件系统并启动核心系统服务
on late-init
    trigger early-fs
    # 触发on fs和on post-fs
    trigger fs
    trigger post-fs
    trigger late-fs
    trigger post-fs-data
    trigger load_persist_props_action
    trigger load_bpf_programs
    trigger zygote-start
    trigger firmware_mounts_complete
    trigger early-boot
    trigger boot

可以看到调用顺序为:启动系统on late-init会先执行,然后继续触发on fs,on post-fs ,on late-fs,on zygote-start ,on boot等,在调用on zygote-start后会解析zygote服务并指定class 名称,然后加入服务管理队列,后续等待调用on nonencrypted来启动zygote服务

9.4. on nonencrypted
on nonencrypted
    class_start main
    class_start late_start

目录:/system/core/rootdir/init.zygote64.rc
service zygote /system/bin/app_process64 -Xzygote /system/bin --zygote --start-system-server
    # class : 给服务指定一个类属
    class main
    priority -20
    # user 在执行此服务之前先切换用户名。当前默认为root.
    user root
    # 切换组名
    group root readproc reserved_disk
    # 在/dev/socket/下创建一个socket,并传递创建的文件描述符fd给服务进程
    # 其中type必须为dgram或stream,seqpacket.用户名和组名默认为0
    socket zygote stream 660 root system
    socket usap_pool_primary stream 660 root system
    onrestart exec_background - system system -- /system/bin/vdc volume abort_fuse
    onrestart write /sys/power/state on
    onrestart restart audioserver
    onrestart restart cameraserver
    onrestart restart media
    onrestart restart netd
    onrestart restart wificond
    writepid /dev/cpuset/foreground/tasks
    # oneshot : 当此服务退出时不会自动重启.
    # disabled:服务不会自动运行,必须显式地通过服务器来启动
    # 据设备相关的关键服务,如果在4分钟内,此服务重复启动了4次,那么设备将会重启进入还原模式。
    critical window=${zygote.critical_window.minute:-off} target=zygote-fatal

可以看到通过class_start main来启动主函数main,位于:frameworks/base/cmds/app_process/app_main.cpp

int main(int argc, char* const argv[])
{
    ...
    if (zygote) {
        runtime.start("com.android.internal.os.ZygoteInit", args, zygote);
    } else if (className) {
        runtime.start("com.android.internal.os.RuntimeInit", args, zygote);
    } else {
        fprintf(stderr, "Error: no class name or --zygote supplied.\n");
        app_usage();
        LOG_ALWAYS_FATAL("app_process: no class name or --zygote supplied.");
    }
}

这里启动了zygote,并且携带参数启动了systemServer,关于zygote这里就不再详细分析了

二. 附录

rc文件中的command以及触发器,action等,对应的关系如下:

static const BuiltinFunctionMap builtin_functions = {
        {"bootchart",               {1,     1,    {false,  do_bootchart}}},
        {"chmod",                   {2,     2,    {true,   do_chmod}}},
        {"chown",                   {2,     3,    {true,   do_chown}}},
        {"class_reset",             {1,     1,    {false,  do_class_reset}}},
        {"class_reset_post_data",   {1,     1,    {false,  do_class_reset_post_data}}},
        {"class_restart",           {1,     1,    {false,  do_class_restart}}},
        {"class_start",             {1,     1,    {false,  do_class_start}}},
        {"class_start_post_data",   {1,     1,    {false,  do_class_start_post_data}}},
        {"class_stop",              {1,     1,    {false,  do_class_stop}}},
        {"copy",                    {2,     2,    {true,   do_copy}}},
        {"copy_per_line",           {2,     2,    {true,   do_copy_per_line}}},
        {"domainname",              {1,     1,    {true,   do_domainname}}},
        {"enable",                  {1,     1,    {false,  do_enable}}},
        {"exec",                    {1,     kMax, {false,  do_exec}}},
        {"exec_background",         {1,     kMax, {false,  do_exec_background}}},
        {"exec_start",              {1,     1,    {false,  do_exec_start}}},
        {"export",                  {2,     2,    {false,  do_export}}},
        {"hostname",                {1,     1,    {true,   do_hostname}}},
        {"ifup",                    {1,     1,    {true,   do_ifup}}},
        {"init_user0",              {0,     0,    {false,  do_init_user0}}},
        {"insmod",                  {1,     kMax, {true,   do_insmod}}},
        {"installkey",              {1,     1,    {false,  do_installkey}}},
        {"interface_restart",       {1,     1,    {false,  do_interface_restart}}},
        {"interface_start",         {1,     1,    {false,  do_interface_start}}},
        {"interface_stop",          {1,     1,    {false,  do_interface_stop}}},
        {"load_exports",            {1,     1,    {false,  do_load_exports}}},
        {"load_persist_props",      {0,     0,    {false,  do_load_persist_props}}},
        {"load_system_props",       {0,     0,    {false,  do_load_system_props}}},
        {"loglevel",                {1,     1,    {false,  do_loglevel}}},
        {"mark_post_data",          {0,     0,    {false,  do_mark_post_data}}},
        {"mkdir",                   {1,     6,    {true,   do_mkdir}}},
        // TODO: Do mount operations in vendor_init.
        // mount_all is currently too complex to run in vendor_init as it queues action triggers,
        // imports rc scripts, etc.  It should be simplified and run in vendor_init context.
        // mount and umount are run in the same context as mount_all for symmetry.
        {"mount_all",               {0,     kMax, {false,  do_mount_all}}},
        {"mount",                   {3,     kMax, {false,  do_mount}}},
        {"perform_apex_config",     {0,     0,    {false,  do_perform_apex_config}}},
        {"umount",                  {1,     1,    {false,  do_umount}}},
        {"umount_all",              {0,     1,    {false,  do_umount_all}}},
        {"update_linker_config",    {0,     0,    {false,  do_update_linker_config}}},
        {"readahead",               {1,     2,    {true,   do_readahead}}},
        {"remount_userdata",        {0,     0,    {false,  do_remount_userdata}}},
        {"restart",                 {1,     1,    {false,  do_restart}}},
        {"restorecon",              {1,     kMax, {true,   do_restorecon}}},
        {"restorecon_recursive",    {1,     kMax, {true,   do_restorecon_recursive}}},
        {"rm",                      {1,     1,    {true,   do_rm}}},
        {"rmdir",                   {1,     1,    {true,   do_rmdir}}},
        {"setprop",                 {2,     2,    {true,   do_setprop}}},
        {"setrlimit",               {3,     3,    {false,  do_setrlimit}}},
        {"start",                   {1,     1,    {false,  do_start}}},
        {"stop",                    {1,     1,    {false,  do_stop}}},
        {"swapon_all",              {0,     1,    {false,  do_swapon_all}}},
        {"enter_default_mount_ns",  {0,     0,    {false,  do_enter_default_mount_ns}}},
        {"symlink",                 {2,     2,    {true,   do_symlink}}},
        {"sysclktz",                {1,     1,    {false,  do_sysclktz}}},
        {"trigger",                 {1,     1,    {false,  do_trigger}}},
        {"verity_update_state",     {0,     0,    {false,  do_verity_update_state}}},
        {"wait",                    {1,     2,    {true,   do_wait}}},
        {"wait_for_prop",           {2,     2,    {false,  do_wait_for_prop}}},
        {"write",                   {2,     2,    {true,   do_write}}},
    };

三. 总结

至此第二阶段就分析完毕了,一句话来总结:优先保证init进程的存活率(拉高优先级),处理设备是否unlock,决定是否卸载一些分区以及调整selinux规则和权限,创建并启动属性服务(实质上就是把属性值映射到全局内存中供所有进程访问,然后在创建socket等待进程来连接 实现更新和新增属性值),继续决定是否把vendor_overlay覆盖到/vendor分区中,然后持续监控/proc/mounts,如果有分区信息加入到该文件中则挂载此分区,接着解析rc文件(创建目录,修改权限,挂载分区,启动服务进程等),根据调用顺序启动核心服务(adbd,ueventd等)以及主服务(zygote)和其他服务

一. Android系统启动基本介绍

1
2
init进程是Android系统中用户空间的第一个进程,作为第一个进程,它被赋予了很多极其重要的工作职责,比如创建zygote(孵化器)和属性服
务等。init进程是由多个源文件共同组成的,这些文件位于源码目录system/core/init

1. Bootloader 引导

当按下设备电源键时,最先运行的就是 bootloader(固化在ROM的程序),bootloader 的主要作用就是硬件设备(如 CPU、flash、内存)的初始化并加载到RAM,通过建立内存空间映射,为装载 Linux 内核做好准备,。如果 bootloader 在运行期间,按下预定义的组合按键,可以进入系统fastboot模式 或者 Receiver 模式。

2. 装载和启动 Linux 内核

在编译完AOSP时会生成boot.img或者boot_debug.img,该镜像就是 Linux 内核和根文件系统,bootloader 会把该镜像装载到内存中,然后 linux 内核会执行整个系统的初始化,完成后装载根文件系统,最后启动 init 进程。

3. 启动 Init 进程

Linux 内核加载完毕后,会从kernel内核层调用到用户空间层,则会首先启动 init 进程,init 进程是系统的第一个进程,在 init 进程的启动过程中会解析最主要的 init.rc 脚本,根据 init.rc 文件的描述,系统会创建文件及目录以及权限的赋予,初始化属性和启动 Android 系统重要的守护进程。

4. 启动 ServiceManager

ServiceManager 由 init 进程启动。它的主要作用是管理 Binder 服务,service 服务的注册和查找,如 AMS、PMS, 都是通过 ServiceManger 来管理。

5. 启动 MediaServer

MediaServer 是由 init 进程启动,它包含了一些多媒体 binder 服务,包括 CameraService、MediaPlayerService、AudioPolicyService 等等

onrestart restart audioserver
onrestart restart cameraserver
onrestart restart media
onrestart restart media.tuner
onrestart restart netd
onrestart restart wificond

6. 启动 Zygote 进程

init 进程初始化结束后,会启动 Zygote 进程。在 Android 系统中所有的应用程序进程和系统服务进程都是通过Zygote 进程 fork 出来的。预装载系统的资源文件,所有从 Zygote 进程 fork 出的子进程都会共享这些资源,节省了资源加载的时间,提高的应用的启动速度。Zygote 启动结束后也会变为守护进程,负责响应启动 APK 的请求。

7. 启动 SystemServer

SystemServer 是跟随Zygote创建出来的第一个子进程,同时也是整个 Android 系统的核心。在系统中运行的大部分系统服务都是有 SystemServer 创建,接着会启动 AMS、WMS、PMS 等。阅读过源码可以发现大部分服务会继承自systemServer

PD2183:/ $ ps --pid 1                                  
USER           PID  PPID     VSZ    RSS WCHAN            ADDR S NAME  
root             1     0 13133644  8264 0                   0 S init

init进程由init_task进程fork而来,在kernel初始化完成后init_task便化身为idle进程,可以看到init的进程pid为:1
而init_task进程是Linux中第一个进程,也即0号进程(PID为0),这里不进一步分析linux内核层。

二. FirstStageMain阶段分析

image-20231129165729682

针对super分区,在开机init的first stage第一阶段运行期间,会解析并验证metadata元数据并创建虚拟block设备来表示每个子分区,super分区头部信息就是metadata元数据,用于映射(mapping)出虚拟block设备,这里盗用一张大佬的图来看一下super结构

super镜像super分区除了包含system\product\vendor,在头部信息包含了描述分区布局的metadata,系统加载动态分区时读取metadata,对其进行解析。

Metadata中的信息会被转换成device mapper中的映射表Mapping Table,基于这个映射表,super分区对应设备/dev/block/by-name/super的不同部分被映射成多个虚拟设备,如/dev/block/mapper/system_a/dev/block/mapper/vendor_a

1. 用户空间层main.cpp

using namespace android::init;

int main(int argc/*1*/, char** argv/*init*/) { // 内核层传过来的,argc:1,argv:init
#if __has_feature(address_sanitizer)
    __asan_set_error_report_callback(AsanReportCallback);
#elif __has_feature(hwaddress_sanitizer)
    __hwasan_set_error_report_callback(AsanReportCallback);
#endif
    // Boost prio which will be restored later
    setpriority(PRIO_PROCESS, 0, -20); // 设置进程最高优先级 -20最高,20最低
    if (!strcmp(basename(argv[0]), "ueventd")) {
        return ueventd_main(argc, argv);
    }

    if (argc > 1) {
        if (!strcmp(argv[1], "subcontext")) {
            android::base::InitLogging(argv, &android::base::KernelLogger);
            const BuiltinFunctionMap& function_map = GetBuiltinFunctionMap();

            return SubcontextMain(argc, argv, &function_map);
        }

        if (!strcmp(argv[1], "selinux_setup")) {
            return SetupSelinux(argv);
        }

        if (!strcmp(argv[1], "second_stage")) {
            return SecondStageMain(argc, argv);
        }
    }

    return FirstStageMain(argc, argv); //第一阶段执行
}

内核层传过来的参数:argc:1,argv:init,所以第一阶段仍然是调用return FirstStageMain(argc, argv); 这里不详细介绍subcontext,ueventd,只关注FirstStageMain阶段即可,调用顺序如下

  • FirstStageMain:主要创建和挂载基本的文件系统,挂载特定分区,启用log等
  • SetupSelinux:挂载并启用selinux权限系统,之前文章有讲过关于权限问题;
  • SecondStageMain:主要解析ini.rc文件,创建zygote孵化器,fork 进程等

2. FirstStageMain(int argc, char** argv)解析

该阶段所挂载的文件系统都属于ramdisk,运行在虚拟内存上

//system/core/init/first_stage_init.cpp
int FirstStageMain(int argc, char** argv) {
    // init阶段的启动引导加载程序(bootLoader),若发生异常重启也会再次执行,主要处理init || fork的子进程进程异常行为
    // init信号处理器,调试版本当init crash,默认重启到 bootLoader
    if (REBOOT_BOOTLOADER_ON_PANIC) {
        InstallRebootSignalHandlers();// setup1
    }
    // 用来设置创建目录或文件时所应该赋予权限的掩码
    // Linux中,文件默认最大权限是666,目录最大权限是777,当创建目录时,假设掩码为022,那赋予它的权限为(777 & ~022)= 755
    // 在执行init第一阶段时,先执行umask(0),使创建的目录或文件的默认权限为最高
    umask(0);

    // 第一次执行时清除环境变量,reset path
    CHECKCALL(clearenv());
    CHECKCALL(setenv("PATH", _PATH_DEFPATH, 1));
    // setup 2
    // 设置linux最基本的文件系统并且挂载到 / 目录(init ram disk)上,
    // 并给0755权限(即用户具有读/写/执行权限,组用户和其它用户具有读写权限),后续会通过rc文件处理一些分区权限和进程
    CHECKCALL(mount("tmpfs", "/dev", "tmpfs", MS_NOSUID, "mode=0755")); //将/dev设置为tmpfs并挂载,设置0755权限,tmpfs是在内存上建立的文件系统(Filesystem)
    CHECKCALL(mkdir("/dev/pts", 0755));//tmpfs文件系统类型
    CHECKCALL(mkdir("/dev/socket", 0755));
    CHECKCALL(mkdir("/dev/dm-user", 0755));//tmpfs文件系统类型
    CHECKCALL(mount("devpts", "/dev/pts", "devpts", 0, NULL));
    // setup 3
     CHECKCALL(mount("proc", "/proc", "proc", 0, "hidepid=2,gid=" MAKE_STR(AID_READPROC)));
#undef MAKE_STR
    // 修改 「保存操作系统的启动参数」 的权限:0440,
    // 修改权限的目的是为了 不要将原始bootConfig暴露给非特权进程,部分文件系统只能是0440权限,如果修改权限则无法读取和操作
    // /proc/cmdline中保存bootloader 启动linux kernel 时 的参数
    CHECKCALL(chmod("/proc/cmdline", 0440));
    std::string cmdline;
    // 读取操作系统的启动参数
    android::base::ReadFileToString("/proc/cmdline", &cmdline);
    // 修改权限的目的是为了 不要将原始bootConfig暴露给非特权进程
    // 部分文件系统只能是0440权限,如果修改权限则无法读取和操作
    chmod("/proc/bootconfig", 0440);
    std::string bootconfig;
    // 读取系统启动参数配置
    android::base::ReadFileToString("/proc/bootconfig", &bootconfig);
    gid_t groups[] = {AID_READPROC};
    CHECKCALL(setgroups(arraysize(groups), groups));
    // setup 4
    // 挂载/sys内核,并设置为sysfs文件系统类型,sysfs是一个伪文件系统。
    // 不代表真实的物理设备,在linux内核中,sysfs文件系统将长期存在于RAM中
    // sysfs文件系统将每个设备抽象成文件,挂载sysfs文件系统在sys目录,用来访问内核信息
    CHECKCALL(mount("sysfs", "/sys", "sysfs", 0, NULL));
    CHECKCALL(mount("selinuxfs", "/sys/fs/selinux", "selinuxfs", 0, NULL));
    CHECKCALL(mknod("/dev/kmsg", S_IFCHR | 0600, makedev(1, 11)));
    if constexpr (WORLD_WRITABLE_KMSG) {
        CHECKCALL(mknod("/dev/kmsg_debug", S_IFCHR | 0622, makedev(1, 11)));
    }
    // 文件系统:/dev/random和 /dev/urandom是 Linux 上的字符设备文件,它们是随机数生成器,为系统提供随机数
    CHECKCALL(mknod("/dev/random", S_IFCHR | 0666, makedev(1, 8)));
    CHECKCALL(mknod("/dev/urandom", S_IFCHR | 0666, makedev(1, 9)));
    
    // 创建日志系统的串口log(伪终端),这是日志包装器所需要的,它在ueventd运行之前被调用。
    CHECKCALL(mknod("/dev/ptmx", S_IFCHR | 0666, makedev(5, 2)));
    CHECKCALL(mknod("/dev/null", S_IFCHR | 0666, makedev(1, 3)));
    
    // setup 5
    // 重要文件系统及分区在第一阶段挂载,其他可以在rc执行流程中挂载
    // 挂载/mnt/{vendor,product},这些相对比较重要,所以只挂载重要的,其余的动作会在第二阶段的解析rc文件中处理
    // tmpfs之前说过了,是运作在RAM的文件系统
    CHECKCALL(mount("tmpfs", "/mnt", "tmpfs", MS_NOEXEC | MS_NOSUID | MS_NODEV,
                    "mode=0755,uid=0,gid=1000"));
    CHECKCALL(mkdir("/mnt/vendor", 0755));
    CHECKCALL(mkdir("/mnt/product", 0755));
    CHECKCALL(mount("tmpfs", "/debug_ramdisk", "tmpfs", MS_NOEXEC | MS_NOSUID | MS_NODEV,
                    "mode=0755,uid=0,gid=0"));
    // 创建selinux驱动节点,类型属于:tmpfs
    CHECKCALL(mkdir("/dev/selinux", 0744));
    // 初始化kernel的日志,之前已经创建过了/dev/kmsg系统,用于处理日志的
    SetStdioToDevNull(argv);
    InitKernelLogging(argv);
    // log可以使用了,第一阶段正式开始 创建设备
    LOG(INFO) << "init first stage started!";
    // setup 6
    // 打开根目录 / ,隶属ramdisk,就是上面挂载的基本文件系统
    auto old_root_dir = std::unique_ptr<DIR, decltype(&closedir)>{opendir("/"), closedir};
    // 用stat函数获取根目录的文件信息给(old_root_info),例如访问的时间,修改的时间,目录下的文件数量
    // 若!=0则是获取失败,提示未释放ramdisk,估计是基本文件系统还未处理完成
    if (stat("/", &old_root_info) != 0) {
        PLOG(ERROR) << "Could not stat(\"/\"), not freeing ramdisk";
        old_root_dir.reset();
    }
    // 加载kernel模块且是非正常的启动模式
    // 根据ALLOW_FIRST_STAGE_CONSOLE(want_console)决定是否打开串口log(控制台log),并加载kernel模块且处于非正常的启动模式
    // 再根据want_console来决定是否打开串口日志
    if (!LoadKernelModules(IsRecoveryMode() && !ForceNormalBoot(cmdline, bootconfig), want_console,
                           want_parallel, module_count)) {
        if (want_console != FirstStageConsoleParam::DISABLED) {
            LOG(ERROR) << "Failed to load kernel modules, starting console";
        } else {
            LOG(FATAL) << "Failed to load kernel modules";
        }
    }
    // 继续根据是否打开串口日志来创建devices
    // want_console == 1
    if (want_console == FirstStageConsoleParam::CONSOLE_ON_FAILURE) {
         // 非恢复模式下进行,在 recovery 模式下不允许创建设备
        if (!IsRecoveryMode()) {
            // 在创建逻辑分区之前挂载 /metadata
            // metadata.img和userdata.img密切相连,metadata存放了一把Primary key,如果没有这个key,userdata数据不能访问
            // 在工作时可能需要单独刷分区来验证问题,所以有时候不能单独刷metadata分区
            created_devices = DoCreateDevices();
            if (!created_devices) {
                LOG(ERROR) << "Failed to create device nodes early";
            }
        }
        StartConsole(cmdline);
    }
    // setup 7
    // 当build.prop具有访问权限时,主要就是生成/second_stage_resources/system/etc/ramdisk/build.prop
    // 将/system/etc/ramdisk/build.prop拷贝到/second_stage_resources/system/etc/ramdisk下
    if (access(kBootImageRamdiskProp, F_OK) == 0) {
        // 获取/second_stage_resources/system/etc/ramdisk/build.prop
        // 当然此时这个目录没有创建,只是一个拼接出来的路径,后续会创建
        std::string dest = GetRamdiskPropForSecondStage();
         // 获取目录路径名称 : /second_stage_resources/system/etc/ramdisk
        std::string dir = android::base::Dirname(dest);
        std::error_code ec;
        if (!fs::create_directories(dir, ec) && !!ec) {
            LOG(FATAL) << "Can't mkdir " << dir << ": " << ec.message();
        }
        // 生成 /second_stage_resources/system/etc/ramdisk/build.prop
        if (!fs::copy_file(kBootImageRamdiskProp, dest, ec)) {
            LOG(FATAL) << "Can't copy " << kBootImageRamdiskProp << " to " << dest << ": "
                       << ec.message();
        }
        LOG(INFO) << "Copied ramdisk prop to " << dest;
    }
    // 如果存在“/force_debugable”,则第二阶段init将使用userdebug sepolicy并加载adb_debug.prop以允许adb root
    // /userdebug_plat_sepolicy.cil属于selinux策略里的规则
    // 如果设备unlocked(解锁了),则会修改selinux规则,放大用户权限
    if (access("/force_debuggable", F_OK) == 0) {
        constexpr const char adb_debug_prop_src[] = "/adb_debug.prop";
        constexpr const char userdebug_plat_sepolicy_cil_src[] = "/userdebug_plat_sepolicy.cil";
        ...
        setenv("INIT_FORCE_DEBUGGABLE", "true", 1);
    }
    // setup 8
    // 如果内核命令行中存在 androidboot.force_normal_boot=1,则设备会正常启动,即正常启动时
    if (ForceNormalBoot(cmdline, bootconfig)) {
        // 创建第一阶段ramdisk目录 /first_stage_ramdisk
        mkdir("/first_stage_ramdisk", 0755);
        // 提前创建 "/system/bin/snapuserd" && "/first_stage_ramdisk/system/bin/snapuserd";
        PrepareSwitchRoot();
        if (mount("/first_stage_ramdisk", "/first_stage_ramdisk", nullptr, MS_BIND, nullptr) != 0) {
            PLOG(FATAL) << "Could not bind mount /first_stage_ramdisk to itself";
        }
        // 将根目录(/)切换为 /first_stage_ramdisk ,将根切换到 first_stage_ramdisk
        SwitchRoot("/first_stage_ramdisk");
    }
    
    // 挂载 system、vendor 、product等系统分区
    if (!DoFirstStageMount(!created_devices)) {
        LOG(FATAL) << "Failed to mount required partitions early ...";
    }
    // 此时new_root_info应该是 /first_stage_ramdisk,而old_root_info是 /root
    // 读取 /first_stage_ramdisk根目录信息,例如有多少个目录等
    struct stat new_root_info;
    if (stat("/", &new_root_info) != 0) {
        PLOG(ERROR) << "Could not stat(\"/\"), not freeing ramdisk";
        old_root_dir.reset();
    }
    // 根目录发生变化,则释放old ramdisk,用new ramdisk
    if (old_root_dir && old_root_info.st_dev != new_root_info.st_dev) {
        FreeRamdisk(old_root_dir.get(), old_root_info.st_dev);
    }
    // setup 8 主要内容:将根目录(/)切换为 /first_stage_ramdisk ,将根切换到 first_stage_ramdisk
    // setup 9
    //初始化安全框架 Android Verified Boot,用于防止系统文件本身被篡改、防止系统回滚,以免回滚系统利用以前的漏洞。
    // 包括Secure Boot, verified boot 和 dm-verity(会校验只读分区大小,若只读分区二进制改变则可能上被串改了,例如 user强制root),
    // 原理都是对二进制文件进行签名,在系统启动时进行认证,确保系统运行的是合法的二进制镜像文件。其中认证的范围涵盖:bootloader,boot.img,system.img。
    // 此处是在recovery模式下初始化avb的版本,不是recovery模式直接跳过
    SetInitAvbVersionInRecovery();
    // setup 10 --->主要开始进入下一个阶段了,即当期阶段结束了
    // init程序的二进制文件目录
    const char* path = "/system/bin/init";
    const char* args[] = {path, "selinux_setup", nullptr}; // 设置args为selinux_setup,又重新执行回到main.cpp中,执行SetupSelinux
    auto fd = open("/dev/kmsg", O_WRONLY | O_CLOEXEC);// 打开日志处理分区
    // exec系列函数可以把当前进程替换为一个新进程,且新进程与原进程有相同的PID,即重新回到main.cpp
    execv(path, const_cast<char**>(args));
}

​ 具体信息可以看注释,这里我分为了11个步骤来分析,也就是对应的setup 1~10

2. FirstStageMain(int argc, char** argv)—–>setup 1步骤

主要分析InstallRebootSignalHandlers();// setup1其关键作用:主要加载引导程序以及init阶段crash的进程处理,也就是异常处理

// 主要加载引导程序以及init阶段crash的进程处理
//system/core/init/reboot_utils.cpp
void InstallRebootSignalHandlers() {
    struct sigaction action;
    // memset是计算机中C/C++语言初始化函数。作用是将某一块内存中的内容全部设置为指定的值, 这个函数通常为新申请的内存做初始化工作
    memset(&action, 0, sizeof(action));
    // sigfillset()用来将参数set信号集初始化,然后把所有的信号加入到此信号集里即将所有的信号标志位置为1。
    // 成功返回0,反之返回1
    sigfillset(&action.sa_mask);
    // 对于从init派生的进程(init进程对操作系统的意义在于,其他所有的用户进程都直接或者间接派生自init进程,例如解析init.rc出来的进程zygote)
    // 这些信号处理程序也会被捕获,但是我们不希望它们触发重新启动,所以我们在这里直接为子进程调用_exit()
    // 针对加载引导程序或init crash后加载引导程序,不应该restart,而是直接退出 再次启动系统时重新start
    action.sa_handler = [](int signal) {
        if (getpid() != 1) {
            _exit(signal);
        }
        // 由于init fatal || crash执行重启(所以有些机器故障会无限卡logo重启),这里执行了重启或是强制关机
        InitFatalReboot(signal); //1
    };
    action.sa_flags = SA_RESTART;
    // 设置信号处理器
    sigaction(SIGABRT, &action, nullptr);
    sigaction(SIGBUS, &action, nullptr);
    sigaction(SIGFPE, &action, nullptr);
    sigaction(SIGILL, &action, nullptr);
    sigaction(SIGSEGV, &action, nullptr);
#if defined(SIGSTKFLT)
    sigaction(SIGSTKFLT, &action, nullptr);
#endif
    sigaction(SIGSYS, &action, nullptr);
    sigaction(SIGTRAP, &action, nullptr);
}

以上代码块的逻辑大概就是收集进程信号集,将这些异常的信号集进行特殊处理(关机或重启 触发循环卡logo等),并把这些信号标志为1,针对init进程(Pid=1)派生出来的子进程(例如zygote)而是选择直接退出 不进一步处理,因为如果init进程重新启动后将会重新派生出原来的子进程。这里继续分析一下InitFatalReboot(signal); //1

2.1 InitFatalReboot(signal)
void __attribute__((noreturn)) InitFatalReboot(int signal_number) {
    // 派生出子进程,pid == -1则代表fork进程失败
    auto pid = fork();

    // Init 是Android OS中第一个user space process(用户态或用户空间pid = 1),守护进程(在后台运行的守护进程,其一作用于执行启动的系统任务)
    // Init 进程是所有用户进程的鼻祖,Init 进程会孵化(fork,派生)出 ueventd、logd、healthd、installd、adbd、lmkd 等用户守护进程
    if (pid == -1) { // 当pid==1时说明fork失败,立即执行bootloader重启,可能会重新执行到pid == 0
        // Couldn't fork, don't even try to backtrace, just reboot.
        RebootSystem(ANDROID_RB_RESTART2, init_fatal_reboot_target);
    } else if (pid == 0) { //fork成功,说明现在运行在子进程上,并且子进程需确保能重启
        sleep(5);
        RebootSystem(ANDROID_RB_RESTART2, init_fatal_reboot_target);
    }

    // 当关机时,尝试在父进程(pid = 1,即init)中获取back trace日志
    LOG(ERROR) << __FUNCTION__ << ": signal " << signal_number;
    std::unique_ptr<Backtrace> backtrace(
            Backtrace::Create(BACKTRACE_CURRENT_PROCESS, BACKTRACE_CURRENT_THREAD));
    if (!backtrace->Unwind(0)) {
        LOG(ERROR) << __FUNCTION__ << ": Failed to unwind callstack.";
    }
    for (size_t i = 0; i < backtrace->NumFrames(); i++) {
        LOG(ERROR) << backtrace->FormatFrameData(i);
    }
    // 判断init(主)进程是否被标记为异常(例如init主进程都退出了),决定是否需要重启bootLoader(正常步骤会执行到重启,异常则直接sysdump)
    // 启动内核时出现panic的几种情况:出现init进程被异常杀死,则直接触发崩溃,即进入sysdump
    if (init_fatal_panic) {
        LOG(ERROR) << __FUNCTION__ << ": Trigger crash";
        // 通过#define PROC_SYSRQ "/proc/sysrq-trigger" 写值触发系统崩溃
        // echo b > /proc/sysrq-trigger -->立即重启
        // echo o > /proc/sysrq-trigger -->立即关机
        // echo c > /proc/sysrq-trigger -->立即让系统崩溃
        // echo t > /proc/sysrq-trigger -->导出线程状态信息
        // echo u > /proc/sysrq-trigger -->立即重新挂载所有的文件系统为只读
        android::base::WriteStringToFile("c", PROC_SYSRQ);
        LOG(ERROR) << __FUNCTION__ << ": Sys-Rq failed to crash the system; fallback to exit().";
        _exit(signal_number);
    }
    // 在init进程上重启
    RebootSystem(ANDROID_RB_RESTART2, init_fatal_reboot_target);
}

以上代码块主要作用于确保子进程,如果fork成功则代表目前运行在子进程上,目的就是一个:确保子进程能重启,如果init进程(主进程)被标记为致命异常,则会立即执行android::base::WriteStringToFile("c", PROC_SYSRQ);,触发死机

image-20231129165843941

至此setup 1就分析完了,总结一句话:针对异常的进程进行特殊的处理,例如让子进程确保能重启,检查init进程是否退出或产生异常,若主进程异常则直接对设备进行强制死机,进入sysdump

3. FirstStageMain(int argc, char** argv)—–>setup 2步骤

setup 2主要就是初始化文件系统,我这里单独在贴一下代码:

    // setup 2
    //将/dev设置为tmpfs文件系统并挂载,设置0755权限(即用户具有读/写/执行权限,组用户和其它用户具有读写权限)
    // 后续会通过rc文件处理一些分区权限和进程,tmpfs是在内存上建立的文件系统(Filesystem)
    // tmpfs文件系统是一种基于内存的文件系统,可以运行在RAM上,所以/dev都属于tmpfs文件系统
     CHECKCALL(mount("tmpfs", "/dev", "tmpfs", MS_NOSUID, "mode=0755")); 
    CHECKCALL(mkdir("/dev/pts", 0755));//1
    // 关于/dev/socket目录
    // 0. tmpfs文件系统类型,例如zygote就保存到该位置(/dev/socket)
    // 1. zygote 开始循环监听 /dev/socket/zygote,system_server 与zygote 达成首次通信
    // 2. 之后AMS会且连接 /dev/socket/zygote 的socket,进行通信
    CHECKCALL(mkdir("/dev/socket", 0755));//2
    CHECKCALL(mkdir("/dev/dm-user", 0755));//3
    CHECKCALL(mount("devpts", "/dev/pts", "devpts", 0, NULL));

这里主要初始化了基本的文件系统tmpfs,既然基于RAM,那肯定有易失性,特点如下:

  • 基于内存的文件系统
  • 能够动态地使用虚拟内存
  • 不需要格式化文件系统
  • tmpfs 数据在重新启动之后不会保留,因为虚拟内存本质上就是易失的,其优点是读写速度很快,但存在掉电丢失的风险(ramfs与tmpfs有着对比性),这也许就是它叫tmpfs的原故
  • 由于tmpfs基于RAM,运行在内存上,因此它比硬盘的速度肯定要快,因此我们可以利用这个优点使用它来提升机器的性能(小伙伴们可以试着把tmpfs改为基于disk的文件系统试试),tmpfs 的另一个主要的好处是它闪电般的速度,因为典型的 tmpfs 文件系统会完全驻留在 RAM 中,读写几乎可以是瞬间的
  • tmpfs使用了虚拟内存的机制,它会进行swap,用例:达到空间上限时继续写入 结果:提示错误信息并终止,且tmpfs是有上限的,超过时会提示错误信息并终止 所以相比ramfs是比较安全的

tmpfs和ramfs有着对比性,tmpfs是相对安全的,因为 达到空间上限时仍继续写入数据,那么提示错误信息并终止
而ramfs没有空间上限,会持续写入尚未分配的空间(占用其他未分配的内存)。因此tmpfs是固定大小,ramfs不固定其大小。
可以通过命令来查看手机系统使用的是tmpfs还是ramfs,以及他们的信息
adb shell mount | grep -E "(tmpfs|ramfs)"
info可以看到该设备使用的是tmpfs文件系统,以及可以看到属于tmpfs文件系统的分区,大小信息等,还有一个命令也可以查看,比较简约
adb shell df -h | grep -E "(tmpfs|ramfs)"
info
可以看到使用的大小,/dev /mnt /apex都属于tmpfs文件系统,代码里提到过关于/dev/socket目录,是一个比较重要的知识点,具体看注释即可

4. FirstStageMain(int argc, char** argv)—–>setup 3步骤

继续贴上FirstStageMain函数里面的setup 3的代码,

// 挂载proc文件系统(驻留在RAM中),Linux系统上的/proc目录是一种文件系统,即proc文件系统。与其它常见的文件系统不同的是,/proc是一种虚拟文件系统
CHECKCALL(mount("proc", "/proc", "proc", 0, "hidepid=2,gid=" MAKE_STR(AID_READPROC)));// 1
#undef MAKE_STR
    // 修改 「保存操作系统的启动参数」 的权限:0440,
    // 修改权限的目的是为了 不要将原始bootConfig暴露给非特权进程,部分文件系统只能是0440权限,如果修改权限则无法读取和操作
    // /proc/cmdline中保存bootloader 启动linux kernel 时 的参数
    CHECKCALL(chmod("/proc/cmdline", 0440));
    std::string cmdline;
    // 读取操作系统的启动参数
    android::base::ReadFileToString("/proc/cmdline", &cmdline);
    // 修改权限的目的是为了 不要将原始bootConfig暴露给非特权进程
    // 部分文件系统只能是0440权限,如果修改权限则无法读取和操作
    chmod("/proc/bootconfig", 0440);
    std::string bootconfig;
    // 读取系统启动参数配置
    android::base::ReadFileToString("/proc/bootconfig", &bootconfig);
    gid_t groups[] = {AID_READPROC};
    CHECKCALL(setgroups(arraysize(groups), groups));

这里主要解释一下注释的第一点

该目录下保存的并不是真正的文件和目录(虚拟文件系统),而是一些【运行时】的信息,如 CPU 信息、负载信息、系统内存信息、磁盘 IO 信息等。
存储的是当前内核运行状态的一系列特殊文件,用户可以通过这些文件查看有关系的硬件及当前【正在运行进程的信息】,甚至可以通过更改其中某些文件来改变内核的运行状态

/proc/cmdline         # 保存操作系统的启动参数,/proc/cmdline中保存bootloader 启动linux kernel 时 的参数
/proc/cpuinfo         # 保存CPU的相关信息。对应lscpu命令。
/proc/devices         # 系统已经加载的所有块设备和字符设备的信息。
/proc/diskstats       # 统计磁盘设备的I/O信息。
/proc/filesystems     # 保存当前系统支持的文件系统。
/proc/kcore	          # 物理内存的镜像。该文件大小是已使用的物理内存加上4K。
/proc/loadavg	      # 保存最近1分钟、5分钟、15分钟的系统平均负载。
/proc/meminfo	      # 保存当前内存使用情况。对应free命令
/proc/mounts -> self/mounts	# 系统中当前挂载的所有文件系统。mount命令。
                            # mounts文件是链接到self/mounts。
/proc/partitions      # 每个分区的主设备号(major)、次设备号(minor)、包含的块(block)数目。
/proc/uptime          # 系统自上次启动后的运行时间。
/proc/version         # 当前系统的内核版本号
/proc/vmstat          # 当前系统虚拟内存的统计数据

所以该步骤的代码块主要代码:CHECKCALL(chmod("/proc/cmdline", 0440));android::base::ReadFileToString("/proc/cmdline", &cmdline);,指定权限,若权限改变则无法正常读取,可以防止强行改变权限为a+x或777而带来的非法操作,然后读取cmdline,读取操作系统的启动参数

4. FirstStageMain(int argc, char** argv)—–>setup 4步骤

    // setup 4
    // 挂载/sys内核,并设置为sysfs文件系统类型,sysfs是一个伪文件系统。
    // 不代表真实的物理设备,在linux内核中,sysfs文件系统将长期存在于RAM中
    // sysfs文件系统将每个设备抽象成文件,挂载sysfs文件系统在sys目录,用来访问内核信息
    CHECKCALL(mount("sysfs", "/sys", "sysfs", 0, NULL));
    // 挂载/sys/fs/selinux文件系统,也属于/sys
    // /sys/fs/selinux : selinux机制,也就是处理selinux权限机制文件存放的位置,判断是否开启严格模式等
    CHECKCALL(mount("selinuxfs", "/sys/fs/selinux", "selinuxfs", 0, NULL));
     // 创建处理日志的设备文件
    // Linux内核通过printk打印的log信息,这些log写入到了/dev/kmsg文件中,
    // 也就是kernel log,在展锐平台上可以通过python解析ylog来看到kernel log
    // 也可以在 Shell终端可以通过dmesg /dev/kmsg 命令查看这些log信息
    CHECKCALL(mknod("/dev/kmsg", S_IFCHR | 0600, makedev(1, 11)));
    // 如果是ud版本则继续创建kmsg_debug设备文件
    // WORLD_WRITABLE_KMSG = 1 则是ud,为0即user
    if constexpr (WORLD_WRITABLE_KMSG) {
        CHECKCALL(mknod("/dev/kmsg_debug", S_IFCHR | 0622, makedev(1, 11)));
    }
    // 文件系统:/dev/random和 /dev/urandom是 Linux 上的字符设备文件,它们是随机数生成器,为系统提供随机数
    // 随机数在计算中很重要。 TCP/IP 序列号、密码盐和 DNS 源端口号都依赖于随机数。
    // 在密码学中,随机性无处不在,从密钥的生成到加密系统,甚至密码系统受到攻击的方式。没有随机性,所有加密操作都是可预测的,因此不安全
    CHECKCALL(mknod("/dev/random", S_IFCHR | 0666, makedev(1, 8)));
    CHECKCALL(mknod("/dev/urandom", S_IFCHR | 0666, makedev(1, 9)));

    // This is needed for log wrapper, which gets called before ueventd runs.
    // 创建日志系统的串口log(伪终端),这是日志包装器所需要的,它在ueventd运行之前被调用。
    CHECKCALL(mknod("/dev/ptmx", S_IFCHR | 0666, makedev(5, 2)));
    CHECKCALL(mknod("/dev/null", S_IFCHR | 0666, makedev(1, 3)));
  1. 上面的代码比较简单,主要就是创建随机数设备文件,所以上层可以调用random获取随机数,随机数在计算中很重要,TCP/IP 序列号、密码盐和 DNS 源端口号都依赖于随机数,也例如加密机制,都需要用到随机数。

  2. 同时也创建了/dev/null设备文件,dev/null 在Linux中是一个空设备文件,它于其他普通的设备文件不同,当往null写入数据时会被丢弃掉,它不能够被执行,所以不能使用管道符去操作它,只能通过文件重定向(>,>>),我们可以通过把命令的输出重定向到 /dev/null 来丢弃脚本的全部输出

  3. 也创建了/dev/kmsg设备文件,主要存储日志,Shell终端可以通过dmesg /dev/kmsg 命令查看这些log信息
    log

  4. 在介绍一下/sys文件系统,sysfs(常驻于RAM中)是一个伪文件系统,不占有任何磁盘空间的虚拟文件系统

/sys下存放的都是设备驱动,网络环境,偏硬件的文件
1./sys/firmware : 固件 文件目录
2./sys/kernel : 内核文件目录
3./sys/module : 内核驱动模块
4./sys/power : 电源相关模块
5./sys/bus : 驱动总线文件目录
6./sys/block : 块设备目录(映射的/sys/devices目录)
7./sys/devices : 设备目录(也有虚拟设备目录),例如:sys/devices/virtual/block/dm-28
8./sys/fs/selinux : selinux机制,也就是处理selinux权限机制文件存放的位置,判断是否开启严格模式等

5. FirstStageMain(int argc, char** argv)—–>setup 5步骤

    // setup 5
    // 重要文件系统及分区在第一阶段挂载,其他可以在rc执行流程中挂载
    // 挂载/mnt/{vendor,product},这些相对比较重要,所以只挂载重要的,其余的动作会在第二阶段的解析rc文件中处理
    // tmpfs之前说过了,是运作在RAM的文件系统
    CHECKCALL(mount("tmpfs", "/mnt", "tmpfs", MS_NOEXEC | MS_NOSUID | MS_NODEV,
                    "mode=0755,uid=0,gid=1000"));
    CHECKCALL(mkdir("/mnt/vendor", 0755));
    CHECKCALL(mkdir("/mnt/product", 0755));
    CHECKCALL(mount("tmpfs", "/debug_ramdisk", "tmpfs", MS_NOEXEC | MS_NOSUID | MS_NODEV,
                    "mode=0755,uid=0,gid=0"));
    // 创建selinux驱动节点,类型属于:tmpfs
    CHECKCALL(mkdir("/dev/selinux", 0744));
    // 初始化kernel的日志,之前已经创建过了/dev/kmsg系统,用于处理日志的
    SetStdioToDevNull(argv);
    InitKernelLogging(argv);
    // log可以使用了,第一阶段正式开始 创建设备
    LOG(INFO) << "init first stage started!";

这里的代码也比较简单,主要创建比较重要的分区,注意这里只是创建并没有挂载,/mnt/{vendor,product},然后初始化kernel log,LOG日志可以正常使用和输出。

  • vendor: 用于存放odm供应商开发的文件,例如MTK自带节点 /mnt/vendor/protect_f/ 可存储恢复出厂+刷机不丢失数据
  • product:根据不同的项目,存放项目中不同的内容,例如APK位置等
  • mnt : 此目录主要是作为挂载点使用,例如挂载/mnt/sdcard

6. FirstStageMain(int argc, char** argv)—–>setup 6步骤

   // setup 6
    // 打开根目录 / ,隶属ramdisk,就是上面挂载的基本文件系统
    auto old_root_dir = std::unique_ptr<DIR, decltype(&closedir)>{opendir("/"), closedir};
    // 用stat函数获取根目录的文件信息给(old_root_info),例如访问的时间,修改的时间,目录下的文件数量
    // 若!=0则是获取失败,提示未释放ramdisk,估计是基本文件系统还未处理完成
    if (stat("/", &old_root_info) != 0) {
        PLOG(ERROR) << "Could not stat(\"/\"), not freeing ramdisk";
        old_root_dir.reset();
    }
    // 根据ALLOW_FIRST_STAGE_CONSOLE(want_console)决定是否打开串口log(控制台log),
    // 并加载kernel模块且处于非正常的启动模式,根据want_console来决定是否打开串口日志
    if (!LoadKernelModules(IsRecoveryMode() && !ForceNormalBoot(cmdline, bootconfig), want_console,
                           want_parallel, module_count)) {
        if (want_console != FirstStageConsoleParam::DISABLED) {
            LOG(ERROR) << "Failed to load kernel modules, starting console";
        } else {
            LOG(FATAL) << "Failed to load kernel modules";
        }
    }
    // 继续根据是否打开串口日志来创建devices
    // want_console == 1
    if (want_console == FirstStageConsoleParam::CONSOLE_ON_FAILURE) {
         // 非恢复模式下进行,在 recovery 模式下不允许创建设备
        if (!IsRecoveryMode()) {
            // 在创建逻辑分区之前挂载 /metadata
            // metadata.img和userdata.img密切相连,metadata存放了一把Primary key,如果没有这个key,userdata数据不能访问
            // 在工作时可能需要单独刷分区来验证问题,所以有时候不能单独刷metadata分区
            created_devices = DoCreateDevices();// 1
            if (!created_devices) {
                LOG(ERROR) << "Failed to create device nodes early";
            }
        }
        StartConsole(cmdline);
    }

这里的代码主要是打开串口log(可选),在手机无法开机的情况下会抓串口log来分析问题。这里挂载了/metadata,metadata.img和userdata.img密切相连,metadata存放了一把Primary key,如果没有这个key,userdata数据不能访问,在文章开头也提到过metadata分区,这里会挂载和创建metadata里的设备文件,感兴趣的可以进一步去了解,挂载/metadata的前提条件是必须有根目录“/” 或 /system,否则,切换根目录后无法访问ramdisk(后续会把old ramdisk切换到new ramdisk,切换后的新根目录会还原默认权限)

7. FirstStageMain(int argc, char** argv)—–>setup 7步骤

    // setup 7
    // 判断文件是否存在,并判断文件是否可写:/system/etc/ramdisk/build.prop
    // 当build.prop具有访问权限时,主要就是生成/second_stage_resources/system/etc/ramdisk/build.prop
    // 将/system/etc/ramdisk/build.prop拷贝到/second_stage_resources/system/etc/ramdisk下
    if (access(kBootImageRamdiskProp, F_OK) == 0) {
        // 获取/second_stage_resources/system/etc/ramdisk/build.prop
        // 当然此时这个目录没有创建,只是一个拼接出来的路径,后续会创建
        std::string dest = GetRamdiskPropForSecondStage();
        // 获取目录路径名称 : /second_stage_resources/system/etc/ramdisk
        std::string dir = android::base::Dirname(dest);
        std::error_code ec;
         // 创建/second_stage_resources/system/etc/ramdisk目录
        if (!fs::create_directories(dir, ec) && !!ec) {
            LOG(FATAL) << "Can't mkdir " << dir << ": " << ec.message();
        }
         // 拷贝 /system/etc/ramdisk/build.prop文件到 /second_stage_resources/system/etc/ramdisk
        // 生成 /second_stage_resources/system/etc/ramdisk/build.prop
        if (!fs::copy_file(kBootImageRamdiskProp, dest, ec)) {
            LOG(FATAL) << "Can't copy " << kBootImageRamdiskProp << " to " << dest << ": "
                       << ec.message();
        }
        LOG(INFO) << "Copied ramdisk prop to " << dest;
    }
    // 如果存在“/force_debugable”,则第二阶段init将使用userdebug sepolicy并加载adb_debug.prop以允许adb root
    // /userdebug_plat_sepolicy.cil属于selinux策略里的规则
    // 如果设备unlocked(解锁了),则会修改selinux规则,放大用户权限
    if (access("/force_debuggable", F_OK) == 0) {
        constexpr const char adb_debug_prop_src[] = "/adb_debug.prop";
        constexpr const char userdebug_plat_sepolicy_cil_src[] = "/userdebug_plat_sepolicy.cil";
        ...
        setenv("INIT_FORCE_DEBUGGABLE", "true", 1);
    }

img
setup7的代码片段主要讲解了获取ramdis下的prop属性值,为了第二阶段做准备,一句话来说就是创建了second_stage_resources/system/etc/ramdisk目录文件,然后把/system/etc/ramdisk/build.prop复制到上面的目录下,得到:/second_stage_resources/system/etc/ramdisk/build.prop。
针对已经unlock了的设备加载特定的selinux规则,以放大权限,使得只读分区可以写入数据

8. FirstStageMain(int argc, char** argv)—–>setup 8步骤

    // setup 8
    // 如果是正常启动模式则创建 /first_stage_ramdisk目录作为根目录,把之前的根目录切换掉
    // 因为之前都是基于根目录创建文件系统,放大了权限,将old根目录切换到first_stage_ramdisk后
    // 将会在first_stage_ramdisk根目录把权限恢复到默认,例如old根目录部分文件系统是777权限,切换到first_stage_ramdisk根目录后
    // 权限会放低,会给一个安全的权限,判断是否是正常启动可以通过该属性值判断:androidboot.force_normal_boot
    if (ForceNormalBoot(cmdline, bootconfig)) {
        // 创建第一阶段ramdisk目录 /first_stage_ramdisk
        mkdir("/first_stage_ramdisk", 0755);
        // 提前创建 "/system/bin/snapuserd" && "/first_stage_ramdisk/system/bin/snapuserd";
        PrepareSwitchRoot();
        // 挂载/first_stage_ramdisk目录
        if (mount("/first_stage_ramdisk", "/first_stage_ramdisk", nullptr, MS_BIND, nullptr) != 0) {
            PLOG(FATAL) << "Could not bind mount /first_stage_ramdisk to itself";
        }
        // 将根目录(/)切换为 (/first_stage_ramdisk) 
        // 将根切换到 first_stage_ramdisk
        SwitchRoot("/first_stage_ramdisk");
    }
    
    // 挂载 system、vendor 、product等系统分区,1
    if (!DoFirstStageMount(!created_devices)) {
        LOG(FATAL) << "Failed to mount required partitions early ...";
    }
    
    // 此时new_root_info应该是 /first_stage_ramdisk,而old_root_info是 /root
    // 读取 /first_stage_ramdisk根目录信息,例如有多少个目录等
    struct stat new_root_info;
    if (stat("/", &new_root_info) != 0) {
        PLOG(ERROR) << "Could not stat(\"/\"), not freeing ramdisk";
        old_root_dir.reset();
    }
    
    // 如果新的根目录已经创建,则释放old ramdisk,用new ramdisk
    if (old_root_dir && old_root_info.st_dev != new_root_info.st_dev) {
        FreeRamdisk(old_root_dir.get(), old_root_info.st_dev);
    }

如果是正常启动模式则创建 /first_stage_ramdisk目录作为根目录,把之前的根目录切换掉,因为之前都是基于根目录创建文件系统,放大了权限,将old根目录切换到first_stage_ramdisk后,将会把first_stage_ramdisk根目录把权限恢复到默认(相对较低的权限),假设old根目录部分文件系统是777权限,切换到/first_stage_ramdisk根目录后,权限会放低(0755),会给一个安全的权限,如果文件权限给太高,是非常危险的,此后会将system、vendor 、product等系统分区挂载到新根目录上。

必须执行的一步:如果新的根目录已经创建,则释放old ramdisk,用new ramdisk,再将system、vendor 、product等系统分区挂载到/first_stage_ramdisk上

这里再跟一下DoFirstStageMount函数

8.1 DoFirstStageMount

该方法位于/system/core/init/first_stage_mount.cpp#DoFirstStageMount

// 装载设备树中fstab指定的分区
bool DoFirstStageMount(bool create_devices) {
    // 如果处于恢复模式,则跳过第一阶段装载
    if (IsRecoveryMode()) {
        LOG(INFO) << "First stage mount skipped (recovery mode)";
        return true;
    }

    auto fsm = FirstStageMount::Create();// 1
    if (!fsm.ok()) {
        LOG(ERROR) << "Failed to create FirstStageMount " << fsm.error();
        return false;
    }

    if (create_devices) {
        if (!(*fsm)->DoCreateDevices()) return false;// 2
    }

    return (*fsm)->DoFirstStageMount();
}

先看第一点 auto fsm = FirstStageMount::Create();,该方法主要用于AVB校验,AVB校验可以去看看google文档

Result<std::unique_ptr<FirstStageMount>> FirstStageMount::Create() {
        // 读取fstab,file system table,里面包含了要挂载的逻辑分区
    auto fstab = ReadFirstStageFstab();
    if (!fstab.ok()) {
        return fstab.error();
    }
    // 判断device tree(fstabl)中是否有vbmeta/compatible结构,值是android,vbmeta
    // 创建FirstStageMountVBootV1或者FirstStageMountVBootV2实例,取决于	
    // IsDtVbmetaCompatible(fstab)的返回值,如果支持vbmeta,则使用FirstStageMountVBootV2,反之FirstStageMountVBootV1
    if (IsDtVbmetaCompatible(*fstab)) {
        return std::make_unique<FirstStageMountVBootV2>(std::move(*fstab));
    } else {
        return std::make_unique<FirstStageMountVBootV1>(std::move(*fstab));
    }
}

以上主要是创建V1或者V2版本的AVB校验,AVB校验主要是针对分区进行校验,对于要启动的 Android 版本中包含的所有可执行代码和数据,启动时验证均要求在使用前以加密形式对其进行验证。包括内核(从 boot 分区加载)、设备树(从 dtbo 分区加载)、system 分区和 vendor 分区等

  • 对于 boot 和 dtbo 这类仅读取一次的小分区,通常是通过将整个内容加载到内存中,然后计算其哈希值来进行验证
  • 内存装不下的较大分区(如文件系统)可能会使用哈希树;
  • 如果在某个时刻计算出的根哈希值与预期根哈希值不一致,系统便不会使用相应数据,无法启动Android
  • 在工作上遇到过开发者模式下OEM无法打开的情况,跟代码才发现开启OEM时会把persist分区文件里的指定位置上写入值(忘记值是多少了),通过解析该分区文件,写入的数据会以十六进制保持到指定位置上。但是瞬间就会把OEM的开关站位信息给擦除了,通过log看该分区文件是启用了RPMB分区安全保护机制

我们继续看第二点if (!(*fsm)->DoCreateDevices()) return false;

bool FirstStageMount::DoFirstStageMount() {
    // 如果fstab(设备树)为空则不执行挂载动作
    // Fstab是内核在启动时用来挂载文件系统的文件系统表
    if (!IsDmLinearEnabled() && fstab_.empty()) {
        // Nothing to mount.
        LOG(INFO) << "First stage mount skipped (missing/incompatible/empty fstab in device tree)";
        return true;
    }

    // 挂载分区详细步骤
    if (!MountPartitions()) return false;

    return true;
}

详细逻辑都在MountPartitions里面,继续跟着看看,该内容比较长

bool FirstStageMount::MountPartitions() {
    // 将system分区挂载到设备的“/”根目录
    if (!TrySwitchSystemAsRoot()) return false;
    
    if (!SkipMountingPartitions(&fstab_, true /* verbose */)) return false;
    
    // 读取fstab(设备树,product,vendor等逻辑分区),并把其中的逻辑分区进行挂载
    for (auto current = fstab_.begin(); current != fstab_.end();) {
        // 跳过/system,因为已经挂载上了
        if (current->mount_point == "/system") {
            ++current;
            continue;
        }
        // 跳过overlay,稍后后挂载它,OverlayFS是新引入的机制,感兴趣的自行了解
        // 当我们adb remount分区时,本来是可以直接把vendor改rw权限,但是引入overlayfs后仍然时只读权限
        // 因为分为了2层,能读写的始终在第一层,第二层仍然保留了原始的权限,保留其原子性
        if (current->fs_type == "overlay") {
            ++current;
            continue;
        }
        
        // flash相关,不太清楚
        if (current->fs_type == "emmc") {
            ++current;
            continue;
        }

        // 挂载fstab里的所有逻辑分区(例如:system,system_ext,vendor,product)
        Fstab::iterator end;
        if (!MountPartition(current, false /* erase_same_mounts */, &end)) {
            if (current->fs_mgr_flags.no_fail) {
                LOG(INFO) << "Failed to mount " << current->mount_point
                          << ", ignoring mount for no_fail partition";
            } else if (current->fs_mgr_flags.formattable) {
                LOG(INFO) << "Failed to mount " << current->mount_point
                          << ", ignoring mount for formattable partition";
            } else {
                PLOG(ERROR) << "Failed to mount " << current->mount_point;
                return false;
            }
        }
        current = end;
    }
    ...
    // 如果在fstab中没有看到/system或/,那么我们需要为overlayfs创建一个根目录/system或“/”
    if (!GetEntryForMountPoint(&fstab_, "/system") && !GetEntryForMountPoint(&fstab_, "/")) {
        FstabEntry root_entry;
        if (GetRootEntry(&root_entry)) {
            fstab_.emplace_back(std::move(root_entry));
        }
    }

    // 为overlayfs实例化设备文件,将vendor,product,data分区等实例化到该设备文件中
    // 例如/dev/block/dm-33设备文件上挂载的是/data,此时会有dm-verity来验证数据,比如root后更改了设备文件,那校验则会不通过,造成无法开机
    // dm-verity 是一个虚拟块设备,专门用于文件系统的校验,fs直接交互的设备是dm-verity,dm-verity调用真正的块驱动去读取对应的块(dm-verity读取dm-xxx)
    //   /dev/block/dm-3                94M  94M  300K 100% /vendor
    //   /dev/block/dm-2               1.5G 1.5G  4.8M 100% /product
    //   /dev/block/dm-1               166M 165M  508K 100% /system_ext
    //   /dev/block/dm-33              5.8G 609M  5.2G  11% /data
    auto init_devices = [this](std::set<std::string> devices) -> bool {
        for (auto iter = devices.begin(); iter != devices.end();) {
            if (android::base::StartsWith(*iter, "/dev/block/dm-")) {
                if (!block_dev_init_.InitDmDevice(*iter)) {
                    return false;
                }
                iter = devices.erase(iter);
            } else {
                iter++;
            }
        }
        return InitRequiredDevices(std::move(devices));
    };
    MapScratchPartitionIfNeeded(&fstab_, init_devices);

    // 再次挂载fstab_里面的全部逻辑分区,也就是overlayfs机制(adb remount也是靠这个机制实现的)
    // 再次声明将只读分区修改为可读写后,写入修改后的分区内容会保存到upperdir上,而不是直接修改其底层分区数据
    // 以保证overlayfs文件操作原子性,这里再次挂载了fstab里的所有逻辑分区,那岂不是重复了?其实这里再次挂载只是一个merged(合并)操作
    fs_mgr_overlayfs_mount_all(&fstab_);

    return true;
}

以上主要挂载了fstab(设备树)下的所有逻辑分区并实例化到对应的/dev/block/dm-xx设备文件上,例如挂载了:system,system_ext,vendor,product,还有挂载了overlay,overlay机制是用于保护分区原子性和分区安全而存在,具体可以自行了解一下,注释里也解释了一些,代码里两次挂载了fstab下的逻辑分区,第二次挂载是因为overlay机制的影响,是为了合并两个名称相同的分区,这里上一张图片来观察分区挂载的设备文件和位置
img可以观察到vendor.img镜像被挂载到了/vendor分区上,使用的设备文件是/dev/block/dm-3

9. FirstStageMain(int argc, char** argv)—–>setup 9/10步骤

        // setup 9
    //初始化安全框架 Android Verified Boot,用于防止系统文件本身被篡改、防止系统回滚,以免回滚系统利用以前的漏洞。
    // 包括Secure Boot, verified boot 和 dm-verity(会校验只读分区大小,若只读分区二进制改变则可能上被串改了,例如 user强制root,则会被dm-verity检测到),
    // 原理都是对二进制文件进行签名,在系统启动时进行认证,确保系统运行的是合法的二进制镜像文件。其中认证的范围涵盖:boot![]()loader,boot.img,system.img。
    // 此处是在recovery模式下初始化avb的版本,不是recovery模式直接跳过
    SetInitAvbVersionInRecovery();
    // setup 10 --->主要开始进入下一个阶段了,即当期阶段结束了
    // init程序的二进制文件目录
    const char* path = "/system/bin/init";
    const char* args[] = {path, "selinux_setup", nullptr}; // 设置args为selinux_setup,又重新执行回到main.cpp中,执行SetupSelinux
    auto fd = open("/dev/kmsg", O_WRONLY | O_CLOEXEC);// 打开日志处理分区
    // exec系列函数可以把当前进程替换为一个新进程,且新进程与原进程有相同的PID,即重新回到main.cpp
    execv(path, const_cast<char**>(args));

SetInitAvbVersionInRecovery里的步骤也是读取fstab,然后根据IsDtVbmetaCompatible是否支持AVB2.0,来进行处理,setup 10就是进入下一个阶段了(SetupSelinux)

三. FirstStageMain阶段总结

以上所有的代码和步骤:根据main.cpp来启用第一阶段FirstStageMain,挂载最基本的文件系统,该文件系统是运行于RAM上的,优点是相比disk磁盘来说运行速度快,不占存储空间,特点是易失性,断电即丢失,挂载上最基本的文件系统后会根据根目录”/“来挂载/mnt/{vendor,product}等重要的分区,其他不重要的文件挂载在第二阶段rc中处理,生成 /second_stage_resources/system/etc/ramdisk/build.prop,该文件会在第二阶段使用,在第一阶段并开启kernel log,挂载/first_stage_ramdisk新的根目录,根据设备树(fstab)来创建逻辑分区system,system_ext,vendor,product并挂载到/first_stage_ramdisk根目录上,然后将old 根目录切换到/first_stage_ramdisk 根目录,释放old根目录,/first_stage_ramdisk根目录将赋予较为安全的权限,创建AVB数据校验,启用overlayfs机制来保护分区原子性,初始化恢复模式下的AVB校验方案,然后调用"/system/bin/init"进入下一个阶段:selinux_setup

本章讲解的方向和你将收获的知识:

  • 什么是SeLinux系统,SeLinux的简介和介绍
  • SeLinux系统的主要作用和存在的意义,是基于哪个版本开始推行该方案的
  • 如果遇到了SeLinux权限问题该如何解决,有几种解决方案
  • SeLinux详细内容知识分解,你将了解宽松模式和严格模式

一. SeLinux介绍

  1. SeLinux 全称 Security-Enhanced Linux 即安全增强型 Linux,基于MAC机制的一种实现,它是一个 Linux 内核模块,也是 Linux 的一个安全子系统,这不是android特有的特性,而是由Linux衍生过来的SEAndroid。

  2. 在Android Q版本上就开始推行SeLinux机制且强行执行此机制(沙盒机制,只能获取到AOSP指定的对外的接口去获取),所以在之前很多应用在Android Q上会产生很多权限相关的问题。

  3. 如果在Android Q或以上的版本遇到权限问题,尝试命令:adb shell logcat | grep avc,如果有对应的avc log输出则大概率是受SeLinux权限影响

    avc: denied { read } for pid=1834 comm=“gps_location” name=“mmcblk0p17” dev=“tmpfs”
    scontext=u:r:gps_location:s0 tcontext=u:object_r:block_device:s0 tclass=blk_file permissive=0

  4. SeLinux关键字介绍
    MAC和DAC都隶属于访问控制类,分为自主和强制两种方式
    image-20240122103754370

  5. 4.1 访问控制
    Linux 内核资源访问控制分为 DAC(Discretionary Access Control,自主访问控制)和 MAC(Mandatory
    Access Control,强制访问控制)两类
    4.2 DAC
    这是基于用户-用户组的读、写、执行的权限检查,该管理过于宽松,如果获得 root 权限,可以在 Linux 系统内做任何事情
    4.3 MAC
    SELinux是 MAC 机制的一种实现,基于安全上下文和安全策略的安全机制,用于补充 DAC 检查。访问系统资源时,会先进行 DAC 检查,DAC 检查通过,才能进行 MAC 检查,如果 MAC 检查通过,才能获得访问权限

二. SeLinux基础知识

SELinux 分为 Permissive 和 Enforcing 两种模式

  1. Permissive 宽容模式
    宽容模式,代表 SELinux 运作中,违反 SELinux 规则时只会有警告讯息(avc denied),而不会实际限制的访问.
    在 Permissive 模式中,SELinux 被启用,但安全策略规则并没有被强制执行。当安全策略规则应该拒绝访问时,访问仍然被允许。然而,此时会向日志文件发送一条消息,表示该访问应该被拒绝(avc).

  2. Enforcing 严格模式
    在 Enforcing 模式中, SELinux 被启动,并强制执行所有的安全策略规则,代表 SELinux 运作中,违反 SELinux 规则的行为将被阻止并记录到日志中(avc)

  3. 查看当前SELinux模式
    (1)通过adb命令行来查看:adb shell getenforce,输出结果—>Enforcing 或者 Permissive
    (2)通过adb logcat命令行来观察:adb logcat | grep avc

    avc:denied {write setter} for path=”/dev/…” dev=”tmpfs”
    scontext=u:r:system_server:s0 tcontext=u:object_r:file:s0 permissive=1
    (permissive=1,说明是 Permissive 模式。permissive=0,说明是 Enforcing 模式)

  4. avc权限语法介绍

    avc: denied { read } for pid=1834 comm=“system_server” name=“mmcblk0p17” dev=“tmpfs” ino=10268 [scontext=u:r:system_server:s0] [tcontext=u:object_r:block_device:s0] tclass=blk_file permissive=0

    (此 AVC log 说明 system_server(进程)缺少对标签为 block_device、类型为 blk_file 和名称为 mmcblk0p17 文件的 read 权限)
    (1). avc: denied:表示当前操作被拒绝。
    (2). { read }:表示被拒绝的操作,{ }中含有实际尝试的操作。
    (3). for pid=1834:当前发生 avc: denied 进程的 ID。
    (4). comm=“system_server”:当前发生 avc: denied 进程的名称,即主体进程名称。
    (5). name=“mmcblk0p17”:操作尝试的目标文件或目录的路径,即客体资源名称。
    (6). dev=“tmpfs”:含有这个文件系统的设备节点,客体资源在该文件系统中。
    (7). ino=10268:目标文件或目录的节点号。
    (8). scontext=u:r:system_server:s0:主体进程的安全上下文。
    (9). tcontext=u:object_r:block_device:s0:客体资源的安全上下文。
    (10). tclass=blk_file:访问资源所属类别。
    (11). permissive=0:当前是 Enforcing 模式,permissive=1 时为 Permissive 模式

三. 解决SeLinux权限问题

1.命令行修改权限模式

1
2
adb root;   
adb shell setenforce 0 --->设置为Permissive宽松模式,临时关闭SELinux,机器重启以后还是会恢复的

2.AndroidManifest.xml配置开关
需要注意targetSdkVersion 需要小于 30

1
2
//用于控制应用在Android 10及更高版本上的外部存储行为
android:requestLegacyExternalStorage="true"

3.修改init启动过程中的代码
这种方式比较简单—>修改 system/core/init/selinux.cpp 文件里的 IsEnforcing()函数,直接让它返回false即可

1
2
3
4
5
6
7
8
9
10
11
12
13
14
15
16
17
18
19
20
21
22
23
24
25
26
bool IsEnforcing() {
// 直接返回false
return false;
if (ALLOW_PERMISSIVE_SELINUX) {
return StatusFromProperty() == SELINUX_ENFORCING;
}
return true;
}

void SelinuxSetEnforcement() {
// getenforce获取Enforcing模式
bool kernel_enforcing = (security_getenforce() == 1);
// 直接让is_enforcing返回false即关闭严格模式
bool is_enforcing = IsEnforcing();
if (kernel_enforcing != is_enforcing) {
// 调用security_setenforce(false)设置为Permissive宽容模式
if (security_setenforce(is_enforcing)) {
PLOG(FATAL) << "security_setenforce(" << (is_enforcing ? "true" : "false")
<< ") failed";
}
}

if (auto result = WriteFile("/sys/fs/selinux/checkreqprot", "0"); !result.ok()) {
LOG(FATAL) << "Unable to write to /sys/fs/selinux/checkreqprot: " << result.error();
}
}

4.根据报错的权限添加SELinux权限
由于缺少 SELinux 权限导致如下“avc: denied”,需要根据 AVC log 信息添加相应权限。

1
2
3
avc: denied { read write } for pid=3483 comm=“batteryTest” name=“rtc0” 
dev=“tmpfs” scontext=u:r:system_server:s0 tcontext=u:object_r:custom_battery_device:s0
tclass=chr_file permissive=0

system_server(进程)缺少对标签为 custom_battery_device、类型为 chr_file 和名称为 rtc0 文件节点的读写权限。
根据上面缺少的avc添加所需的读写权限:
(1). 打开/system/sepolicy/private/{scontext.te}(system_server.te)文件
(2). 添加如下代码:和上面的标签对应上:{allow scontext tcontext:tclass permission }
(3). 例如allow system_server custom_battery_device:chr_file {read write} ,编译源码并进行烧录即可

四. Neverallow问题

1
2
3
4
5
6
7
8
9
10
11
添加了selinux权限后,代码进行编译时,编译失败并报 neverallow 错误,例如添加`allow system_app sysfs:file {write};`权限后
编译报错

原因是 Google 不允许应用进程写 sysfs 类型的文件,这是Google规范,安全考虑,部分权限不允许给,
当然也可以修改domain.te来修改Google的规范,虽然可以解决问题,但是这是不被允许的,在送测的时候会导致GMS测试失败。

例如domain.te拥有以下代码:
neverallow { appdomain -bluetooth -nfc }sysfs:dir_file_class_set write
那么则不允许给dir_file_class_set标签赋予write权限。

那又必须要这个权限怎么办?那就可以客制化SELiunx权限。

五. SELinux权限客制化(自定义权限)

根据上面所说,Google规则需遵守,部分权限不允许通过,所以需要自定义权限规则.

  • type定义
    type分为了property.tefile.tesystem.te,有很多类型,不止这三种,使用哪个文件取决于avc权限中的tclass属性,目前只用file.te举例,打开file.te添加如下type

    1
    2
    3
    4
    5
    /system/sepolicy/private/file.te
    # {parameter1,parameter2,parameter3}
    # type固定格式,custom_battery_file自定义的名称,file_type定义为文件类型
    # 逗号分割,后面可以继续跟类型 例如:data_file_type
    type custom_battery_file, file_type;
  • 配置安全上下文
    安全上下文分为了 genfs_contextsfile_contextsproperty_contexts ,当然不止这几种,例举了一些常用的
    打开 /system/sepolicy/private/file_contexts 文件,打开哪个文件取决于avc权限中的tclass属性
    (三个xxx_contexts,需要自行判断缺少的权限的客体资源是目录还是文件 或是 属性值):

    1
    2
    3
    4
    5
    /system/sepolicy/private/file_contexts
    # 添加如下代码
    # 第一个参数写文件节点(读取这个文件节点没权限,就添加这个节点)
    # 第二个参数固定写法u:object_r:custom_battery_file(这里写file.te里定义的类型):s0(这些参数不做详细解释)
    /vendor/custom/product/battery u:object_r:custom_battery_file:s0

    /xxx/xxx (目标文件路径或文件) u:object_r:file.te里面自定义的名称:s0

  • 配置原进程访问权限
    根据avc log中的scontext(主体进程)的值来决定在哪个文件下添加访问权限
    例如 scontext=u:r:system_server:s0,那则打开system_server.te即可

    /system/sepolicy/private/system_server.te
    # 1.allow固定格式 
    # 2.system_server固定格式取决于scontext的值  
    # 3.custom_battery_file(file.te里自定义的类型)
    # 4.冒号后面的file,取决于avc log中的tclass类型是什么(例如tclass=file)
    # 5.{要给的权限类型}
    allow system_server custom_battery_file:file {read open};
    

    这样就客制化好了一个节点的写权限

六. 补充知识(mls规则)

终端中查看安全上下文的方法
在终端中,可通过如下指令查看文件安全上下文:ls -lZ
在终端中,可通过如下指令查看属性安全上下文:getprop -Z
在终端中,可通过如下指令查看进程安全上下文:ps -Z

如果 te 文件已经添加 SELinux 权限,但没有生效,查看 AVC log 信息出现“s0:c512,c768”字眼,则可判
断是由于 mls 规则导致。说明主体和客体安全级别不同,
举例:已经在 platform_app.te 中添加了 SELinux 权限,但 log 中依然有如下报错:
avc: denied { write } for pid=2002 comm=“lightness”
scontext=u:r:platform_app:s0(主体):c512,c768 tcontext=u:r:custom_device_lightness:s0(客体资源) tclass=char_file(file类型,读取的文件节点属于file类型) permissive=0

主体: scontext=u:r:【platform_app】
客体: tcontext=u:r:【custom_device_lightness】
这是因为 Google 在文件 system/sepolicy/private/mls 中进行了安全级的限制,代码如下:
【mlsconstrain cahr_file { write } (l1 eq l2 or t1 == mlstrustedsubject or t2 == mlstrustedsubject);】
l1需要l2相等,或者l1等于mlstrustedsubject l2等于mlstrustedsubject ,才能允许SELiunx权限。

这种情况需要主体进程或者客体进程中的一个是 mlstrustedsubject,这里 platform_app(主体) 最好不要修改,所以要修改客体 slogmodem(客体)。

具体修改方法如下:

/system/sepolicy/private/platform_app.te(取决于主体进程)文件
添加如下代码:
type custom_device_lightness, domain, mlstrustedsubject;

七. 代码修改后烧录

1.如果只是修改 selinux 相关文件–通过编译命令:
(1)lunch 项目
(2)cd system/sepolicy
(3)mma
将编译产物 out/target/product/xxx/system/etc/selinux 和 out/target/product/xxx/vendor/etc/selinux 拷贝出来,推入手机查看是否生效,执行指令如下:
(1)cd out/target/product/xxx
(2)adb root
(3)adb remount
(4)adb push system/etc/selinux /system/etc/
(5)adb push vendor/etc/selinux /vendor/etc/
如果手机不能root && remount,可以考虑通过编译烧录的方式去验证

总结

至此SELinux权限系统基本上介绍完毕,如何解决权限问题,如何关闭权限和切换权限,自定义权限,配置权限,皆已教学完毕。不为别的,为了留下工作上的脚印

解析init.rc脚本

Android Init Language

rc文件,是用Android Init Language编写的特殊文件。用这种语法编写的文件,统一用”.rc”后缀

它的语法说明可以在aosp源码system/core/init/README.md中找到:

system/core/init/README.md原文:

1
2
3
4
5
6
7
8
9
10
11
12
13
14
15
16
17
18
19
20
21
22
23
24
25
26
27
28
29
30
31
32
33
34
35
36
37
38
39
40
41
42
43
44
45
46
47
48
49
50
51
52
53
54
55
56
57
58
59
60
61
62
63
64
65
66
67
68
69
70
71
72
73
74
75
76
77
78
79
80
81
82
83
84
85
86
87
88
89
90
91
92
93
94
95
96
97
98
99
100
101
102
103
104
105
106
107
108
109
110
111
112
113
114
115
116
117
118
119
120
121
122
123
124
125
126
127
128
129
130
131
132
133
134
135
136
137
138
139
140
141
142
143
144
145
146
147
148
149
150
151
152
153
154
155
156
157
158
159
160
161
162
163
164
165
166
167
168
169
170
171
172
173
174
175
176
177
178
179
180
181
182
183
184
185
186
187
188
189
190
191
192
193
194
195
196
197
198
199
200
201
202
203
204
205
206
207
208
209
210
211
212
213
214
215
216
217
218
219
220
221
222
223
224
225
226
227
228
229
230
231
232
233
234
235
236
237
238
239
240
241
242
243
244
245
246
247
248
249
250
251
252
253
254
255
256
257
258
259
260
261
262
263
264
265
266
267
268
269
270
271
272
273
274
275
276
277
278
279
280
281
282
283
284
285
286
287
288
289
290
291
292
293
294
295
296
297
298
299
300
301
302
303
304
305
306
307
308
309
310
311
312
313
314
315
316
317
318
319
320
321
322
323
324
325
326
327
328
329
330
331
332
333
334
335
336
337
338
339
340
341
342
343
344
345
346
347
348
349
350
351
352
353
354
355
356
357
358
359
360
361
362
363
364
365
366
367
368
369
370
371
372
373
374
375
376
377
378
379
380
381
382
383
384
385
386
387
388
389
390
391
392
393
394
395
396
397
398
399
400
401
402
403
404
405
406
407
408
409
410
411
412
413
414
415
416
417
418
419
420
421
422
423
424
425
426
427
428
429
430
431
432
433
434
435
436
437
438
439
440
441
442
443
444
445
446
447
448
449
450
451
452
453
454
455
456
457
458
459
460
461
462
463
464
465
466
467
468
469
470
471
472
473
474
475
476
477
478
479
480
481
482
483
484
485
486
487
488
489
490
491
492
493
494
495
496
497
498
499
500
501
502
503
504
505
506
507
508
509
510
511
512
513
514
515
516
517
518
519
520
521
522
523
524
525
526
527
528
529
530
531
532
533
534
535
536
537
538
539
540
541
542
543
544
545
546
547
548
549
550
551
552
553
554
555
556
557
558
559
560
561
562
563
564
565
566
567
568
569
570
571
572
573
574
575
576
577
578
579
580
581
582
583
584
585
586
587
588
589
590
591
592
593
594
595
596
597
598
599
600
601
602
603
604
605
606
607
608
609
610
611
612
613
614
615
616
617
618
619
620
621
622
623
624
625
626
627
628
629
630
631
632
633
634
635
636
637
638
639
640
641
642
643
644
645
646
647
648
649
650
651
652
653
654
655
656
657
658
659
660
661
662
663
664
665
666
667
668
669
670
671
672
673
674
675
676
677
678
679
680
681
682
683
684
685
686
687
688
689
690
691
692
693
694
695
696
697
698
699
700
701
702
703
704
705
706
707
708
709
710
711
712
713
714
715
716
717
718
719
720
721
722
723
724
725
726
727
728
729
730
731
732
733
734
735
736
737
738
739
740
741
742
743
744
745
746
747
748
749
750
751
752
753
754
755
756
757
758
759
760
761
762
763
764
765
766
767
768
769
770
771
772
773
774
775
776
777
778
779
780
781
782
783
784
785
786
787
788
789
790
791
792
793
794
795
796
797
798
799
800
801
802
803
804
805
806
807
808
809
810
811
812
813
814
815
816
817
818
819
820
821
822
823
824
825
826
827
828
829
830
831
832
833
834
835
836
837
838
839
840
841
842
843
844
845
846
847
848
849
850
851
852
853
854
855
856
857
858
859
860
861
862
863
864
865
866
867
868
869
870
871
872
873
874
875
876
877
878
879
880
881
882
883
884
885
886
887
888
889
890
891
892
893
894
895
896
897
898
899
900
901
902
903
904
905
906
907
908
909
910
911
912
913
914
915
916
917
918
919
920
921
922
923
924
925
926
927
928
929
930
931
932
933
934
935
936
937
938
939
940
941
942
943
944
945
946
947
948
949
950
951
952
953
954
955
956
957
958
959
960
961
962
963
964
965
966
967
968
969
970
971
972
973
974
975
976
977
978
979
980
981
982
983
984
985
986
987
988
989
990
991
992
993
994
995
996
997
998
999
1000
1001
1002
1003
1004
1005
1006
1007
1008
1009
1010
1011
1012
1013
1014
1015
1016
1017
1018
1019
1020
1021
1022
1023
1024
1025
1026
1027
1028
1029
1030
1031
1032
1033
1034
1035
1036
1037
1038
1039
1040
1041
1042
1043
1044
1045
1046
1047
1048
1049
Android Init Language
---------------------

The Android Init Language consists of five broad classes of statements:
Actions, Commands, Services, Options, and Imports.

All of these are line-oriented, consisting of tokens separated by
whitespace. The c-style backslash escapes may be used to insert
whitespace into a token. Double quotes may also be used to prevent
whitespace from breaking text into multiple tokens. The backslash,
when it is the last character on a line, may be used for line-folding.

Lines which start with a `#` (leading whitespace allowed) are comments.

System properties can be expanded using the syntax
`${property.name}`. This also works in contexts where concatenation is
required, such as `import /init.recovery.${ro.hardware}.rc`.

Actions and Services implicitly declare a new section. All commands
or options belong to the section most recently declared. Commands
or options before the first section are ignored.

Services have unique names. If a second Service is defined
with the same name as an existing one, it is ignored and an error
message is logged.

Init .rc Files
--------------
The init language is used in plain text files that take the .rc file
extension. There are typically multiple of these in multiple
locations on the system, described below.

`/system/etc/init/hw/init.rc` is the primary .rc file and is loaded by the init executable at the
beginning of its execution. It is responsible for the initial set up of the system.

Init loads all of the files contained within the
`/{system,system_ext,vendor,odm,product}/etc/init/` directories immediately after loading
the primary `/system/etc/init/hw/init.rc`. This is explained in more details in the
[Imports](#imports) section of this file.

Legacy devices without the first stage mount mechanism previously were
able to import init scripts during mount_all, however that is deprecated
and not allowed for devices launching after Q.

The intention of these directories is:

1. /system/etc/init/ is for core system items such as
SurfaceFlinger, MediaService, and logd.
2. /vendor/etc/init/ is for SoC vendor items such as actions or
daemons needed for core SoC functionality.
3. /odm/etc/init/ is for device manufacturer items such as
actions or daemons needed for motion sensor or other peripheral
functionality.

All services whose binaries reside on the system, vendor, or odm
partitions should have their service entries placed into a
corresponding init .rc file, located in the /etc/init/
directory of the partition where they reside. There is a build
system macro, LOCAL\_INIT\_RC, that handles this for developers. Each
init .rc file should additionally contain any actions associated with
its service.

An example is the userdebug logcatd.rc and Android.mk files located in the
system/core/logcat directory. The LOCAL\_INIT\_RC macro in the
Android.mk file places logcatd.rc in /system/etc/init/ during the
build process. Init loads logcatd.rc during the mount\_all command and
allows the service to be run and the action to be queued when
appropriate.

This break up of init .rc files according to their daemon is preferred
to the previously used monolithic init .rc files. This approach
ensures that the only service entries that init reads and the only
actions that init performs correspond to services whose binaries are in
fact present on the file system, which was not the case with the
monolithic init .rc files. This additionally will aid in merge
conflict resolution when multiple services are added to the system, as
each one will go into a separate file.

Versioned RC files within APEXs
-------------------------------

With the arrival of mainline on Android Q, the individual mainline
modules carry their own init.rc files within their boundaries. Init
processes these files according to the naming pattern `/apex/*/etc/*rc`.

Because APEX modules must run on more than one release of Android,
they may require different parameters as part of the services they
define. This is achieved, starting in Android T, by incorporating
the SDK version information in the name of the init file. The suffix
is changed from `.rc` to `.#rc` where # is the first SDK where that
RC file is accepted. An init file specific to SDK=31 might be named
`init.31rc`. With this scheme, an APEX may include multiple init files. An
example is appropriate.

For an APEX module with the following files in /apex/sample-module/apex/etc/:

1. init.rc
2. init.32rc
4. init.35rc

The selection rule chooses the highest `.#rc` value that does not
exceed the SDK of the currently running system. The unadorned `.rc`
is interpreted as sdk=0.

When this APEX is installed on a device with SDK <=31, the system will
process init.rc. When installed on a device running SDK 32, 33, or 34,
it will use init.32rc. When installed on a device running SDKs >= 35,
it will choose init.35rc

This versioning scheme is used only for the init files within APEX
modules; it does not apply to the init files stored in /system/etc/init,
/vendor/etc/init, or other directories.

This naming scheme is available after Android S.

Actions
-------
Actions are named sequences of commands. Actions have a trigger which
is used to determine when the action is executed. When an event
occurs which matches an action's trigger, that action is added to
the tail of a to-be-executed queue (unless it is already on the
queue).

Each action in the queue is dequeued in sequence and each command in
that action is executed in sequence. Init handles other activities
(device creation/destruction, property setting, process restarting)
"between" the execution of the commands in activities.

Actions take the form of:

on <trigger> [&& <trigger>]*
<command>
<command>
<command>

Actions are added to the queue and executed based on the order that
the file that contains them was parsed (see the Imports section), then
sequentially within an individual file.

For example if a file contains:

on boot
setprop a 1
setprop b 2

on boot && property:true=true
setprop c 1
setprop d 2

on boot
setprop e 1
setprop f 2

Then when the `boot` trigger occurs and assuming the property `true`
equals `true`, then the order of the commands executed will be:

setprop a 1
setprop b 2
setprop c 1
setprop d 2
setprop e 1
setprop f 2


Services
--------
Services are programs which init launches and (optionally) restarts
when they exit. Services take the form of:

service <name> <pathname> [ <argument> ]*
<option>
<option>
...


Options
-------
Options are modifiers to services. They affect how and when init
runs the service.

`capabilities [ <capability>\* ]`
> Set capabilities when exec'ing this service. 'capability' should be a Linux
capability without the "CAP\_" prefix, like "NET\_ADMIN" or "SETPCAP". See
http://man7.org/linux/man-pages/man7/capabilities.7.html for a list of Linux
capabilities.
If no capabilities are provided, then all capabilities are removed from this service, even if it
runs as root.

`class <name> [ <name>\* ]`
> Specify class names for the service. All services in a
named class may be started or stopped together. A service
is in the class "default" if one is not specified via the
class option. Additional classnames beyond the (required) first
one are used to group services.
The `animation` class should include all services necessary for both
boot animation and shutdown animation. As these services can be
launched very early during bootup and can run until the last stage
of shutdown, access to /data partition is not guaranteed. These
services can check files under /data but it should not keep files opened
and should work when /data is not available.

`console [<console>]`
> This service needs a console. The optional second parameter chooses a
specific console instead of the default. The default "/dev/console" can
be changed by setting the "androidboot.console" kernel parameter. In
all cases the leading "/dev/" should be omitted, so "/dev/tty0" would be
specified as just "console tty0".
This option connects stdin, stdout, and stderr to the console. It is mutually exclusive with the
stdio_to_kmsg option, which only connects stdout and stderr to kmsg.

`critical [window=<fatal crash window mins>] [target=<fatal reboot target>]`
> This is a device-critical service. If it exits more than four times in
_fatal crash window mins_ minutes or before boot completes, the device
will reboot into _fatal reboot target_.
The default value of _fatal crash window mins_ is 4, and default value
of _fatal reboot target_ is 'bootloader'.
For tests, the fatal reboot can be skipped by setting property
`init.svc_debug.no_fatal.<service-name>` to `true` for specified critical service.

`disabled`
> This service will not automatically start with its class.
It must be explicitly started by name or by interface name.

`enter_namespace <type> <path>`
> Enters the namespace of type _type_ located at _path_. Only network namespaces are supported with
_type_ set to "net". Note that only one namespace of a given _type_ may be entered.

`file <path> <type>`
> Open a file path and pass its fd to the launched process. _type_ must be
"r", "w" or "rw". For native executables see libcutils
android\_get\_control\_file().

`group <groupname> [ <groupname>\* ]`
> Change to 'groupname' before exec'ing this service. Additional
groupnames beyond the (required) first one are used to set the
supplemental groups of the process (via setgroups()).
Currently defaults to root. (??? probably should default to nobody)

`interface <interface name> <instance name>`
> Associates this service with a list of the AIDL or HIDL services that it provides. The interface
name must be a fully-qualified name and not a value name. For instance, this is used to allow
servicemanager or hwservicemanager to lazily start services. When multiple interfaces are served,
this tag should be used multiple times. An example of an entry for a HIDL
interface is `interface vendor.foo.bar@1.0::IBaz default`. For an AIDL interface, use
`interface aidl <instance name>`. The instance name for an AIDL interface is
whatever is registered with servicemanager, and these can be listed with `adb
shell dumpsys -l`.

`ioprio <class> <priority>`
> Sets the IO priority and IO priority class for this service via the SYS_ioprio_set syscall.
_class_ must be one of "rt", "be", or "idle". _priority_ must be an integer in the range 0 - 7.

`keycodes <keycode> [ <keycode>\* ]`
> Sets the keycodes that will trigger this service. If all of the keys corresponding to the passed
keycodes are pressed at once, the service will start. This is typically used to start the
bugreport service.

> This option may take a property instead of a list of keycodes. In this case, only one option is
provided: the property name in the typical property expansion format. The property must contain
a comma separated list of keycode values or the text 'none' to indicate that
this service does not respond to keycodes.

> For example, `keycodes ${some.property.name:-none}` where some.property.name expands
to "123,124,125". Since keycodes are handled very early in init,
only PRODUCT_DEFAULT_PROPERTY_OVERRIDES properties can be used.

`memcg.limit_in_bytes <value>` and `memcg.limit_percent <value>`
> Sets the child's memory.limit_in_bytes to the minimum of `limit_in_bytes`
bytes and `limit_percent` which is interpreted as a percentage of the size
of the device's physical memory (only if memcg is mounted).
Values must be equal or greater than 0.

`memcg.limit_property <value>`
> Sets the child's memory.limit_in_bytes to the value of the specified property
(only if memcg is mounted). This property will override the values specified
via `memcg.limit_in_bytes` and `memcg.limit_percent`.

`memcg.soft_limit_in_bytes <value>`
> Sets the child's memory.soft_limit_in_bytes to the specified value (only if memcg is mounted),
which must be equal or greater than 0.

`memcg.swappiness <value>`
> Sets the child's memory.swappiness to the specified value (only if memcg is mounted),
which must be equal or greater than 0.

`namespace <pid|mnt>`
> Enter a new PID or mount namespace when forking the service.

`oneshot`
> Do not restart the service when it exits.

`onrestart`
> Execute a Command (see below) when service restarts.

`oom_score_adjust <value>`
> Sets the child's /proc/self/oom\_score\_adj to the specified value,
which must range from -1000 to 1000.

`override`
> Indicates that this service definition is meant to override a previous definition for a service
with the same name. This is typically meant for services on /odm to override those defined on
/vendor. The last service definition that init parses with this keyword is the service definition
will use for this service. Pay close attention to the order in which init.rc files are parsed,
since it has some peculiarities for backwards compatibility reasons. The 'imports' section of
this file has more details on the order.

`priority <priority>`
> Scheduling priority of the service process. This value has to be in range
-20 to 19. Default priority is 0. Priority is set via setpriority().

`reboot_on_failure <target>`
> If this process cannot be started or if the process terminates with an exit code other than
CLD_EXITED or an status other than '0', reboot the system with the target specified in
_target_. _target_ takes the same format as the parameter to sys.powerctl. This is particularly
intended to be used with the `exec_start` builtin for any must-have checks during boot.

`restart_period <seconds>`
> If a non-oneshot service exits, it will be restarted at its start time plus
this period. It defaults to 5s to rate limit crashing services.
This can be increased for services that are meant to run periodically. For
example, it may be set to 3600 to indicate that the service should run every hour
or 86400 to indicate that the service should run every day.

`rlimit <resource> <cur> <max>`
> This applies the given rlimit to the service. rlimits are inherited by child
processes, so this effectively applies the given rlimit to the process tree
started by this service.
It is parsed similarly to the setrlimit command specified below.

`seclabel <seclabel>`
> Change to 'seclabel' before exec'ing this service.
Primarily for use by services run from the rootfs, e.g. ueventd, adbd.
Services on the system partition can instead use policy-defined transitions
based on their file security context.
If not specified and no transition is defined in policy, defaults to the init context.

`setenv <name> <value>`
> Set the environment variable _name_ to _value_ in the launched process.

`shutdown <shutdown_behavior>`
> Set shutdown behavior of the service process. When this is not specified,
the service is killed during shutdown process by using SIGTERM and SIGKILL.
The service with shutdown_behavior of "critical" is not killed during shutdown
until shutdown times out. When shutdown times out, even services tagged with
"shutdown critical" will be killed. When the service tagged with "shutdown critical"
is not running when shut down starts, it will be started.

`sigstop`
> Send SIGSTOP to the service immediately before exec is called. This is intended for debugging.
See the below section on debugging for how this can be used.

`socket <name> <type> <perm> [ <user> [ <group> [ <seclabel> ] ] ]`
> Create a UNIX domain socket named /dev/socket/_name_ and pass its fd to the
launched process. _type_ must be "dgram", "stream" or "seqpacket". _type_
may end with "+passcred" to enable SO_PASSCRED on the socket. User and
group default to 0. 'seclabel' is the SELinux security context for the
socket. It defaults to the service security context, as specified by
seclabel or computed based on the service executable file security context.
For native executables see libcutils android\_get\_control\_socket().

`stdio_to_kmsg`
> Redirect stdout and stderr to /dev/kmsg_debug. This is useful for services that do not use native
Android logging during early boot and whose logs messages we want to capture. This is only enabled
when /dev/kmsg_debug is enabled, which is only enabled on userdebug and eng builds.
This is mutually exclusive with the console option, which additionally connects stdin to the
given console.

`task_profiles <profile> [ <profile>\* ]`
> Set task profiles for the process when it forks. This is designed to replace the use of
writepid option for moving a process into a cgroup.

`timeout_period <seconds>`
> Provide a timeout after which point the service will be killed. The oneshot keyword is respected
here, so oneshot services do not automatically restart, however all other services will.
This is particularly useful for creating a periodic service combined with the restart_period
option described above.

`updatable`
> Mark that the service can be overridden (via the 'override' option) later in
the boot sequence by APEXes. When a service with updatable option is started
before APEXes are all activated, the execution is delayed until the activation
is finished. A service that is not marked as updatable cannot be overridden by
APEXes.

`user <username>`
> Change to 'username' before exec'ing this service.
Currently defaults to root. (??? probably should default to nobody)
As of Android M, processes should use this option even if they
require Linux capabilities. Previously, to acquire Linux
capabilities, a process would need to run as root, request the
capabilities, then drop to its desired uid. There is a new
mechanism through fs\_config that allows device manufacturers to add
Linux capabilities to specific binaries on a file system that should
be used instead. This mechanism is described on
<http://source.android.com/devices/tech/config/filesystem.html>. When
using this new mechanism, processes can use the user option to
select their desired uid without ever running as root.
As of Android O, processes can also request capabilities directly in their .rc
files. See the "capabilities" option below.

`writepid <file> [ <file>\* ]`
> Write the child's pid to the given files when it forks. Meant for
cgroup/cpuset usage. If no files under /dev/cpuset/ are specified, but the
system property 'ro.cpuset.default' is set to a non-empty cpuset name (e.g.
'/foreground'), then the pid is written to file /dev/cpuset/_cpuset\_name_/tasks.
The use of this option for moving a process into a cgroup is obsolete. Please
use task_profiles option instead.


Triggers
--------
Triggers are strings which can be used to match certain kinds of
events and used to cause an action to occur.

Triggers are subdivided into event triggers and property triggers.

Event triggers are strings triggered by the 'trigger' command or by
the QueueEventTrigger() function within the init executable. These
take the form of a simple string such as 'boot' or 'late-init'.

Property triggers are strings triggered when a named property changes
value to a given new value or when a named property changes value to
any new value. These take the form of 'property:<name>=<value>' and
'property:<name>=\*' respectively. Property triggers are additionally
evaluated and triggered accordingly during the initial boot phase of
init.

An Action can have multiple property triggers but may only have one
event trigger.

For example:
`on boot && property:a=b` defines an action that is only executed when
the 'boot' event trigger happens and the property a equals b.

`on property:a=b && property:c=d` defines an action that is executed
at three times:

1. During initial boot if property a=b and property c=d.
2. Any time that property a transitions to value b, while property c already equals d.
3. Any time that property c transitions to value d, while property a already equals b.


Trigger Sequence
----------------

Init uses the following sequence of triggers during early boot. These are the
built-in triggers defined in init.cpp.

1. `early-init` - The first in the sequence, triggered after cgroups has been configured
but before ueventd's coldboot is complete.
2. `init` - Triggered after coldboot is complete.
3. `charger` - Triggered if `ro.bootmode == "charger"`.
4. `late-init` - Triggered if `ro.bootmode != "charger"`, or via healthd triggering a boot
from charging mode.

Remaining triggers are configured in `init.rc` and are not built-in. The default sequence for
these is specified under the "on late-init" event in `init.rc`. Actions internal to `init.rc`
have been omitted.

1. `early-fs` - Start vold.
2. `fs` - Vold is up. Mount partitions not marked as first-stage or latemounted.
3. `post-fs` - Configure anything dependent on early mounts.
4. `late-fs` - Mount partitions marked as latemounted.
5. `post-fs-data` - Mount and configure `/data`; set up encryption. `/metadata` is
reformatted here if it couldn't mount in first-stage init.
6. `zygote-start` - Start the zygote.
7. `early-boot` - After zygote has started.
8. `boot` - After `early-boot` actions have completed.

Commands
--------

`bootchart [start|stop]`
> Start/stop bootcharting. These are present in the default init.rc files,
but bootcharting is only active if the file /data/bootchart/enabled exists;
otherwise bootchart start/stop are no-ops.

`chmod <octal-mode> <path>`
> Change file access permissions.

`chown <owner> <group> <path>`
> Change file owner and group.

`class_start <serviceclass>`
> Start all services of the specified class if they are
not already running. See the start entry for more information on
starting services.

`class_stop <serviceclass>`
> Stop and disable all services of the specified class if they are
currently running.

`class_reset <serviceclass>`
> Stop all services of the specified class if they are
currently running, without disabling them. They can be restarted
later using `class_start`.

`class_restart [--only-enabled] <serviceclass>`
> Restarts all services of the specified class. If `--only-enabled` is
specified, then disabled services are skipped.

`copy <src> <dst>`
> Copies a file. Similar to write, but useful for binary/large
amounts of data.
Regarding to the src file, copying from symbolic link file and world-writable
or group-writable files are not allowed.
Regarding to the dst file, the default mode created is 0600 if it does not
exist. And it will be truncated if dst file is a normal regular file and
already exists.

`copy_per_line <src> <dst>`
> Copies a file line by line. Similar to copy, but useful for dst is a sysfs node
that doesn't handle multiple lines of data.

`domainname <name>`
> Set the domain name.

`enable <servicename>`
> Turns a disabled service into an enabled one as if the service did not
specify disabled.
If the service is supposed to be running, it will be started now.
Typically used when the bootloader sets a variable that indicates a specific
service should be started when needed. E.g.

on property:ro.boot.myfancyhardware=1
enable my_fancy_service_for_my_fancy_hardware

`exec [ <seclabel> [ <user> [ <group>\* ] ] ] -- <command> [ <argument>\* ]`
> Fork and execute command with the given arguments. The command starts
after "--" so that an optional security context, user, and supplementary
groups can be provided. No other commands will be run until this one
finishes. _seclabel_ can be a - to denote default. Properties are expanded
within _argument_.
Init halts executing commands until the forked process exits.

`exec_background [ <seclabel> [ <user> [ <group>\* ] ] ] -- <command> [ <argument>\* ]`
> Fork and execute command with the given arguments. This is handled similarly
to the `exec` command. The difference is that init does not halt executing
commands until the process exits for `exec_background`.

`exec_start <service>`
> Start a given service and halt the processing of additional init commands
until it returns. The command functions similarly to the `exec` command,
but uses an existing service definition in place of the exec argument vector.

`export <name> <value>`
> Set the environment variable _name_ equal to _value_ in the
global environment (which will be inherited by all processes
started after this command is executed)

`hostname <name>`
> Set the host name.

`ifup <interface>`
> Bring the network interface _interface_ online.

`insmod [-f] <path> [<options>]`
> Install the module at _path_ with the specified options.
-f: force installation of the module even if the version of the running kernel
and the version of the kernel for which the module was compiled do not match.

`interface_start <name>` \
`interface_restart <name>` \
`interface_stop <name>`
> Find the service that provides the interface _name_ if it exists and run the `start`, `restart`,
or `stop` commands on it respectively. _name_ may be either a fully qualified HIDL name, in which
case it is specified as `<interface>/<instance>`, or an AIDL name, in which case it is specified as
`aidl/<interface>` for example `android.hardware.secure_element@1.1::ISecureElement/eSE1` or
`aidl/aidl_lazy_test_1`.

> Note that these commands only act on interfaces specified by the `interface` service option, not
on interfaces registered at runtime.

> Example usage of these commands: \
`interface_start android.hardware.secure_element@1.1::ISecureElement/eSE1`
will start the HIDL Service that provides the `android.hardware.secure_element@1.1` and `eSI1`
instance. \
`interface_start aidl/aidl_lazy_test_1` will start the AIDL service that
provides the `aidl_lazy_test_1` interface.

`load_exports <path>`
> Open the file at _path_ and export global environment variables declared
there. Each line must be in the format `export <name> <value>`, as described
above.

`load_system_props`
> (This action is deprecated and no-op.)

`load_persist_props`
> Loads persistent properties when /data has been decrypted.
This is included in the default init.rc.

`loglevel <level>`
> Sets init's log level to the integer level, from 7 (all logging) to 0
(fatal logging only). The numeric values correspond to the kernel log
levels, but this command does not affect the kernel log level. Use the
`write` command to write to `/proc/sys/kernel/printk` to change that.
Properties are expanded within _level_.

`mark_post_data`
> Used to mark the point right after /data is mounted.

`mkdir <path> [<mode>] [<owner>] [<group>] [encryption=<action>] [key=<key>]`
> Create a directory at _path_, optionally with the given mode, owner, and
group. If not provided, the directory is created with permissions 755 and
owned by the root user and root group. If provided, the mode, owner and group
will be updated if the directory exists already.

> _action_ can be one of:
* `None`: take no encryption action; directory will be encrypted if parent is.
* `Require`: encrypt directory, abort boot process if encryption fails
* `Attempt`: try to set an encryption policy, but continue if it fails
* `DeleteIfNecessary`: recursively delete directory if necessary to set
encryption policy.

> _key_ can be one of:
* `ref`: use the systemwide DE key
* `per_boot_ref`: use the key freshly generated on each boot.

`mount_all [ <fstab> ] [--<option>]`
> Calls fs\_mgr\_mount\_all on the given fs\_mgr-format fstab with optional
options "early" and "late".
With "--early" set, the init executable will skip mounting entries with
"latemount" flag and triggering fs encryption state event. With "--late" set,
init executable will only mount entries with "latemount" flag. By default,
no option is set, and mount\_all will process all entries in the given fstab.
If the fstab parameter is not specified, fstab.${ro.boot.fstab_suffix},
fstab.${ro.hardware} or fstab.${ro.hardware.platform} will be scanned for
under /odm/etc, /vendor/etc, or / at runtime, in that order.

`mount <type> <device> <dir> [ <flag>\* ] [<options>]`
> Attempt to mount the named device at the directory _dir_
_flag_s include "ro", "rw", "remount", "noatime", ...
_options_ include "barrier=1", "noauto\_da\_alloc", "discard", ... as
a comma separated string, e.g. barrier=1,noauto\_da\_alloc

`perform_apex_config`
> Performs tasks after APEXes are mounted. For example, creates data directories
for the mounted APEXes, parses config file(s) from them, and updates linker
configurations. Intended to be used only once when apexd notifies the mount
event by setting `apexd.status` to ready.

`restart [--only-if-running] <service>`
> Stops and restarts a running service, does nothing if the service is currently
restarting, otherwise, it just starts the service. If "--only-if-running" is
specified, the service is only restarted if it is already running.

`restorecon <path> [ <path>\* ]`
> Restore the file named by _path_ to the security context specified
in the file\_contexts configuration.
Not required for directories created by the init.rc as these are
automatically labeled correctly by init.

`restorecon_recursive <path> [ <path>\* ]`
> Recursively restore the directory tree named by _path_ to the
security contexts specified in the file\_contexts configuration.

`rm <path>`
> Calls unlink(2) on the given path. You might want to
use "exec -- rm ..." instead (provided the system partition is
already mounted).

`rmdir <path>`
> Calls rmdir(2) on the given path.

`readahead <file|dir> [--fully]`
> Calls readahead(2) on the file or files within given directory.
Use option --fully to read the full file content.

`setprop <name> <value>`
> Set system property _name_ to _value_. Properties are expanded
within _value_.

`setrlimit <resource> <cur> <max>`
> Set the rlimit for a resource. This applies to all processes launched after
the limit is set. It is intended to be set early in init and applied globally.
_resource_ is best specified using its text representation ('cpu', 'rtio', etc
or 'RLIM_CPU', 'RLIM_RTIO', etc). It also may be specified as the int value
that the resource enum corresponds to.
_cur_ and _max_ can be 'unlimited' or '-1' to indicate an infinite rlimit.

`start <service>`
> Start a service running if it is not already running.
Note that this is _not_ synchronous, and even if it were, there is
no guarantee that the operating system's scheduler will execute the
service sufficiently to guarantee anything about the service's status.
See the `exec_start` command for a synchronous version of `start`.

> This creates an important consequence that if the service offers
functionality to other services, such as providing a
communication channel, simply starting this service before those
services is _not_ sufficient to guarantee that the channel has
been set up before those services ask for it. There must be a
separate mechanism to make any such guarantees.

`stop <service>`
> Stop a service from running if it is currently running.

`swapon_all [ <fstab> ]`
> Calls fs\_mgr\_swapon\_all on the given fstab file.
If the fstab parameter is not specified, fstab.${ro.boot.fstab_suffix},
fstab.${ro.hardware} or fstab.${ro.hardware.platform} will be scanned for
under /odm/etc, /vendor/etc, or / at runtime, in that order.

`symlink <target> <path>`
> Create a symbolic link at _path_ with the value _target_

`sysclktz <minutes_west_of_gmt>`
> Set the system clock base (0 if system clock ticks in GMT)

`trigger <event>`
> Trigger an event. Used to queue an action from another
action.

`umount <path>`
> Unmount the filesystem mounted at that path.

`umount_all [ <fstab> ]`
> Calls fs\_mgr\_umount\_all on the given fstab file.
If the fstab parameter is not specified, fstab.${ro.boot.fstab_suffix},
fstab.${ro.hardware} or fstab.${ro.hardware.platform} will be scanned for
under /odm/etc, /vendor/etc, or / at runtime, in that order.

`verity_update_state`
> Internal implementation detail used to update dm-verity state and
set the partition._mount-point_.verified properties used by adb remount
because fs\_mgr can't set them directly itself. This is required since
Android 12, because CtsNativeVerifiedBootTestCases will read property
"partition.${partition}.verified.hash_alg" to check that sha1 is not used.
See https://r.android.com/1546980 for more details.

`wait <path> [ <timeout> ]`
> Poll for the existence of the given file and return when found,
or the timeout has been reached. If timeout is not specified it
currently defaults to five seconds. The timeout value can be
fractional seconds, specified in floating point notation.

`wait_for_prop <name> <value>`
> Wait for system property _name_ to be _value_. Properties are expanded
within _value_. If property _name_ is already set to _value_, continue
immediately.

`write <path> <content>`
> Open the file at _path_ and write a string to it with write(2).
If the file does not exist, it will be created. If it does exist,
it will be truncated. Properties are expanded within _content_.


Imports
-------
`import <path>`
> Parse an init config file, extending the current configuration.
If _path_ is a directory, each file in the directory is parsed as
a config file. It is not recursive, nested directories will
not be parsed.

The import keyword is not a command, but rather its own section,
meaning that it does not happen as part of an Action, but rather,
imports are handled as a file is being parsed and follow the below logic.

There are only three times where the init executable imports .rc files:

1. When it imports `/system/etc/init/hw/init.rc` or the script indicated by the property
`ro.boot.init_rc` during initial boot.
2. When it imports `/{system,system_ext,vendor,odm,product}/etc/init/` immediately after
importing `/system/etc/init/hw/init.rc`.
3. (Deprecated) When it imports /{system,vendor,odm}/etc/init/ or .rc files
at specified paths during mount_all, not allowed for devices launching
after Q.

The order that files are imported is a bit complex for legacy reasons. The below is guaranteed:

1. `/system/etc/init/hw/init.rc` is parsed then recursively each of its imports are
parsed.
2. The contents of `/system/etc/init/` are alphabetized and parsed sequentially, with imports
happening recursively after each file is parsed.
3. Step 2 is repeated for `/system_ext/etc/init`, `/vendor/etc/init`, `/odm/etc/init`,
`/product/etc/init`

The below pseudocode may explain this more clearly:

fn Import(file)
Parse(file)
for (import : file.imports)
Import(import)

Import(/system/etc/init/hw/init.rc)
Directories = [/system/etc/init, /system_ext/etc/init, /vendor/etc/init, /odm/etc/init, /product/etc/init]
for (directory : Directories)
files = <Alphabetical order of directory's contents>
for (file : files)
Import(file)

Actions are executed in the order that they are parsed. For example the `post-fs-data` action(s)
in `/system/etc/init/hw/init.rc` are always the first `post-fs-data` action(s) to be executed in
order of how they appear in that file. Then the `post-fs-data` actions of the imports of
`/system/etc/init/hw/init.rc` in the order that they're imported, etc.

Properties
----------
Init provides state information with the following properties.

`init.svc.<name>`
> State of a named service ("stopped", "stopping", "running", "restarting")

`dev.mnt.dev.<mount_point>`, `dev.mnt.blk.<mount_point>`, `dev.mnt.rootdisk.<mount_point>`
> Block device base name associated with a *mount_point*.
The *mount_point* has / replaced by . and if referencing the root mount point
"/", it will use "/root".
`dev.mnt.dev.<mount_point>` indicates a block device attached to filesystems.
(e.g., dm-N or sdaN/mmcblk0pN to access `/sys/fs/ext4/${dev.mnt.dev.<mount_point>}/`)

`dev.mnt.blk.<mount_point>` indicates the disk partition to the above block device.
(e.g., sdaN / mmcblk0pN to access `/sys/class/block/${dev.mnt.blk.<mount_point>}/`)

`dev.mnt.rootdisk.<mount_point>` indicates the root disk to contain the above disk partition.
(e.g., sda / mmcblk0 to access `/sys/class/block/${dev.mnt.rootdisk.<mount_point>}/queue`)

Init responds to properties that begin with `ctl.`. These properties take the format of
`ctl.[<target>_]<command>` and the _value_ of the system property is used as a parameter. The
_target_ is optional and specifies the service option that _value_ is meant to match with. There is
only one option for _target_, `interface` which indicates that _value_ will refer to an interface
that a service provides and not the service name itself.

For example:

`SetProperty("ctl.start", "logd")` will run the `start` command on `logd`.

`SetProperty("ctl.interface_start", "aidl/aidl_lazy_test_1")` will run the `start` command on the
service that exposes the `aidl aidl_lazy_test_1` interface.

Note that these
properties are only settable; they will have no value when read.

The _commands_ are listed below.

`start` \
`restart` \
`stop` \
These are equivalent to using the `start`, `restart`, and `stop` commands on the service specified
by the _value_ of the property.

`oneshot_on` and `oneshot_off` will turn on or off the _oneshot_
flag for the service specified by the _value_ of the property. This is
particularly intended for services that are conditionally lazy HALs. When
they are lazy HALs, oneshot must be on, otherwise oneshot should be off.

`sigstop_on` and `sigstop_off` will turn on or off the _sigstop_ feature for the service
specified by the _value_ of the property. See the _Debugging init_ section below for more details
about this feature.

Boot timing
-----------
Init records some boot timing information in system properties.

`ro.boottime.init`
> Time after boot in ns (via the CLOCK\_BOOTTIME clock) at which the first
stage of init started.

`ro.boottime.init.first_stage`
> How long in ns it took to run first stage.

`ro.boottime.init.selinux`
> How long in ns it took to run SELinux stage.

`ro.boottime.init.modules`
> How long in ms it took to load kernel modules.

`ro.boottime.init.cold_boot_wait`
> How long init waited for ueventd's coldboot phase to end.

`ro.boottime.<service-name>`
> Time after boot in ns (via the CLOCK\_BOOTTIME clock) that the service was
first started.


Bootcharting
------------
This version of init contains code to perform "bootcharting": generating log
files that can be later processed by the tools provided by <http://www.bootchart.org/>.

On the emulator, use the -bootchart _timeout_ option to boot with bootcharting
activated for _timeout_ seconds.

On a device:

adb shell 'touch /data/bootchart/enabled'

Don't forget to delete this file when you're done collecting data!

The log files are written to /data/bootchart/. A script is provided to
retrieve them and create a bootchart.tgz file that can be used with the
bootchart command-line utility:

sudo apt-get install pybootchartgui
# grab-bootchart.sh uses $ANDROID_SERIAL.
$ANDROID_BUILD_TOP/system/core/init/grab-bootchart.sh

One thing to watch for is that the bootchart will show init as if it started
running at 0s. You'll have to look at dmesg to work out when the kernel
actually started init.


Comparing two bootcharts
------------------------
A handy script named compare-bootcharts.py can be used to compare the
start/end time of selected processes. The aforementioned grab-bootchart.sh
will leave a bootchart tarball named bootchart.tgz at /tmp/android-bootchart.
If two such tarballs are preserved on the host machine under different
directories, the script can list the timestamps differences. For example:

Usage: system/core/init/compare-bootcharts.py _base-bootchart-dir_ _exp-bootchart-dir_

process: baseline experiment (delta) - Unit is ms (a jiffy is 10 ms on the system)
------------------------------------
/init: 50 40 (-10)
/system/bin/surfaceflinger: 4320 4470 (+150)
/system/bin/bootanimation: 6980 6990 (+10)
zygote64: 10410 10640 (+230)
zygote: 10410 10640 (+230)
system_server: 15350 15150 (-200)
bootanimation ends at: 33790 31230 (-2560)


Systrace
--------
Systrace (<http://developer.android.com/tools/help/systrace.html>) can be
used for obtaining performance analysis reports during boot
time on userdebug or eng builds.

Here is an example of trace events of "wm" and "am" categories:

$ANDROID_BUILD_TOP/external/chromium-trace/systrace.py \
wm am --boot

This command will cause the device to reboot. After the device is rebooted and
the boot sequence has finished, the trace report is obtained from the device
and written as trace.html on the host by hitting Ctrl+C.

Limitation: recording trace events is started after persistent properties are loaded, so
the trace events that are emitted before that are not recorded. Several
services such as vold, surfaceflinger, and servicemanager are affected by this
limitation since they are started before persistent properties are loaded.
Zygote initialization and the processes that are forked from the zygote are not
affected.


Debugging init
--------------
When a service starts from init, it may fail to `execv()` the service. This is not typical, and may
point to an error happening in the linker as the new service is started. The linker in Android
prints its logs to `logd` and `stderr`, so they are visible in `logcat`. If the error is encountered
before it is possible to access `logcat`, the `stdio_to_kmsg` service option may be used to direct
the logs that the linker prints to `stderr` to `kmsg`, where they can be read via a serial port.

Launching init services without init is not recommended as init sets up a significant amount of
environment (user, groups, security label, capabilities, etc) that is hard to replicate manually.

If it is required to debug a service from its very start, the `sigstop` service option is added.
This option will send SIGSTOP to a service immediately before calling exec. This gives a window
where developers can attach a debugger, strace, etc before continuing the service with SIGCONT.

This flag can also be dynamically controlled via the ctl.sigstop_on and ctl.sigstop_off properties.

Below is an example of dynamically debugging logd via the above:

stop logd
setprop ctl.sigstop_on logd
start logd
ps -e | grep logd
> logd 4343 1 18156 1684 do_signal_stop 538280 T init
gdbclient.py -p 4343
b main
c
c
c
> Breakpoint 1, main (argc=1, argv=0x7ff8c9a488) at system/core/logd/main.cpp:427

Below is an example of doing the same but with strace

stop logd
setprop ctl.sigstop_on logd
start logd
ps -e | grep logd
> logd 4343 1 18156 1684 do_signal_stop 538280 T init
strace -p 4343

(From a different shell)
kill -SIGCONT 4343

> strace runs

Host Init Script Verification
-----------------------------

Init scripts are checked for correctness during build time. Specifically the below is checked.

1) Well formatted action, service and import sections, e.g. no actions without a preceding 'on'
line, and no extraneous lines after an 'import' statement.
2) All commands map to a valid keyword and the argument count is within the correct range.
3) All service options are valid. This is stricter than how commands are checked as the service
options' arguments are fully parsed, e.g. UIDs and GIDs must resolve.

There are other parts of init scripts that are only parsed at runtime and therefore not checked
during build time, among them are the below.

1) The validity of the arguments of commands, e.g. no checking if file paths actually exist, if
SELinux would permit the operation, or if the UIDs and GIDs resolve.
2) No checking if a service exists or has a valid SELinux domain defined
3) No checking if a service has not been previously defined in a different init script.

Early Init Boot Sequence
------------------------
The early init boot sequence is broken up into three stages: first stage init, SELinux setup, and
second stage init.

First stage init is responsible for setting up the bare minimum requirements to load the rest of the
system. Specifically this includes mounting /dev, /proc, mounting 'early mount' partitions (which
needs to include all partitions that contain system code, for example system and vendor), and moving
the system.img mount to / for devices with a ramdisk.

Note that in Android Q, system.img always contains TARGET_ROOT_OUT and always is mounted at / by the
time first stage init finishes. Android Q will also require dynamic partitions and therefore will
require using a ramdisk to boot Android. The recovery ramdisk can be used to boot to Android instead
of a dedicated ramdisk as well.

First stage init has three variations depending on the device configuration:
1) For system-as-root devices, first stage init is part of /system/bin/init and a symlink at /init
points to /system/bin/init for backwards compatibility. These devices do not need to do anything to
mount system.img, since it is by definition already mounted as the rootfs by the kernel.

2) For devices with a ramdisk, first stage init is a static executable located at /init. These
devices mount system.img as /system then perform a switch root operation to move the mount at
/system to /. The contents of the ramdisk are freed after mounting has completed.

3) For devices that use recovery as a ramdisk, first stage init it contained within the shared init
located at /init within the recovery ramdisk. These devices first switch root to
/first_stage_ramdisk to remove the recovery components from the environment, then proceed the same
as 2). Note that the decision to boot normally into Android instead of booting
into recovery mode is made if androidboot.force_normal_boot=1 is present in the
kernel commandline, or in bootconfig with Android S and later.

Once first stage init finishes it execs /system/bin/init with the "selinux_setup" argument. This
phase is where SELinux is optionally compiled and loaded onto the system. selinux.cpp contains more
information on the specifics of this process.

Lastly once that phase finishes, it execs /system/bin/init again with the "second_stage"
argument. At this point the main phase of init runs and continues the boot process via the init.rc
scripts.

chatgpt译文:

1
2
3
4
5
6
7
8
9
10
11
12
13
14
15
16
17
18
19
20
21
22
23
24
25
26
27
28
29
30
31
32
33
34
35
36
37
38
39
40
41
42
43
44
45
46
47
48
49
50
51
52
53
54
55
56
57
58
59
60
61
62
63
64
65
66
67
68
69
70
71
72
73
74
75
76
77
78
79
80
81
82
83
84
85
86
87
88
89
90
91
92
93
94
95
96
97
98
99
100
101
102
103
104
105
106
107
108
109
110
111
112
113
114
115
116
117
118
119
120
121
122
123
124
125
126
127
128
129
130
131
132
133
134
135
136
137
138
139
140
141
142
143
144
145
146
147
148
149
150
151
152
153
154
155
156
157
158
159
160
161
162
163
164
165
166
167
168
169
170
171
172
173
174
175
176
177
178
179
180
181
182
183
184
185
186
187
188
189
190
191
192
193
194
195
196
197
198
199
200
201
202
203
204
205
206
207
208
209
210
211
212
213
214
215
216
217
218
219
220
221
222
223
224
225
226
227
228
229
230
231
232
233
234
235
236
237
238
239
240
241
242
243
244
245
246
247
248
249
250
251
252
253
254
255
256
257
258
259
260
261
262
263
264
265
266
267
268
269
270
271
272
273
274
275
276
277
278
279
280
281
282
283
284
285
286
287
288
289
290
291
292
293
294
295
296
297
298
299
300
301
302
303
304
305
306
307
308
309
310
311
312
313
314
315
316
317
318
319
320
321
322
323
324
325
326
327
328
329
330
331
332
333
334
335
336
337
338
339
340
341
342
343
344
345
346
347
348
349
350
351
352
353
354
355
356
357
358
359
360
361
362
363
364
365
366
367
368
369
370
371
372
373
374
375
376
377
378
379
380
381
382
383
384
385
386
387
388
389
390
391
392
393
394
395
396
397
398
399
400
401
402
403
404
405
406
407
408
409
410
411
412
413
414
415
416
417
418
419
420
421
422
423
424
425
426
427
428
429
430
431
432
433
434
435
436
437
438
439
440
441
442
443
444
445
446
447
448
449
450
451
452
453
454
455
456
457
458
459
460
461
462
463
464
465
466
467
468
469
470
471
472
473
474
475
476
477
478
479
480
481
482
483
484
485
486
487
488
489
490
491
492
493
494
495
496
497
498
499
500
501
502
503
504
505
506
507
508
509
510
511
512
513
514
515
516
517
518
519
520
521
522
523
524
525
526
527
528
529
530
531
532
533
534
535
536
537
538
539
540
541
542
543
544
545
546
547
548
549
550
551
552
553
554
555
556
557
558
559
560
561
562
563
564
565
566
567
568
569
570
571
572
573
574
575
576
577
578
579
580
581
582
583
584
585
586
587
588
589
590
591
592
593
594
595
596
597
598
599
600
601
602
603
604
605
606
607
608
609
610
611
612
613
614
615
616
617
618
619
620
621
622
623
624
625
626
627
628
629
630
631
632
633
634
635
636
637
638
639
640
641
642
643
644
645
646
647
648
649
650
651
652
653
654
655
656
657
658
659
660
661
662
663
664
665
666
667
668
669
670
671
672
673
674
675
676
677
678
679
680
681
682
683
684
685
686
687
688
689
690
691
692
693
694
695
696
697
698
699
700
701
702
703
704
705
706
707
708
709
710
711
712
713
714
715
716
717
718
719
720
721
722
723
724
725
726
727
728
729
730
731
732
733
734
735
736
737
738
739
740
741
742
743
744
745
746
747
748
749
750
751
752
753
754
755
756
757
758
759
760
761
762
763
764
765
766
767
768
769
770
771
772
773
774
Android Init Language
---------------------

Android Init语言由五个宽泛的语句类别组成:Actions(动作)、Commands(命令)、Services(服务)、Options(选项)和
Imports(导入)。

所有这些语句以行为单位,由空格分隔的标记组成。可以使用C风格的反斜杠转义将空格插入标记中。双引号也可以用于防止空格破坏文本形成
多个标记。当反斜杠是行末字符时,可以用于行折叠。

以`#`开头的行(允许前置空格)是注释。

可以使用`${property.name}`的语法扩展系统属性。这在需要连接的上下文中也适用,例如`import /init.recovery.${ro.hardware}.rc`。

Actions和Services隐式声明了一个新的区块。所有的命令或选项都属于最近声明的区块。在第一个区块之前的命令或选项将被忽略。

Services具有唯一的名称。如果定义了第二个名称与现有Service相同的Service,则会被忽略并记录错误消息。

Init .rc文件
--------------

Init语言用于采用.rc文件扩展的纯文本文件中。通常在系统中有多个这样的文件,如下所述。

`/system/etc/init/hw/init.rc`是主要的.rc文件,由init可执行文件在其启动时加载。它负责系统的初始设置。

在加载主要的`/system/etc/init/hw/init.rc`之后,Init会立即加载`/{system,system_ext,vendor,odm,product}/etc/init/`目录
中包含的所有文件。这在本文件的[Imports](#imports)部分中有更详细的解释。

在Q之后启动的设备不再支持在mount_all期间导入init脚本。

这些目录的目的是:

1. /system/etc/init/ 用于核心系统项,如SurfaceFlinger、MediaService和logd。
2. /vendor/etc/init/ 用于SoC供应商项,如用于核心SoC功能的动作或守护进程。
3. /odm/etc/init/ 用于设备制造商项,如用于运动传感器或其他外围设备功能的动作或守护进程。

所有二进制文件位于系统、供应商或odm分区的服务应将其服务条目放置在相应的init .rc文件中,位于它们所在分区的/etc/init/目录中。
开发人员可以使用构建系统宏LOCAL_INIT_RC来处理此问题。每个init .rc文件还应包含与其服务关联的任何操作。

一个例子是位于system/core/logcat目录中的userdebug logcatd.rc和Android.mk文件。Android.mk文件中的LOCAL_INIT_RC宏在构建
过程中将logcatd.rc放置在/system/etc/init/中。Init在执行mount_all命令时加载logcatd.rc,并在适当时运行服务和排队操作。

将init .rc文件按照它们的守护进程进行拆分比以前使用的大型init .rc文件更可取。这种方法确保init读取的只有存在于文件系统上的二
进制文件对应的服务条目,而在大型init .rc文件中并非如此。此外,当向系统添加多个服务时,这样分拆将有助于解决合并冲突,因为每个
服务都将进入单独的文件。

APEXs中的带版本的RC文件
---------------------------
随着在Android Q上的主线开始,各个主线模块在其范围内携带自己的init.rc文件。Init根据命名模式`/apex/*/etc/*rc`来处理这些文件。

由于APEX模块必须在多个Android版本上运行,它们可能需要不同的参数作为其定义的服务的一部分。从Android T开始,通过在init文件名
中加入SDK版本信息来实现。后缀从`.rc`变为`.#rc`,其中#是该RC文件被接受的第一个SDK版本。一个特定于SDK=31的init文件可以被命名
为`init.31rc`。使用这种方案,一个APEX可以包含多个init文件。下面是一个示例。

对于/apex/sample-module/apex/etc/目录下拥有以下文件的APEX模块:

1. init.rc
2. init.32rc
4. init.35rc

选择规则选择不超过当前运行系统的SDK的最高`.#rc`值。不带后缀的`.rc`表示sdk=0。

当此APEX安装在SDK <=31的设备上时,系统会处理init.rc。当安装在运行SDK 32、33或34的设备上时,它将使用init.32rc。当安装在运
行SDK >= 35的设备上时,它将选择init.35rc。

此版本方案仅适用于APEX模块中的init文件,不适用于存储在/system/etc/init、/vendor/etc/init或其他目录中的init文件。

此命名方案在Android S之后提供。

动作
-------
动作是命令的命名序列。动作有一个触发器,用于确定何时执行该动作。当发生与动作的触发器匹配的事件时,该动作将被添加到待执行队列
的末尾(除非它已经在队列中)。

队列中的每个动作都按顺序出队,并执行该动作中的每个命令。在执行活动命令期间,Init处理其他活动(设备创建/销毁、属性设置、进程
重启)。

动作的形式如下:

on <trigger> [&& <trigger>]*
<command>
<command>
<command>

根据包含它们的文件的解析顺序(请参阅导入部分),动作按顺序添加到队列并执行,然后在单个文件内顺序执行。

例如,如果一个文件包含:

on boot
setprop a 1
setprop b 2

on boot && property:true=true
setprop c 1
setprop d 2

on boot
setprop e 1
setprop f 2

那么当`boot`触发器发生并且假设属性`true`等于`true`时,执行命令的顺序将是:

setprop a 1
setprop b 2
setprop c 1
setprop d 2
setprop e 1
setprop f 2

服务
--------
服务是在init启动和(可选地)重新启动时运行的程序。服务的形式如下:

service <名称> <路径> [ <参数> ]*
<选项>
<选项>
...

选项
--------
选项是对服务的修改器。它们会影响到init运行服务的方式和时间。

`capabilities [ <capability>\* ]`
> 在执行该服务时设置能力(capabilities)。'capability'应为一个Linux能力(capability),没有"CAP_"前缀,比如"NET_ADMIN"
或"SETPCAP"。请参考http://man7.org/linux/man-pages/man7/capabilities.7.html 获取Linux能力的列表。
如果未提供任何能力,则该服务将被移除所有能力,即使它以root用户运行。

`class <name> [ <name>\* ]`
> 为该服务指定类名(class names)。一个指定类的所有服务可以一起启动或停止。如果没有通过class选项指定类名,则该服务默认为
"default"类。除了(必需的)第一个类名外,额外的类名用于分组服务。
"animation"类应包括所有启动动画和关机动画所需的服务。由于这些服务可以在启动过程的非常早期被启动,并且可能一直运行到关机
的最后阶段,因此不能保证可以访问/data分区。这些服务可以检查/data下的文件,但不能保持文件处于打开状态,且在/data不可用时应该正常工作。

`console [<console>]`
> 该服务需要一个控制台。可选的第二个参数选择一个特定的控制台,而不使用默认规定的控制台。默认的"/dev/console"可以通过设置
"androidboot.console"内核参数来更改。在所有情况下,应省略"/dev/"前缀,所以"/dev/tty0"可以指定为"console tty0"。
此选项将标准输入、标准输出和标准错误连接到控制台。它与stdio_to_kmsg选项互斥,后者只将标准输出和标准错误连接到kmsg。

`critical [window=<fatal crash window分钟>] [target=<fatal reboot目标>]`
> 这是一个设备关键的服务。如果在_fatal crash window分钟_内它退出了超过四次,或者在启动完成之前退出,设备将重新启动到
_fatal reboot目标_。
_fatal crash window分钟_的默认值为4,_fatal reboot目标_的默认值为'bootloader'。
可以通过将属性`init.svc_debug.no_fatal.<service-name>`设置为`true`来跳过对指定关键服务的致命重启,以进行测试。

`disabled`
> 这个服务不会随其类一起自动启动。
必须通过名称或接口名称显式启动。

`enter_namespace <type> <path>`
> 进入位于 _path_ 的 _type_ 类型的命名空间。仅支持网络命名空间,_type_ 设置为 "net"。请注意,每种 _type_ 类型只能进入一
个命名空间。

`file <path> <type>`
> 打开文件路径并将其文件描述符传递给启动的进程。_type_ 必须为
"r"、"w" 或 "rw"。对于原生可执行文件,请参阅 libcutils
android\_get\_control\_file()。

`group <groupname> [ <groupname>\* ]`
> 在执行此服务之前切换到“groupname”。除了(必需的)第一个 groupname 之外的其他 groupname 用于设置进程的附加组(通过
setgroups())。
当前默认为 root。 (???应该默认为 nobody)

`interface <interface name> <instance name>`
> 将此服务与其提供的一组 AIDL 或 HIDL 服务关联起来。接口名称必须是完全限定的名称而不是值名称。例如,这用于允许 servicemanager
或 hwservicemanager 惰性启动服务。
当提供多个接口时,此标记应多次使用。HIDL 接口的示例条目是 `interface vendor.foo.bar@1.0::IBaz default`。对于 AIDL 接口,
请使用`interface aidl <instance name>`。AIDL 接口的实例名称是
与 servicemanager 注册的实例名称一致,可以使用 `adb
shell dumpsys -l` 列出它们。

`ioprio <class> <priority>`
> 通过 SYS_ioprio_set 系统调用设置此服务的 IO 优先级和 IO 优先级类。
_class_ 必须是 "rt"、"be" 或 "idle" 中的一个。_priority_ 必须是 0 - 7 范围内的整数。

`keycodes <keycode> [ <keycode>\* ]`
> 设置触发该服务的按键代码。如果同时按下与传递的按键代码对应的所有按键,则服务将启动。这通常用于启动 bugreport 服务。

> 此选项可以接受属性而不是按键代码列表。在这种情况下,提供一个选项:按典型属性扩展格式的属性名。属性必须包含逗号分隔的按键代
码值列表或文本 'none',表示该服务不响应按键代码。

> 例如,`keycodes ${some.property.name:-none}`,其中 some.property.name 扩展
为 "123,124,125"。由于按键代码在 init 非常早期处理,
只能使用 PRODUCT_DEFAULT_PROPERTY_OVERRIDES 属性。

`memcg.limit_in_bytes <value>` 和 `memcg.limit_percent <value>`
> 将子进程的 memory.limit_in_bytes 设置为 `limit_in_bytes`
字节和 `limit_percent` 中较小的一个,`limit_percent` 表示设备物理内存大小的百分比(仅在 memcg 挂载时)。
值必须大于等于 0。

`memcg.limit_property <value>`
> 将子进程的 memory.limit_in_bytes 设置为指定属性的值(仅在 memcg 挂载时)。此属性将覆盖通过 `memcg.limit_in_bytes`
和 `memcg.limit_percent` 指定的值。

`memcg.soft_limit_in_bytes <value>`
> 将子进程的 memory.soft_limit_in_bytes 设置为指定值(仅在 memcg 挂载时),该值必须大于等于 0。

`memcg.swappiness <value>`
> 将子进程的 memory.swappiness 设置为指定值(仅在 memcg 挂载时),该值必须大于等于 0。

`namespace <pid|mnt>`
> 在 fork 服务时进入新的 PID 或挂载命名空间。

`oneshot`
> 当服务退出时不重新启动。

`onrestart`
> 在服务重新启动时执行命令(参见下文)。

`oom_score_adjust <value>`
> 将子进程的 /proc/self/oom\_score\_adj 设置为指定值,
该值必须在 -1000 到 1000 范围内。

`override`
> 表示此服务定义旨在覆盖先前定义的具有相同名称的服务。这通常用于在 /odm 上覆盖在 /vendor 上定义的服务。init 解析的具有此关
键字的最后一个服务定义将用于此服务。
请注意 init.rc 文件解析的顺序,因为出于向后兼容性原因,它具有一些特殊性。此文件的 'imports' 部分详细介绍了顺序。

`priority <priority>`
> 服务进程的调度优先级。该值必须在
-20 到 19 的范围内。默认优先级为 0。优先级通过 setpriority() 设置。

`reboot_on_failure <目标>`
> 如果该进程无法启动,或者进程以CLD_EXITED以外的退出代码或非0的状态码终止,则重新启动带有指定目标的系统。_target_ 的格式与
sys.powerctl的参数相同。这主要用于在启动期间进行一些必要的检查。

`restart_period <秒数>`
> 如果非一次性服务退出,则在其启动时间加上此持续时间后重新启动。默认为5秒,用于限制崩溃服务的速率。可以增加此值以适应定期运行
的服务。例如,可以将其设置为3600表示服务应每小时运行一次,或者设置为86400表示服务应每天运行一次。

`rlimit <资源> <当前值> <最大值>`
> 将给定的rlimit应用于服务。rlimit会被子进程继承,因此这实际上将给定的rlimit应用于由此服务启动的进程树。解析方式与下面的
setrlimit命令类似。

`seclabel <安全标签>`
> 在执行此服务之前切换到“seclabel”。主要用于从根文件系统运行的服务,例如ueventd、adbd。位于系统分区上的服务可以根据其文件
安全上下文使用策略定义的转换代替。如果未指定,并且策略中未定义转换,则默认为init上下文。

`setenv <变量名> <值>`
> 在启动的进程中将环境变量_name_设置为_value_。

`shutdown <关机行为>`
> 设置服务进程的关机行为。如果未指定,则在关机过程中使用SIGTERM和SIGKILL终止服务。使用"critical"关机行为的服务在关机期间不
会被终止,直到关机超时。当关机超时时,即使标记为"shutdown critical"的服务也会被终止。如果在关机开始时标记为
"shutdown critical"的服务未运行,则会启动该服务。

`sigstop`
> 在调用exec之前立即向服务发送SIGSTOP信号。这用于调试。关于如何使用该选项的更多信息,请参见下面有关调试的部分。

`socket <名称> <类型> <权限> [ <用户> [ <组> [ <安全标签> ] ] ]`
> 创建名为/dev/socket/_name_的UNIX域套接字,并将其文件描述符传递给启动的进程。_type_必须是"dgram"、"stream"或"seqpacket"。
_type_可以以"+passcred"结尾,以启用套接字上的SO_PASSCRED选项。用户和组默认为0。'seclabel'是套接字的SELinux安全上下文。它默
认为服务的安全上下文,如seclabel中指定的,或根据服务可执行文件的安全上下文计算得出。对于原生可执行文件,请参见
libcutils android\_get\_control\_socket()。

`stdio_to_kmsg`
> 将stdout和stderr重定向到/dev/kmsg_debug。这对于在早期启动期间不使用本机Android日志记录且我们希望捕获其日志消息的服务非常
有用。仅当启用/dev/kmsg_debug时,即仅在userdebug和eng构建上启用时,才会启用此功能。这与console选项互斥,console选项还会将
stdin连接到给定的控制台。

`task_profiles <配置文件> [ <配置文件>* ]`
> 在进程分叉时为进程设置任务配置文件。这旨在取代使用writepid选项将进程移动到cgroup的方法。

`timeout_period <秒数>`
> 提供超时时间,在该时间之后,服务将被终止。在这里,将尊重oneshot关键字,因此一次性服务不会自动重新启动,但其他所有服务都会
重新启动。这对于创建与上面描述的restart_period选项结合使用的周期性服务特别有用。

`updatable`
> 标记服务可以后续被APEX覆盖(通过'override'选项)。具有可更新选项的服务在APEX全部激活之前启动时,执行将会延迟,直到激活完
成。不标记为可更新的服务无法被APEX覆盖。

`user <用户名>`
> 在执行此服务之前切换到'username'。当前默认为root。(???可能应默认为nobody)从Android M版本开始,即使进程需要Linux特
权,也应使用此选项。以前,为了获取Linux特权,进程需要以root身份运行,请求特权,然后切换到所需的uid。这里有一种新的机制,通
过fs\_config允许设备厂商向特定文件系统上的特定二进制文件添加Linux特权。该机制在
<http://source.android.com/devices/tech/config/filesystem.html>上进行了描述。使用此新机制时,进程可以使用user选项选择其
所需的uid,而无需以root身份运行。从Android O开始,进程还可以在其.rc文件中直接请求特权。参见下面的"capabilities"选项。

`writepid <文件> [ <文件>* ]`
> 当进程分叉时,将子进程的pid写入给定的文件。用于cgroup/cpuset。如果未指定/dev/cpuset/下的文件,但系统属性
'ro.cpuset.default'设置为非空的cpuset名称(例如'/foreground'),则pid将写入文件/dev/cpuset/_cpuset\_name_/tasks。
对于将进程移动到cgroup,此选项的使用已过时。请改用task_profiles选项。

触发器
--------
触发器是用来匹配特定类型事件并引发某个动作的字符串。

触发器被分为事件触发器和属性触发器。

事件触发器是由'trigger'命令或在init可执行文件中使用QueueEventTrigger()函数引发的字符串。它们采用简单的字符串形式,比
如'boot'或'late-init'。

属性触发器是在命名属性的值变为给定新值或命名属性的值变为任意新值时引发的字符串。它们采用'property:<name>=<value>'
和'property:<name>=\*'的形式。在init的初始引导阶段,属性触发器还会进行评估并相应地引发。

一个动作可以有多个属性触发器,但只能有一个事件触发器。

例如:
`on boot && property:a=b`定义了一个只有在'boot'事件触发发生且属性a等于b时才执行的动作。

`on property:a=b && property:c=d`定义了一个在以下三种情况下执行的动作:

1. 在初始引导期间,如果属性a=b且属性c=d。
2. 每当属性a从其他值过渡到值b时,而属性c已经等于d。
3. 每当属性c从其他值过渡到值d时,而属性a已经等于b。


触发器顺序
----------------

在早期引导过程中,init使用以下一系列触发器。这些是在init.cpp中定义的内置触发器。

1. `early-init` - 首个触发器,在cgroups被配置之后、ueventd的冷启动完成之前触发。
2. `init` - 冷启动完成后触发。
3. `charger` - 如果`ro.bootmode == "charger"`,则触发。
4. `late-init` - 如果`ro.bootmode != "charger"`,或者通过healthd从充电模式启动,则触发。

剩余的触发器由`init.rc`中配置,并非内置的。这些触发器的默认顺序在`init.rc`的"on late-init"事件下指定。在`init.rc`内部的
动作被省略。

1. `early-fs` - 启动vold。
2. `fs` - Vold已启动。将未标记为first-stage或latemounted的分区挂载。
3. `post-fs` - 配置任何依赖早期挂载的内容。
4. `late-fs` - 挂载被标记为latemounted的分区。
5. `post-fs-data` - 挂载和配置`/data`;设置加密。如果在第一阶段init中无法挂载`/metadata`,则在这里重新格式化。
6. `zygote-start` - 启动Zygote。
7. `early-boot` - 在Zygote启动后。
8. `boot` - 在`early-boot`动作完成后。

命令
----

`bootchart [start|stop]`
> 启动/停止启动图表记录。这些命令在默认的init.rc文件中存在,但仅当文件/data/bootchart/enabled存在时,启动图表记录才会生
效;否则,启动图表记录的start/stop命令不起作用。

`chmod <octal-mode> <path>`
> 更改文件访问权限。

`chown <owner> <group> <path>`
> 更改文件所有者和组。

`class_start <serviceclass>`
> 如果指定类别的所有服务尚未运行,则启动它们。有关启动服务的更多信息,请参阅启动条目。

`class_stop <serviceclass>`
> 如果指定类别的所有服务当前正在运行,则停止并禁用它们。

`class_reset <serviceclass>`
> 如果指定类别的所有服务当前正在运行,则停止它们,但不禁用。稍后可以使用`class_start`命令重新启动它们。

`class_restart [--only-enabled] <serviceclass>`
> 重新启动指定类别的所有服务。如果指定了`--only-enabled`选项,则跳过已禁用的服务。

`copy <src> <dst>`
> 复制文件。与write类似,但适用于二进制/大量数据。关于src文件,不允许从符号链接文件和world-writable或group-writable文件
复制。关于dst文件,如果文件不存在,则创建的默认模式是0600。如果dst文件是一个普通常规文件并且已经存在,则会被截断。

`copy_per_line <src> <dst>`
> 逐行复制文件。与copy类似,但适用于dst是不能处理多行数据的sysfs节点。

`domainname <name>`
> 设置域名。

`enable <servicename>`
> 将禁用的服务变为启用状态,就好像该服务未指定禁用一样。
如果该服务应该在运行,则现在它将被启动。
通常在引导加载程序设置指定特定服务在需要时启动的变量时使用。例如:

on property:ro.boot.myfancyhardware=1
enable my_fancy_service_for_my_fancy_hardware

`exec [ <seclabel> [ <user> [ <group>\* ] ] ] -- <command> [ <argument>\* ]`
> 分支并以给定的参数执行命令。命令在“--”之后开始,以便可以提供可选的安全上下文、用户和辅助组。在此命令完成之前,不会执行其他
命令。_seclabel_可以是“-”表示默认值。属性会在_argument_中展开。
Init会等待分支的进程退出后再继续执行命令。

`exec_background [ <seclabel> [ <user> [ <group>\* ] ] ] -- <command> [ <argument>\* ]`
> 分支并以给定的参数执行命令。这与“exec”命令类似处理。
不同之处在于,对于`exec_background`,init不会在该进程退出之前停止执行命令。

`exec_start <service>`
> 启动给定的服务,并暂停处理其他init命令,直到该服务返回。该命令的功能类似于“exec”命令,但使用现有的服务定义替代exec参数向量。

`export <name> <value>`
> 在全局环境中将环境变量_name_设置为_value_(该变量将被所有在执行此命令后启动的进程继承)

`hostname <name>`
> 设置主机名。

`ifup <interface>`
> 将网络接口_interface_上线。

`insmod [-f] <path> [<options>]`
> 使用指定选项安装_path_处的模块。
-f: 强制安装模块,即使运行的内核版本和编译该模块的内核版本不匹配。

`interface_start <name>`
`interface_restart <name>`
`interface_stop <name>`
> 查找提供接口_name_的服务(如果存在),并在其上分别运行`start`、`restart`或`stop`命令。_name_可以是完全限定的HIDL名称,
格式为`<interface>/<instance>`,也可以是AIDL名称,格式为`aidl/<interface>`,例
如`android.hardware.secure_element@1.1::ISecureElement/eSE1`或`aidl/aidl_lazy_test_1`。

> 注意,这些命令只作用于由`interface`服务选项指定的接口,而不作用于动态注册的接口。

> 这些命令的示例用法:\
`interface_start android.hardware.secure_element@1.1::ISecureElement/eSE1`将启动
提供`android.hardware.secure_element@1.1`和`eSI1`实例的HIDL服务。\
`interface_start aidl/aidl_lazy_test_1`将启动提供`aidl_lazy_test_1`接口的AIDL服务。

`load_exports <path>`
> 打开_path_处的文件,并导出其中声明的全局环境变量。每一行必须按照上述格式`export <name> <value>`。

`load_system_props`
> (此操作已弃用,并且不会执行任何操作。)

`load_persist_props`
> 在/data被解密后加载持久属性。
这在默认的init.rc中包含。

`loglevel <level>`
> 将init的日志级别设置为整数级别,从7(所有日志)到0(仅致命日志)。数字值对应于内核日志级别,但此命令不会影响内核日志级别。
使用`write`命令写入`/proc/sys/kernel/printk`以更改内核日志级别。属性在_level_中展开。

`mark_post_data`
> 用于标记/data挂载后的点。

`mkdir <path> [<mode>] [<owner>] [<group>] [encryption=<action>] [key=<key>]`
> 在_path_处创建目录,可选择使用给定的模式、所有者和组。如果未提供,目录将以权限755创建,并由root用户和root组拥有。如果提供
了该参数,将在目录已存在时更新模式、所有者和组。

> _action_可以是以下之一:
* `None`:不采取加密操作;如果父目录已加密,则目录将被加密。
* `Require`:加密目录,如果加密失败,则中止引导过程。
* `Attempt`:尝试设置加密策略,如果失败继续执行。
* `DeleteIfNecessary`:递归删除必要的目录以设置加密策略。

> _key_可以是以下之一:
* `ref`:使用系统范围的DE密钥
* `per_boot_ref`:使用每次启动时新生成的密钥。

`mount_all [ <fstab> ] [--<option>]`
> 在给定的fs\_mgr格式fstab上调用fs\_mgr\_mount\_all,可选使用选项"early"和"late"。
如果设置了“--early”,init可执行文件将跳过具有“latemount”标志的挂载条目,并触发fs加密状态事件。如果设置了“--late”,init
可执行文件将仅挂载具有“latemount”标志的条目。默认情况下,未设置选项,并且mount\_all将处理给定fstab中的所有条目。
如果未指定fstab参数,则在运行时将扫描fstab.${ro.boot.fstab_suffix}、fstab.${ro.hardware}
或fstab.${ro.hardware.platform},按照/odm/etc、/vendor/etc或/的顺序。

`mount <类型> <设备> <目录> [ <标志>\*] [<选项>]`
> 尝试将指定的设备挂载到目录_dir_上。
_标志_包括"ro"、"rw"、"remount"、"noatime",...
_选项_是一个逗号分隔的字符串,例如,barrier=1,noauto\_da\_alloc

`perform_apex_config`
> 在APEX挂载后执行任务。例如,为已挂载的APEX创建数据目录、解析其配置文件,并更新链接器配置。仅在apexd将`apexd.status`设
置为ready时通知挂载事件时使用。

`restart [--only-if-running] <服务>`
> 停止并重启正在运行的服务,如果服务当前正在重新启动,则不执行任何操作,否则,仅启动服务。如果指定了"--only-if-running",
则只有在服务已经运行时才会重启服务。

`restorecon <路径> [ <路径>\* ]`
> 将名为_path_的文件恢复为文件上指定的安全上下文中的状态。
对于由init.rc创建的目录不需要此操作,因为它们会自动进行正确的标记。

`restorecon_recursive <路径> [ <路径>\* ]`
> 递归地将名为_path_的目录树恢复为文件上指定的安全上下文中的状态。

`rm <路径>`
> 对给定路径调用unlink(2)。如果系统分区已经挂载,可能应该使用
"exec -- rm ..." (provided the system partition is already mounted)。

`rmdir <路径>`
> 对给定路径调用rmdir(2)。

`readahead <文件|目录> [--fully]`
> 对给定的文件或指定目录中的文件调用readahead(2)。使用选项--fully以读取完整的文件内容。

`setprop <名称> <值>`
> 将系统属性_name_的值设置为_value_。属性将在_value_中进行扩展。

`setrlimit <资源> <当前值> <最大值>`
> 设置资源的rlimit。此设置将应用于在限制设置后启动的所有进程。它旨在在init早期进行设置,并应用于全局。
_资源_最好使用其文本表示('cpu'、'rtio'等)或'RLIM_CPU'、'RLIM_RTIO'等表示。也可以将其指定为资源枚举对应的整数值。
_当前值_和_最大值_可以设置为'unlimited'或'-1',表示无限制的rlimit。

开始<service>
通过启动服务来运行,如果服务尚未运行。
请注意,这不是同步的,即使是同步的,也不能保证操作系统的调度程序会执行足够的次数来保证服务的状态。
有关同步版本的"start"命令,请参阅"exec_start"命令。

这带来了一个重要的结果,如果服务向其他服务提供功能,例如提供通信通道,那么仅仅在那些服务之前启动此服务是不足以保证在那些服务
请求它之前已经建立了通道的。必须有一种单独的机制来做出任何这样的保证。

停止<service>
如果服务当前正在运行,则停止运行。

swapon_all [<fstab>]
在给定的fstab文件上调用fs_mgr_swapon_all命令。
如果没有指定fstab参数,则会在/odm/etc、/vendor/etc或/根目录下以fstab.${ro.boot.fstab_suffix}、fstab.${ro.hardware}
或fstab.${ro.hardware.platform}的顺序进行扫描。

symlink <target> <path>
在路径_path_上创建一个带有值_target_的符号链接。

sysclktz <minutes_west_of_gmt>
设置系统时钟基准(如果系统时钟在GMT中嘀嗒,则为0)

trigger <event>
触发一个事件。用于将一个动作排队从另一个动作中执行。

umount <path>
卸载位于该路径的文件系统。

umount_all [<fstab>]
在给定的fstab文件上调用fs_mgr_umount_all命令。
如果没有指定fstab参数,则会在/odm/etc、/vendor/etc或/根目录下以fstab.${ro.boot.fstab_suffix}、fstab.${ro.hardware}
或fstab.${ro.hardware.platform}的顺序进行扫描。

verity_update_state
用于更新dm-verity状态并设置由adb remount使用的partition._mount-point_.verified属性的内部实现细节,因为fs_mgr不能直接设
置这些属性。这是自Android 12以来所需的,因为CtsNativeVerifiedBootTestCases将读取属性
"partition.${partition}.verified.hash_alg"以检查是否使用了sha1。有关更多详情,请参见https://r.android.com/1546980。

wait <path> [<timeout>]
轮询给定文件的存在,直到找到为止,或者超时已达到。如果未指定超时时间,默认为五秒。超时值可以是小数秒,以浮点数表示法指定。

wait_for_prop <name> <value>
等待系统属性_name_的值为_value_。_value_中的属性将被展开。如果属性_name_已经设置为_value_,则立即继续。

write <path> <content>
打开位于路径_path_的文件,并使用write(2)将字符串写入其中。
如果文件不存在,则会创建文件。如果文件已存在,则会将其截断。_content_中的属性将被展开。

导入
-------
`import <路径>`
> 解析一个init配置文件,扩展当前的配置。
如果`路径`是一个目录,则会解析目录中的每个文件作为配置文件。这是非递归的,嵌套目录不会被解析。

import关键字不是一个命令,而是它自己的部分,即它不会作为一个动作的一部分发生,而是在解析文件时处理导入,并遵循以下逻辑。

只有三种情况下,init可执行程序会导入.rc文件:

1. 当它在初始启动时导入`/system/etc/init/hw/init.rc`或由属性`ro.boot.init_rc`指示的脚本时。
2. 当它在导入`/system/etc/init/hw/init.rc`之后立即导入`/{system,system_ext,vendor,odm,product}/etc/init/`。
3. (不推荐使用)当它在mount_all期间导入/{system,vendor,odm}/etc/init/或.rc文件时,
不允许在Q之后启动的设备使用。

文件的导入顺序因遗留原因而稍微复杂。以下是保证的:

1. 首先,解析`/system/etc/init/hw/init.rc`,然后递归解析它的每个导入文件。
2. `/system/etc/init/`的内容按字母顺序排序并顺序解析,每个文件解析后递归进行导入。
3. 对`/system_ext/etc/init`,`/vendor/etc/init`,`/odm/etc/init`,`/product/etc/init`执行步骤2。

下面的伪代码可以更清楚地解释这个问题:

fn Import(文件)
解析(文件)
for (导入 : 文件.导入)
导入(导入)

导入(/system/etc/init/hw/init.rc)
目录 = [/system/etc/init, /system_ext/etc/init, /vendor/etc/init, /odm/etc/init, /product/etc/init]
for (目录 : 目录)
文件 = <按目录内容的字母顺序排序>
for (文件 : 文件)
导入(文件)

动作按照解析顺序执行。例如,在`/system/etc/init/hw/init.rc`中的`post-fs-data`动作总是按照它们在文件中出现的顺序执行。
然后,按导入的顺序执行`/system/etc/init/hw/init.rc`的导入中的`post-fs-data`动作,依此类推。

属性
------
Init提供以下属性的状态信息。

`init.svc.<名称>`
> 一个命名服务的状态("stopped","stopping","running","restarting")

`dev.mnt.dev.<挂载点>`,`dev.mnt.blk.<挂载点>`,`dev.mnt.rootdisk.<挂载点>`
> 与*挂载点*关联的块设备基本名称。
*挂载点*将/替换为.,如果引用根挂载点"/",则使用"/root"。
`dev.mnt.dev.<挂载点>`表示附加到文件系统的块设备。
(例如,使用`${dev.mnt.dev.<挂载点>}`/sys/fs/ext4/来访问)

`dev.mnt.blk.<挂载点>`表示上述块设备的磁盘分区。
(例如,使用`/sys/class/block/${dev.mnt.blk.<挂载点>}`来访问)

`dev.mnt.rootdisk.<挂载点>`表示包含上述磁盘分区的根磁盘。
(例如,使用`/sys/class/block/${dev.mnt.rootdisk.<挂载点>}/queue`来访问)

Init会响应以`ctl.`开头的属性。这些属性的格式为`ctl.[<target>_]<command>`,系统属性的_value_将用作参数。
_target_是可选的,指定_value_应与哪个服务选项匹配。_target_只有一个选项,即`interface`,表示_value_将引用服务提供的接口,
而不是服务名称本身。

例如:

`SetProperty("ctl.start", "logd")` 将在 `logd` 上运行 `start` 命令。

`SetProperty("ctl.interface_start", "aidl/aidl_lazy_test_1")` 将在公开 `aidl aidl_lazy_test_1` 接口的服务上运行
`start` 命令。

请注意,这些属性只是可设置的,当读取时它们没有值。

以下是 _commands_。

`start` \
`restart` \
`stop` \
这等效于在由属性的 _value_ 指定的服务上使用 `start`、`restart` 和 `stop` 命令。

`oneshot_on` 和 `oneshot_off` 将打开或关闭由属性的 _value_ 指定的服务的 _oneshot_ 标志。这特别适用于条件上懒加载硬件抽
象层 (HAL) 的服务。当它们是懒加载 HAL 时,oneshot 必须开启,否则 oneshot 应该关闭。

`sigstop_on` 和 `sigstop_off` 将打开或关闭由属性的 _value_ 指定的服务的 _sigstop_ 功能。有关此功能的更多详细信息,请参阅
下面的 _Debugging init_ 部分。

引导时间
-----------
Init 在系统属性中记录了一些引导时间信息。

`ro.boottime.init`
> 使用 CLOCK_BOOTTIME 时钟以纳秒为单位记录的启动后阶段 init 开始的时间。

`ro.boottime.init.first_stage`
> 运行第一阶段所需的时间,以纳秒为单位。

`ro.boottime.init.selinux`
> 运行 SELinux 阶段所需的时间,以纳秒为单位。

`ro.boottime.init.modules`
> 加载内核模块所需的时间,以毫秒为单位。

`ro.boottime.init.cold_boot_wait`
> init 等待 ueventd 的冷启动阶段结束的时间,以毫秒为单位。

`ro.boottime.<service-name>`
> 服务首次启动后的时间,以 CLOCK_BOOTTIME 时钟为单位,以纳秒表示。

Bootcharting
------------
这个版本的init包含有执行“bootcharting”的代码:生成日志文件,可以在之后使用<http://www.bootchart.org/>提供的工具进行处理。

在模拟器上,使用-bootchart _timeout_选项激活bootcharting功能,持续_timeout_秒。

在设备上:

adb shell 'touch /data/bootchart/enabled'

完成数据收集后,请不要忘记删除此文件!

日志文件将被写入到/data/bootchart/。提供了一个脚本来检索这些文件并创建一个可以与bootchart命令行工具一起使用的bootchart.tgz
文件:

sudo apt-get install pybootchartgui
# grab-bootchart.sh使用$ANDROID_SERIAL。
$ANDROID_BUILD_TOP/system/core/init/grab-bootchart.sh

需要注意的一点是,bootchart将显示init从0秒开始运行。您需要查看dmesg来确定内核实际上何时启动init。

比较两个bootchart
------------------------
一个方便的脚本名为compare-bootcharts.py用于比较所选进程的开始/结束时间。上述的grab-bootchart.sh将
在/tmp/android-bootchart下留下一个名为bootchart.tgz的bootchart tarball。如果在主机上的不同目录下保存了两个这
样的tarballs,脚本可以列出时间戳的差异。例如:

用法:system/core/init/compare-bootcharts.py _base-bootchart-dir_ _exp-bootchart-dir_

进程:基准 实验 (增量) - 单位为ms(系统上的jiffy是10ms)
------------------------------------
/init: 50 40 (-10)
/system/bin/surfaceflinger: 4320 4470 (+150)
/system/bin/bootanimation: 6980 6990 (+10)
zygote64: 10410 10640 (+230)
zygote: 10410 10640 (+230)
system_server: 15350 15150 (-200)
bootanimation ends at: 33790 31230 (-2560)

Systrace
--------
在userdebug或eng构建上,可以使用Systrace (<http://developer.android.com/tools/help/systrace.html>) 获取在启动过程中
的性能分析报告。

以下是“wm”和“am”类别的示例跟踪事件:

$ANDROID_BUILD_TOP/external/chromium-trace/systrace.py \
wm am --boot

该命令将导致设备重新启动。设备重新启动并完成启动顺序后,通过按Ctrl+C从设备获取跟踪报告,并将其作为trace.html写入主机。

限制:记录跟踪事件是在加载持久属性之后开始的,因此不记录在那之前发出的跟踪事件。一些服务,如vold、surfaceflinger和
servicemanager受到此限制的影响,因为它们在加载持久属性之前启动。Zygote初始化和从Zygote派生的进程不受影响。

调试初始化
--------------
当一个服务从init启动时,可能会无法`execv()`该服务。这种情况并不常见,可能是由于新服务启动时链接器发生错误引起的。Android中的
链接器将其日志打印到`logd`和`stderr`中,因此它们可以在`logcat`中看到。如果在访问`logcat`之前遇到错误,可以使
用`stdio_to_kmsg`服务选项将链接器打印到`stderr`中的日志导向到`kmsg`,然后可以通过串口读取这些日志。

不建议在没有init的情况下启动init服务,因为init设置了大量环境(用户、组、安全标签、能力等),很难手动复制。

如果需要从服务的起始位置开始调试,可以添加`sigstop`服务选项。该选项将在调用exec之前立即发送SIGSTOP给服务。在继续使用SIGCONT
继续服务之前,开发者可以通过附加调试器、strace等进行调试。

该标志也可以通过ctl.sigstop_on和ctl.sigstop_off属性动态控制。

以下是通过上述方法动态调试logd的示例:

stop logd
setprop ctl.sigstop_on logd
start logd
ps -e | grep logd
> logd 4343 1 18156 1684 do_signal_stop 538280 T init
gdbclient.py -p 4343
b main
c
c
c
> Breakpoint 1, main (argc=1, argv=0x7ff8c9a488) at system/core/logd/main.cpp:427

以下是使用strace进行相同操作的示例:

stop logd
setprop ctl.sigstop_on logd
start logd
ps -e | grep logd
> logd 4343 1 18156 1684 do_signal_stop 538280 T init
strace -p 4343

(从另一个Shell执行)
kill -SIGCONT 4343

> strace运行

主机Init脚本验证
-----------------------------
在构建时会检查Init脚本的正确性。具体检查如下所示。

1) 格式良好的action、service和import部分,例如没有在'import'语句之后多余的行,没有在'on'行之前的动作。
2) 所有命令都映射到有效的关键词,并且参数计数在正确范围内。
3) 所有服务选项都是有效的。这比命令检查更严格,因为服务选项的参数会完全解析,例如需要解析UID和GID。

还有一些Init脚本的其他部分是仅在运行时解析的,因此在构建时不会进行检查,其中包括以下内容。

1) 命令的参数的有效性,例如不会检查文件路径是否存在,SELinux是否允许操作,以及UID和GID是否可解析。
2) 不会检查服务是否存在或是否定义了有效的SELinux域。
3) 不会检查服务是否在其他Init脚本中已经定义。

早期Init引导顺序
------------------------
早期Init引导顺序分为三个阶段:第一阶段init、SELinux设置、第二阶段init。

第一阶段init负责设置加载系统的最低要求。具体包括挂载/dev、/proc,挂载'early mount'分区(需要包括包含系统代码的所有分区,
例如system和vendor),并将system.img挂载到/(对于使用ramdisk的设备)。

需要注意的是,在Android Q中,system.img始终包含TARGET_ROOT_OUT,并且总是在第一阶段init完成时挂载到/。Android Q还需要动态
分区,因此需要使用ramdisk引导Android。还可以使用恢复ramdisk来引导到Android,而不是使用专用的ramdisk。

根据设备配置的不同,第一阶段init有三个变种:
1) 对于system-as-root设备,第一阶段init是/system/bin/init的一部分,而/init是一个指向/system/bin/init的符号链接,以向后兼
容。这些设备不需要执行任何操作来挂载system.img,因为根据定义,它已经被内核作为根文件系统挂载。

2) 对于具有ramdisk的设备,第一阶段init是位于/init的静态可执行文件。这些设备将system.img挂载为/system,然后通过切换根操作将
挂载点从/system移动到/。挂载完成后,ramdisk的内容被释放。

3) 对于使用恢复模式作为ramdisk的设备,在恢复ramdisk中的/shared init中包含了第一阶段init。这些设备首先切换根目录到
/first_stage_ramdisk,以从环境中删除恢复组件,然后像第二种情况一样继续处理。注意,决定正常启动到Android而不是启动到恢复模
式时,是通过内核命令行中是否存在androidboot.force_normal_boot=1或在Android S及更高版本中的bootconfig中指定。

第一阶段init完成后,它会使用"selinux_setup"参数执行/system/bin/init。此阶段是可选地编译和加载SELinux到系统上。有关此过程
的详细信息,请参阅selinux.cpp。

最后,一旦该阶段完成,它会再次使用"second_stage"参数执行/system/bin/init。此时,主要的init阶段运行,并通过init.rc脚本继续
引导过程。

一. 什么是线程?

这个基本不用多说了吧,学过编程的都知道,但还是简单介绍以下。线程是CPU调度的最小单位,被包含在进程之中,拥有自己的栈空间,和进程共享堆等其他资源,所以在多线程环境中存在线程同步,互斥等问题。

小知识点

其实在Linux中,新建的线程并不是在原先的进程中,而是系统通过一个系统调用clone( )。该系统调用copy了一个和原先进程完全一样的进程,并在这个进程中执行线程函数。不过这个copy过程和fork不一样。 copy后的进程和原先的进程共享了所有的变量,运行环境。这样,原先进程中的变量变动在copy后的进程中便能体现出来。

提示

本次课程使用ubuntu 环境 、vim编辑器

编译命令:

1
2
3
4
5
6
7
8
#man xx linux方法使用说明
man pthread_create
#编译c文件 编译线程加-lpthread
gcc xxx.c -lpthread
# 执行
./a.out
#strerror(xx)将错误码翻译成字符串
strerror(ret)or(xx)

二. 线程的创建函数pthread_create

用于创建一个线程,对应进程中就是fork函数。

1
2
3
4
5
6
7
8
9
10
11
12
13
14
15
16
17
#man xx linux查询xx方法使用说明
man pthread_create

#include <pthread.h>
int pthread_create(pthread_t *tidp,const pthread_attr_t *attr, void *(*start_rtn)(void*),void *arg);

// 若线程创建成功,则返回0。若线程创建失败,则返回出错编号,并且*thread中的内容是未定义的。
// 返回成功时,由tidp指向的内存单元被设置为新创建线程的线程ID.attr参数用于指定各种不同的线程属性。新创建的线程从start_rtn函
//数的地址开始运行,该函数只有一个万能指针参数arg,如果需要向start_rtn函数传递的参数不止一个,那么需要把这些参数放到一个结构
//中,然后把这个结构的地址作为arg的参数传入。
// 失败返回errno

// 参数
// 第一个参数为指向线程标识符的指针。
// 第二个参数用来设置线程属性。
// 第三个参数是线程运行函数的起始地址。
// 最后一个参数是运行函数的参数。

例子:

1
2
3
4
5
6
7
8
9
10
11
12
13
14
15
16
17
18
19
20
21
22
23
24
#include <stdio.h>
#include <stdlib.h>
#include <pthread.h>
#include <errno.h>
#include <unistd.h>
#include <string.h>
void *func(void *arg){
printf("func------------------\n");
}

int main(int argc, const char *argv[])
{
pthread_t tid;
int ret = pthread_create(&tid, NULL, func, NULL);
if (ret != 0){
//fprintf打印
fprintf(stderr, "pthread_create error: %s\n", strerror(ret));
return 1;
}
//不加休眠就直接运行结束了,不会显示打印的日志
sleep(3);
return 0;
}

三. 线程ID获取函数pthread_self

进程有进程ID,用getpid()。线程同样也有线程ID,对应的函数就是pthread_self函数,用来获取当前线程ID

1
2
3
4
#include <pthread.h>
// 返回值:成功线程ID;失败:其他
pthread_t pthread_self();

例子:

1
2
3
4
5
6
7
8
9
10
11
12
13
14
15
16
17
18
19
20
21
22
23
24
25
26
27
28
#include <stdio.h>
#include <stdlib.h>
#include <pthread.h>
#include <errno.h>
#include <unistd.h>
#include <string.h>

void *func(void *arg){
printf("child pthread: pid = %d tid = %ld\n", getpid(), pthread_self());
printf("func------------------\n");
}

int main(int argc, const char *argv[])
{

pthread_t tid;
int ret = pthread_create(&tid, NULL, func, NULL);
if (ret != 0){
fprintf(stderr, "pthread_create error: %s\n", strerror(ret));
return 1;
}

printf("main thread: pid = %d tid = %ld\n", getpid(), pthread_self());

sleep(3);
return 0;
}

四. 线程退出函数pthread_exit函数

线程通过调用pthread_exit函数终止执行,就如同进程在结束时调用exit函数一样。这个函数的作用是,终止调用它的线程并返回一个指向某个对象的指针。

1
void pthread_exit(void* retval);

例子:

1
2
3
4
5
6
7
8
9
10
11
12
13
14
15
16
17
18
19
20
21
22
23
24
25
26
27
28
29
30
31
32
33
34
35
36
37
38
39
40
41
42
43
44
45
46
47
48
49
50
51
52
53
54
#include <stdio.h>
#include <stdlib.h>
#include <pthread.h>
#include <errno.h>
#include <unistd.h>
#include <string.h>


void testxxx()
{

// ...
printf("need exit............. [%s][%d] \n", __func__, __LINE__);
pthread_exit((void *)100);
}


int test_return(){

// ....
printf("need exit ...........................[%s][%d]\n", __func__, __LINE__);
return 100;

}

void *func(void *arg){
printf("child pthread: pid = %d tid = %ld\n", getpid(), pthread_self());
printf("func------------------\n");
test_return();
testxxx();

printf("xxxxxxxxxxxxxxxxxxxxxxxxxxxxxxxxxxxxxx\n");
}


int main(int argc, const char *argv[])
{

pthread_t tid;
int ret = pthread_create(&tid, NULL, func, NULL);
if (ret != 0){
fprintf(stderr, "pthread_create error: %s\n", strerror(ret));
return 1;
}

printf("main thread: pid = %d tid = %ld\n", getpid(), pthread_self());

// sleep(3);

pthread_exit((void *)0);

return 0;
}

五. pthread_join函数

等待线程的结束,线程间同步的操作。以阻塞的方式等待thread指定的线程结束。当函数返回时,被等待线程的资源被收回。如果线程已经结束,那么该函数会立即返回。并且thread指定的线程必须是joinable的。

1
2
3
4
5
 int pthread_join(pthread_t thread, void **retval);

// 参数 :thread: 线程标识符,即线程ID,标识唯一线程。
// retval: 用户定义的指针,用来存储被等待线程的返回值。
// 返回值 : 0代表成功。 失败,返回的则是errno。
1
2
3
4
5
6
7
8
9
10
11
12
13
14
15
16
17
18
19
20
21
22
23
24
25
26
27
28
29
30
31
32
33
34
35
36
37
38
39
40
41
42
43
44
45
46
47
48
49
50
51
52
53
54
55
56
57
58
59
60
61
62
63
#include <stdio.h>
#include <stdlib.h>
#include <pthread.h>
#include <errno.h>
#include <unistd.h>
#include <string.h>


void testxxx()
{
// ...
printf("need exit............. [%s][%d] \n", __func__, __LINE__);
pthread_exit((void *)100);
}


int test_return(){

// ....
printf("need exit ...........................[%s][%d]\n", __func__, __LINE__);
return 100;

}

void *func(void *arg){
printf("child pthread: pid = %d tid = %ld\n", getpid(), pthread_self());
printf("func------------------\n");
test_return();
testxxx();

printf("xxxxxxxxxxxxxxxxxxxxxxxxxxxxxxxxxxxxxx\n");
}


int main(int argc, const char *argv[])
{

pthread_t tid;
int ret = pthread_create(&tid, NULL, func, NULL);
if (ret != 0){
fprintf(stderr, "pthread_create error: %s\n", strerror(ret));
return 1;
}

printf("main thread: pid = %d tid = %ld\n", getpid(), pthread_self());

// sleep(3);

int r;
ret = pthread_join(tid, &r);
if (0 != ret){
fprintf(stderr, "pthread_join error: %s\n", strerror(ret));
}else{

printf("r = %d\n", (int)r);

}

printf("main end\n");

return 0;
}

六. pthread_cancel函数

终止一个线程

1
2
3
int pthread_cancel(pthread_t thread);
// 参数:线程标识符,即线程ID,标识唯一线程。
// 返回值:0代表成功。 失败,返回的则是errno。

例子:

1
2
3
4
5
6
7
8
9
10
11
12
13
14
15
16
17
18
19
20
21
22
23
24
25
26
27
28
29
30
31
32
33
34
35
36
37
38
39
40
41
42
43
44
45
46
47
48
49
50
51
52
53
54
55
56
#include <stdio.h>
#include <stdlib.h>
#include <pthread.h>
#include <errno.h>
#include <unistd.h>
#include <string.h>

void *func(void *arg){
while(1){
printf("child pthread: pid = %d tid = %ld\n", getpid(), pthread_self());

sleep(1);
}
return NULL;
}


void *fun_1(void *arg){
while(1){
pthread_testcancel();
}
return (void *)111;
}


int main(int argc, const char *argv[])
{

pthread_t tid;
// int ret = pthread_create(&tid, NULL, func, NULL);
int ret = pthread_create(&tid, NULL, fun_1, NULL);
if (ret != 0){
fprintf(stderr, "pthread_create error: %s\n", strerror(ret));
return 1;
}

printf("main thread: pid = %d tid = %ld\n", getpid(), pthread_self());
sleep(3);
ret = pthread_cancel(tid);
if (0 != ret){
fprintf(stderr, "pthread_cancel error: %s\n", strerror(ret));
}

sleep(1);
int r;
ret = pthread_join(tid, &r);
if (0 != ret){
fprintf(stderr, "pthread_join error: %s\n", strerror(ret));
}else{
printf("r = %d\n", r);
}

printf("main end\n");

return 0;
}

小提示

必须要有系统调用,线程必须到达一个取消点才可以杀死线程。可以主动添加一个取消点:pthread_testcancel();

七. pthread_detach函数

线程分离函数,线程结束后,直接自动释放,不用主动回收。

1
2
3
int pthread_detach(pthread_t thread);
// 参数:线程标识符,即线程ID,标识唯一线程。
// 返回值:0代表成功。 失败,返回的则是errno。

例子:

1
2
3
4
5
6
7
8
9
10
11
12
13
14
15
16
17
18
19
20
21
22
23
24
25
26
27
28
29
30
31
32
33
34
35
36
37
38
39
40
41
42
43
44
45
46
47
48
#include <stdio.h>
#include <stdlib.h>
#include <pthread.h>
#include <errno.h>
#include <unistd.h>
#include <string.h>

void *func(void *arg){

int count = 0;
while(1){
if (count == 10){
printf("-----------------------------------\n");
return NULL;
}
printf("child pthread: pid = %d tid = %ld\n", getpid(), pthread_self());

sleep(1);
count ++;
}
return NULL;
}

int main(int argc, const char *argv[])
{

pthread_t tid;
int ret = pthread_create(&tid, NULL, func, NULL);
if (ret != 0){
fprintf(stderr, "pthread_create error: %s\n", strerror(ret));
return 1;
}

ret = pthread_detach(tid);
if (ret != 0){
fprintf(stderr, "pthread_detach error: %s\n", strerror(ret));
}

ret = pthread_join(tid, NULL);
if (ret != 0){
fprintf(stderr, "pthread_join error: %s\n", strerror(ret));
}
printf("main thread: pid = %d tid = %ld\n", getpid(), pthread_self());

pthread_exit((void *)0);
return 0;
}

八. 线程属性pthread_attr_t

做简单了解:通过线程属性设置线程分离

1
2
3
4
5
6
7
8
9
10
11
12
13
14
15
16
17
18
19
20
21
22
23
24
25
26
27
28
29
30
31
32
typedef struct{
int etachstate; // 线程的分离状态
int schedpolicy; // 线程的调度策略
struct sched_param schedparam; // 线程的调度参数
int inheritsched; // 线程的继承性
int scope; // 线程的作用域
size_t guardsize; // 线程栈末尾的警戒缓冲区大小
int stackaddr_set; // 线程的栈设置
void * stackaddr; // 线程栈的位置
size_t stacksize; // 线程栈大小
}pthread_attr_t;


// 线程属性初始化: 成功:0 失败:errno
int pthread_attr_init(pthread_attr_t *attr);
// 销毁线程属性所占用的资源: 成功0 失败:errno
int pthread_attr_destroy(pthread_attr_t *attr);

// 设置线程属性:是否分离
int pthread_attr_setdetachstate(pthread_attr_t *attr, int detachstate);
// 获取线程属性:是否分离
int pthread_attr_getdetachstate(pthread_attr_t *attr, int *detachstate);


// detachstate:
// PTHREAD_CREATE_DETACHED: 分离线程
// PTHREAD_CREATE_JOINABLE: 非分离线程


例子:

1
2
3
4
5
6
7
8
9
10
11
12
13
14
15
16
17
18
19
20
21
22
23
24
25
26
27
28
29
30
31
32
33
34
35
36
37
38
39
40
41
42
43
44
45
46
47
48
49
50
51
52
53
54
55
56
57
58
59
60
61
62
63
64
#include <stdio.h>
#include <stdlib.h>
#include <pthread.h>
#include <errno.h>
#include <unistd.h>
#include <string.h>

void *func(void *arg){

int count = 0;
while(1){
if (count == 10){
printf("-----------------------------------\n");
return NULL;
}
printf("child pthread: pid = %d tid = %ld\n", getpid(), pthread_self());

sleep(1);
count ++;
}
return NULL;
}

int main(int argc, const char *argv[])
{

pthread_t tid;

int ret;
pthread_attr_t attr;
ret = pthread_attr_init(&attr);
if (ret != 0){
fprintf(stderr, "pthread_attr_init error: %s\n", strerror(ret));
}

ret = pthread_attr_setdetachstate(&attr, PTHREAD_CREATE_DETACHED);
if (ret != 0){
fprintf(stderr, "pthread_attr_setdetachstate error: %s\n", strerror(ret));
}


ret = pthread_create(&tid, &attr, func, NULL);
if (ret != 0){
fprintf(stderr, "pthread_create error: %s\n", strerror(ret));
return 1;
}

ret = pthread_detach(tid);
if (ret != 0){
fprintf(stderr, "pthread_detach error: %s\n", strerror(ret));
}

ret = pthread_join(tid, NULL);
if (ret != 0){
fprintf(stderr, "pthread_join error: %s\n", strerror(ret));
}
printf("main thread: pid = %d tid = %ld\n", getpid(), pthread_self());

pthread_exit((void *)0);
return 0;
}

一、说明
这里介绍的函数大多是 NDK 开发中常用的函数,但并不是全部,内容稍多,基本可以满足我们的开发需求了,建议通过目录索引来找需要了解的。
这里的函数都是 JNIEnv 操作的相关函数,JNI_OnLoad 等 JavaVM 的方法不在这里介绍。
JNI 有 C、C++ 两种代码风格,即:

1
2
C风格:(*env)->NewStringUTF(env, "Hellow World!");
C++风格:env->NewStringUTF("Hellow World!");

这里我们使用 C++ 风格作为示例。

二、获取版本

  1. jint GetVersion()
    说明:获取当前 JNI 的版本号
    返回值:
1
2
3
4
#define JNI_VERSION_1_1 0x00010001
#define JNI_VERSION_1_2 0x00010002
#define JNI_VERSION_1_4 0x00010004
#define JNI_VERSION_1_6 0x00010006

三、类操作

  1. jclass FindClass(const char* name)
    说明:根据类的全路径找到相应的 jclass 对象
    参数:
  • name:类的全路径,例如 “Ljava/lang/String;”
    示例:
1
jclass mStringClass = env->FindClass("Ljava/lang/String;");
  1. jclass GetSuperclass(jclass clazz)
    说明:返回一个类的父类,如果 clazz 是 Object 类,没有父类,那么将返回 NULL
    参数:
  • jclazz:当前类对象
    示例:
1
jclass clazz = env->GetSuperclass(mStringClass); // clazz is Ljava/lang/Object;
  1. jboolean IsAssignableFrom(jclass clazz1, jclass clazz2)
    说明:判断类1是否可以安全的强制转换类2
    参数:
  • clazz1:类1
  • clazz2:类2

四、对象操作

  1. jobject AllocObject(jclass clazz)
    说明:不调用构造方法创建实例
    参数:
  • clazz:指定对象的类
  1. jobject NewObject(jclass clazz, jmethodID methodID, …)
  2. jobject NewObjectA(jclass clazz, jmethodID methodID, jvalue* args)
  3. jobject NewObjectV(jclass clazz, jmethodID methodID, va_list args)
    说明:使用指定的构造方法创建类的实例,唯一不同的是输入参数的传入形式不同
    参数:
  • clazz:指定对象的类

  • methodID:指定的构造方法

  • args:输入参数列表

    示例:

    1
    2
    3
    jclass rect_clazz = env->FindClass("android/graphics/Rect");
    jmethodID rect_constructor = env->GetMethodID(rect_clazz, "<init>", "()V");
    jobject rect = env->NewObject(rect_clazz, rect_constructor);
  1. jclass GetObjectClass(jobject obj)
    说明:根据对象获取所属类
    参数:
  • obj:某个 Java 对象实例,不能为 NULL
  1. jobjectRefType GetObjectRefType(jobject obj)
    说明:获取到对象的引用类型,JNI 1.6 新增的方法

参数:

  • obj:某个 Java 对象实例
    返回:

    JNIInvalidRefType = 0 // 该 obj 是个无效的引用
    JNILocalRefType = 1 // 该 obj 是个局部引用
    JNIGlobalRefType = 2 // 该 obj 是个全局引用
    JNIWeakGlobalRefType = 3 // 该 obj 是个全局的弱引用

  1. jboolean IsInstanceOf(jobject obj, jclass clazz)
    说明:判断某个对象是否是指定类的实例
    参数:
  • obj:某个 Java 对象实例
  • clazz:指定的类对象
  1. jboolean IsSameObject(jobject ref1, jobject ref2)
    说明:判断两个对象的引用是否指向的是相同的 Java 对象
    参数:
  • ref1:某个 Java 对象的引用1
  • ref2:某个 Java 对象的引用2

五、域操作

  1. jfieldID GetFieldID(jclass clazz, const char name, const char sig)
    说明:获取类中某个非静态成员变量的ID(域ID)
    参数:
  • clazz:指定对象的类

  • name:这个域(Field)在 Java 类中定义的名字

  • sig:这个域(Field)的类型描述符
    示例:

    1
    2
    3
    4
    5
    jclass clazz = env->FindClass("android/graphics/Rect");
    jfieldID left_field = env->GetFieldID(clazz, "left", "I");
    jfieldID top_field = env->GetFieldID(clazz, "top", "I");
    jfieldID right_field = env->GetFieldID(clazz, "right", "I");
    jfieldID bottom_field = env->GetFieldID(clazz, "bottom", "I");
  1. NativeType Get<type>Field(jobject obj, jfieldID fieldID)
    说明:获取实例域的变量值,这里 type 表示的是一系列方法,如下:
GetField Routine Name Native Type
GetObjectField() jobject
GetBooleanField() jboolean
GetByteField() jbyte
GetCharField() jchar
GetShortField() jshort
GetIntField() jint
GetLongField() jlong
GetFloatField() jfloat
GetDoubleField() jdouble

参数:

  • obj:某个 Java 对象实例

  • fieldID:这个变量的域ID
    示例:

    1
    2
    3
    4
    jobject rect; // 初始化过程省略
    jclass clazz = env->FindClass("android/graphics/Rect");
    jfieldID left_field = env->GetFieldID(clazz, "left", "I");
    jint left = env->GetIntField(rect, left_field);
  1. void Set<type>Field(jobject obj, jfieldID fieldID, NativeType value)
    说明:修改实例域的变量值,这里 type 对应上面的 Get 方法,不再累述
    参数:
  • obj:需要修改的 Java 对象实例

  • fieldID:这个变量的域ID

  • value:需要设置的值
    示例:

    1
    2
    3
    4
    jobject rect; // 初始化过程省略
    jclass clazz = env->FindClass("android/graphics/Rect");
    jfieldID left_field = env->GetFieldID(clazz, "left", "I");
    env->SetIntField(rect, left_field, 1);
  1. jfieldID GetStaticFieldID(jclass clazz, const char name, const char sig)
    说明:同 GetFieldID,只不过这里操作的是静态的域(Filed)

  2. NativeType GetStaticField(jobject obj, jfieldID fieldID)
    说明:同 GetField,只不过这里操作的是静态的域(Filed)

  3. void SetStaticField(jobject obj, jfieldID fieldID, NativeType value)
    说明:同 SetField,只不过这里操作的是静态的域(Filed)

六、方法操作

  1. jmethodID GetMethodID(jclass clazz, const char name, const char sig)
    说明:获取类中某个非静态方法的ID

参数:

  • clazz:指定对象的类
  • name:这个方法在 Java 类中定义的名称,构造方法为 ““
  • sig:这个方法的类型描述符,例如 “()V”,其中括号内是方法的参数,括号后是返回值类型
    示例:

Java 的类定义如下:

1
2
3
4
5
6
7
8
9
10
package com.afei.jnidemo;

class Test {
public Test(){}
public int show(String msg, int number) {
System.out.println("msg: " + msg);
System.out.println("number: " + number);
return 0;
}
}

JNI 调用如下:

1
2
3
jclass clazz = env->FindClass("com/afei/jnidemo/Test");
jmethodID constructor_method = env->GetMethodID(clazz, "<init>", "()V");
jmethodID show_method = env->GetMethodID(clazz, "show", "(Ljava/lang/String;I)I");

​ 签名时其中括号内是方法的参数,括号后是返回值类型。例如 show 方法,第一个参数是 String 类,对应 Ljava/lang/String;(注意后面有一个分号),第二个参数是 int 基本类型,对应的类型描述符是 I,返回值也是 int,同样是 I,所以最终该方法的签名为 “(Ljava/lang/String;I)I”。

  1. NativeType CallMethod(jobject obj, jmethodID methodID, …)
  2. NativeType CallMethodA(jobject obj, jmethodID methodID, jvalue* args)
  3. NativeType CallMethodV(jobject obj, jmethodID methodID, va_list args)
    说明:调用对象的某个方法,唯一不同的是输入参数的传入形式不同,这里 type 表示的是一系列方法,如下:

image-20231123153835482

参数:

  • obj:某个 Java 对象实例

  • methodID:指定方法的ID

  • args:输入参数列表
    示例:

    1
    2
    3
    jclass clazz = env->FindClass("com/afei/jnidemo/Test");
    jmethodID show_method = env->GetMethodID(clazz, "show", "(Ljava/lang/String;I)I");
    jint result = env->CallIntMethod(clazz, show_method, "Hello JNI!", 0);
  1. jmethodID GetStaticMethodID(jclass clazz, const char name, const char sig)
    说明:同 GetMethodID,只不过操作的是静态方法

  2. NativeType CallStaticMethod(jclass clazz, jmethodID methodID, …)

  3. NativeType CallStaticMethodA(jclass clazz, jmethodID methodID, jvalue* args)

  4. NativeType CallStaticMethodV(jclass clazz, jmethodID methodID, va_list args)
    说明:同 NativeType CallMethod,只不过操作的是静态方法,参数也由 jobject 变成了 jclass。

七、全局引用和局部引用

  1. jobject NewGlobalRef(jobject obj)
    说明:创建一个全局引用,不用时必须调用 DeleteGlobalRef() 方法释放。
    参数:
  • obj:某个 Java 对象实例,可以是局部引用或全局引用
    示例:

    1
    2
    3
    4
    5
    jclass mPointFClass;  // global reference to PointF class

    ...
    jclass clazz = env->FindClass("android/graphics/PointF");
    mPointFClass = (jclass) env->NewGlobalRef(clazz);
  1. void DeleteGlobalRef(jobject globalRef)
    说明:释放某个全局引用
    参数:
  • globalRef:某全局引用
  1. jobject NewLocalRef(jobject ref)
    说明:创建一个局部引用。这个方法一般很少用。
    参数:
  • ref:某个引用,可以是全局引用或者局部引用
  1. void DeleteLocalRef(jobject localRef)
    说明:释放某个局部引用
    参数:
  • localRef:某局部引用

    注意:
    局部引用在方法执行完后也会自动释放,不过当你在执行一个很大的循环时,里面会产生大量临时的局部引用,那么建议的做法是手动的调用该方法去释放这个局部引用。

  1. jweak NewWeakGlobalRef(jobject obj)
    说明:创建一个全局的弱引用
    参数:
  • obj:某个 Java 对象实例

    注意:
    弱引用不会阻止 GC 回收它引用的对象,在内存不足时,弱引用的对象往往会被回收掉,使用时一定要多加小心。

  1. void DeleteWeakGlobalRef(jweak obj)
    说明:释放某个全局的弱引用
    参数:
  • obj:某个全局弱引用

八、字符串操作

  1. jstring NewString(const jchar* unicodeChars, jsize len)
    说明:以 UTF-16 的编码方式创建一个 Java 的字符串(jchar 的定义为 uint16_t)
    参数:
  • unicodeChars:指向字符数组的指针
  • len:字符数组的长度
  1. jstring NewStringUTF(const char* bytes)
    说明:以 UTF-8 的编码方式创建一个 Java 的字符串
    参数:
  • bytes:指向字符数组的指针
  1. jsize GetStringLength(jstring string)
  2. jsize GetStringUTFLength(jstring string)
    说明:获取字符串的长度,GetStringLength 是 UTF-16 编码,GetStringUTFLength 是 UTF-8 编码
    参数:
  • string:字符串
  1. const jchar GetStringChars(jstring string, jboolean isCopy)
  2. const char GetStringUTFChars(jstring string, jboolean isCopy)
    说明:将 Java 风格的 jstring 对象转换成 C 风格的字符串,同上一个是 UTF-16 编码,一个是 UTF-8 编码
    参数:
  • string:Java 风格的字符串
  • isCopy:是否进行拷贝操作,0 为不拷贝
  1. void ReleaseStringChars(jstring string, const jchar* chars)
  2. void ReleaseStringUTFChars(jstring string, const char* utf)
    说明:释放指定的字符串指针,通常来说,Get 和 Release 是成对出现的
    参数:
  • string:Java 风格的字符串

  • chars/utf:对应的 C 风格的字符串
    示例:

    1
    2
    3
    4
    5
    6
    JNIEXPORT void JNICALL
    Java_com_afei_jnidemo_MainActivity_test(JNIEnv *env, jobject instance, jstring msg_) {
    const char *msg = env->GetStringUTFChars(msg_, 0);
    // Do Something
    env->ReleaseStringUTFChars(msg_, msg);
    }

九、数组操作

  1. jobjectArray NewObjectArray(jsize length, jclass elementClass, jobject initialElement)
    说明:创建引用数据类型的数组
    参数:
  • length:数组的长度

  • elementClass:数组的元素所属的类

  • initialElement:使用什么样的对象来初始化,可以选择 NULL
    示例:

    1
    2
    3
    int points_count = 21;
    jclass pointFClass = env->FindClass("android/graphics/PointF");
    jobjectArray point_array = env->NewObjectArray(points_count, pointFClass, NULL);

2.ArrayType NewArray(jsize length)
说明:创建基本数据类型的数组。这里的基本数据类型有:

image-20231123154203044

参数:

  • length:数组的长度
  1. jsize GetArrayLength(jarray array)
    说明:获取数组的长度
    参数:
  • array:指定的数组对象。jarray 是 jbooleanArray、jbyteArray、jcharArray 等的父类。
  1. jobject GetObjectArrayElement(jobjectArray array, jsize index)
    说明:获取引用数据类型数组指定索引位置处的对象
    参数:
  • array:引用数据类型数组
  • index:目标索引值
  1. void SetObjectArrayElement(jobjectArray array, jsize index, jobject value)
    说明:设置引用数据类型数组指定索引位置处的值
    参数:
  • array:需要设置的引用数据类型数组
  • index:目标索引值
  • value:需要设置的值
  1. NativeType GetArrayElements(ArrayType array, jboolean isCopy)
    说明:获取基本数据类型数组的头指针
    参数:
  • array:基本数据类型数组
  • isCopy:是否进行拷贝操作,0 为不拷贝
  1. void ReleaseArrayElements(ArrayType array, NativeType* elems, jint mode)
    说明:释放基本数据类型数组指针。通常来说,Get 和 Release 是成对出现的
    参数:
  • array:基本数据类型数组
  • elems:对应的 C 风格的基本数据类型指针
  • mode:释放模式,通常我们都是使用 0,有三种,如下
    image-20231123154251199

示例:

1
2
3
4
5
Java_com_afei_jnidemo_MainActivity_test(JNIEnv *env, jobject instance, jintArray array_) {
jint *array = env->GetIntArrayElements(array_, 0);
// Do Something
env->ReleaseIntArrayElements(array_, array, 0);
}
  1. void GetArrayRegion(ArrayType array, jsize start, jsize len, NativeType* buf)
    说明:返回基本数据类型数组的部分副本。这里的基本数据类型有:

image-20231123154324154

参数:

  • array:基本数据类型数组
  • start:起始的索引值
  • len:拷贝的长度
  • buf:拷贝到的目标数组
  1. void SetArrayRegion(ArrayType array, jsize start, jsize len, const NativeType* buf)
    说明:设置基本数据类型数组元素。类型和上面的表类似。
    参数:
  • array:需要设置的基本数据类型数组
  • start:起始的索引值
  • len:需要设置的 buf 的长度
  • buf:需要设置的值数组

十、异常操作

  1. jint Throw(jthrowable obj)
    说明:抛出一个异常,需要手动创建异常的实例,调用较复杂,一般不使用这个方法
    参数:
  • obj:异常对象
    示例:

    1
    2
    3
    4
    5
    6
    7
    8
    9
    jclass ioExceptionClazz = env->FindClass("java/io/IOException");
    jmethodID ioExceptionConstructor = env->GetMethodID(ioExceptionClazz, "<init>", "(Ljava/lang/String;)V");
    jthrowable exceptionObj = static_cast<jthrowable>(env->NewObject(ioExceptionClazz,
    ioExceptionConstructor, "IO异常"));
    if (env->Throw(exceptionObj) == JNI_OK) {
    // 创建成功
    } else {
    // 创建失败
    }
  1. jint ThrowNew(jclass clazz, const char* message)
    说明:抛出一个异常。使用起来比三个方法方便
    参数:
  • clazz:指定的异常类

  • message:异常信息
    示例:

    if (env->ThrowNew(env->FindClass(“java/io/IOException”), “IO异常”) == JNI_OK) {
    // 创建成功
    } else {
    // 创建失败
    }

  1. jthrowable ExceptionOccurred()

  2. jboolean ExceptionCheck()
    说明:检查是否有异常,如果本地函数有异常抛出,ExceptionOccurred 会返回这个异常的示例,ExceptionCheck 只返回是否有异常

  3. void ExceptionDescribe()
    说明:将异常和堆栈信息推送到错误流

  4. void ExceptionClear()
    说明:清除掉发生的异常

以上几个方法的示例:

Java 部分代码为:

public class MainActivity extends AppCompatActivity {
 
    static {
        System.loadLibrary("native-lib");
    }
 
    @Override
    protected void
    onCreate(Bundle savedInstanceState) {
        super.onCreate(savedInstanceState);
        setContentView(R.layout.activity_main);
        try {
            test();
        } catch (Exception e) {
            Log.e("MainActivity", "onCreate: " + e);
        }
    }
 
    private native void test() throws IllegalArgumentException;
 
    private void callNullPointerException() throws NullPointerException {
        throw new NullPointerException("MainActivity NullPointerException");
    }
 
}

JNI 部分代码为:

1
2
3
4
5
6
7
8
9
10
11
12
13
14
15
JNIEXPORT void JNICALL
Java_com_afei_jnidemo_MainActivity_test(JNIEnv *env, jobject instance) {
jclass clazz = env->GetObjectClass(instance);
jmethodID mid =env->GetMethodID(clazz, "callNullPointerException", "()V");
env->CallVoidMethod(instance, mid); // will throw a NullPointerException
jthrowable exc = env->ExceptionOccurred(); // 检测是否发生异常
if (exc) {
LOGD("============");
env->ExceptionDescribe(); // 打印异常信息
LOGD("============");
env->ExceptionClear(); // 清除掉发生的异常
jclass newExcCls = env->FindClass("java/lang/IllegalArgumentException");
env->ThrowNew(newExcCls, "throw from JNI"); // 返回一个新的异常到 Java
}
}

运行结果为:

1
2
3
4
5
6
7
8
9
10
11
12
13
14
15
16
17
18
19
07-12 14:57:07.443 26623-26623/com.afei.jnidemo D/FaceAPI: ============
07-12 14:57:07.443 26623-26623/com.afei.jnidemo W/System.err: java.lang.NullPointerException: MainActivity NullPointerException
at com.afei.jnidemo.MainActivity.callNullPointerException(MainActivity.java:34)
at com.afei.jnidemo.MainActivity.test(Native Method)
at com.afei.jnidemo.MainActivity.onCreate(MainActivity.java:25)
at android.app.Activity.performCreate(Activity.java:6857)
at android.app.Instrumentation.callActivityOnCreate(Instrumentation.java:1125)
at android.app.ActivityThread.performLaunchActivity(ActivityThread.java:2702)
at android.app.ActivityThread.handleLaunchActivity(ActivityThread.java:2810)
at android.app.ActivityThread.-wrap12(ActivityThread.java)
at android.app.ActivityThread$H.handleMessage(ActivityThread.java:1532)
at android.os.Handler.dispatchMessage(Handler.java:102)
at android.os.Looper.loop(Looper.java:181)
at android.app.ActivityThread.main(ActivityThread.java:6288)
at java.lang.reflect.Method.invoke(Native Method)
07-12 14:57:07.443 26623-26623/com.afei.jnidemo W/System.err: at com.android.internal.os.ZygoteInit$MethodAndArgsCaller.run(ZygoteInit.java:900)
at com.android.internal.os.ZygoteInit.main(ZygoteInit.java:790)
07-12 14:57:07.443 26623-26623/com.afei.jnidemo D/FaceAPI: ============
07-12 14:57:07.444 26623-26623/com.afei.jnidemo E/MainActivity: onCreate: java.lang.IllegalArgumentException: throw from JNI
  1. void FatalError(const char* msg)
    说明:抛出一个致命异常,并且不希望JVM处理
    参数:
  • msg:致命异常的信息

十一、其它
其他还有有关 Monitor Operations、NIO Support、Reflection Support 等一些方法,由于我也没使用过,就不再这里解释了。
可以参考 JNI 的官网的介绍:https://docs.oracle.com/javase/7/docs/technotes/guides/jni/spec/functions.html#wp9502

原文链接:JNI 方法大全及使用示例-CSDN博客

基础知识

1.1 访问域

Java有两类域:实例域和静态域。类的每个实例都有自己的实例域副本,而每个类的所有实例共享同一个静态域。

了解Java的都知道,在一个类加载器中,类的class只有一个,但可以有很多类的实例对象。所以在我们使用JNI访问Java的方法时,会有两种不同的方法。

1.2 域ID

在前面章节中我们讲解了Java调用jni的方法,Java调用jni方法只需要注意函数的命名规则即可,但在jni访问Java的方法时需要获得访问域的ID,访问域有两种,同样,域ID也有两种。一种是静态域ID,一种是实例域ID,如下所示:

1.2.1 获取类

1.2.1.1 用对象引用获得jclass

通过传入Java对象(jobject类型变量),获取Java类对象。

1
2
jclass clazz;
clazz = env->GetObjectClass(env, instance);

1.2.1.2 通过包名类名获取jclass

通过传入完整的包名/类名获取java类对应的C/C++环境下的jclass类型的变量,返回值:Java字节码class对象,对应C++中的jclass对象。注意:包名中的 . 使用 / 来替代

1
2
jclass clazz;
clazz = env->FindClass("com/jiangc/jni/TestJni");

1.3 签名规则

以下是签名规则,在jni的环境中调用Java的方法或者获取Field时,需要用到签名,签名规则如下:

java 类型 签名
Boolean Z
Byte B
Char C
Short S
Int I
Long J
Float F
Double D
fully-qualified-class Lfully-qualified-class
type[] [type
method type (arg-type)ret-type

例子:

1
2
3
4
5
6
7
8
9
10
11
12
13
14
15
16
17
18
19
package com.example.javap;

public class TestJni {
static {
System.loadLibrary("javap");
}

// ()Ljava/lang/String
public native String HelloWorld();

// (II)I
public int add(int a, int b){
return a + b;
}
// ()Z
public boolean isTrue(){
return true;
}
}

1.3.1 使用javap生成函数签名

1
2
3
4
5
6
7
8
9
10
11
12
13
14
15
16
17
18
19
20
21
22
1.javac TestJni.java
2.javap -s -p -classpatch . TestJni

javap -s -p -classpath . TestJni
警告: 文件 .\TestJni.class 不包含类 TestJni
Compiled from "TestJni.java"
public class com.example.javap.TestJni {
public com.example.javap.TestJni();
descriptor: ()V

public native java.lang.String HelloWorld();
descriptor: ()Ljava/lang/String;

public int add(int, int);
descriptor: (II)I

public boolean isTrue();
descriptor: ()Z

static {};
descriptor: ()V
}

1.4 设置Android Studio javap

打开Android Studio ,File->Settings->Tools->External Tools扩展工具栏,如下图:

点击+号按钮

填写信息如下:

1
2
3
Program:  javap的绝对路径
Arguments:-s -p $FileClass$
Working directory: $OutputPath$

首先编译一下项目,然后通过右键javap获取函数签名

获取到的签名如下:

这样我们就可以相对比较快捷的得到函数签名了。

二. 通过jni访问java方法

2.1 调用实例对象的方法

1
2
3
4
5
6
7
8
9
10
11
12
13
14
15
16
17
18
19
20
21
22
23
24
25
26
27
28
29
30
31
extern "C"
JNIEXPORT jstring JNICALL
Java_com_example_javap_TestJni_HelloWorld(JNIEnv *env, jobject thiz) {

jmethodID jmethodId;
jclass clazz = env->GetObjectClass(thiz);
if (nullptr == clazz) {
LOGE("jclass is null\n");
}
//GetMethodID()获取java方法,GetMethodID(类,方法名,方法签名)
jmethodId = env->GetMethodID(clazz, "add", "(II)I");
jint result;
result = env->CallIntMethod(thiz, jmethodId, 1, 2);
LOGE("result = %d\n", result);
std::string hello = "Hello from C++";
return env->NewStringUTF(hello.c_str());
}


extern "C"
JNIEXPORT void JNICALL
Java_com_example_javap_TestJni_callStaticFunc(JNIEnv *env, jobject thiz) {

jclass clazz;
// com.example.javap
clazz = env->FindClass("com/example/javap/TestJni");
jmethodID jmethodId = env->GetStaticMethodID(clazz, "sAdd", "(II)I");

jint result = env->CallStaticIntMethod(clazz, jmethodId, 1, 2);
LOGE("call static result : %d\n", result);
}