Repo简介
Repo是Google开发的用于管理Android版本库的一个工具,repo是使用Python对git进行了一定的封装,并不是用于取代git,它简化了对多个Git版本库的管理。用repo管理的版本库都需要使用git命令来进行操作。

Repo 可以在必要时整合多个 Git 代码库,将相关内容上传到 Gerrit 修订版本控制系统,并自动执行 Android 开发工作流程的部分环节。

Repo 启动器会提供一个 Python 脚本,该脚本可以初始化检出,并可以下载第二部分,即完整的 Repo 工具。完整的 Repo 工具包含在 Android 源代码检出中。该工具默认位于 $SRCDIR/.repo/repo/… 中,它可以从下载的 Repo 启动器接收转发的命令。Repo 使用清单文件将 Git 项目汇总到 Android 超级项目中。

Repo安装

1
2
3
4
5
6
7
8
9
10
11
12
13
14
15
16
安装git
sudo apt-get install git
mkdir ~/bin
PATH=~/bin:$PATH
//安装curl
sudo apt install curl
//安装repo脚本
curl https://storage.googleapis.com/git-repo-downloads/repo > ~/bin/repo
//设置权限
chmod a+x ~/bin/repo
//建立本地目录
mkdir WworkSpace
//init项目
repo init -u git://mirrors.ustc.edu.cn/aosp/platform/manifest -b android-13.0.0_r6
//执行下载
repo sync

Repo命令

1
2
3
4
5
6
7
8
9
10
11
12
13
14
15
16
17
18
19
20
21
22
23
24
25
26
27
28
29
server@dev: $ repo help
usage: repo COMMAND [ARGS]
The most commonly used repo commands are:
abandon Permanently abandon a development branch
branch View current topic branches
branches View current topic branches
checkout Checkout a branch for development
cherry-pick Cherry-pick a change.
diff Show changes between commit and working tree
diffmanifests Manifest diff utility
download Download and checkout a change
gitc-delete Delete a GITC Client.
gitc-init Initialize a GITC Client.
grep Print lines matching a pattern
info Get info on the manifest branch, current branch or unmerged branches
init Initialize a repo client checkout in the current directory
list List projects and their associated directories
overview Display overview of unmerged project branches
prune Prune (delete) already merged topics
rebase Rebase local branches on upstream branch
smartsync Update working tree to the latest known good revision
stage Stage file(s) for commit
start Start a new branch for development
status Show the working tree status
sync Update working tree to the latest revision
upload Upload changes for code review
See 'repo help <command>' for more information on a specific command.
See 'repo help --all' for a complete list of recognized commands.
Bug reports: https://bugs.chromium.org/p/gerrit/issues/entry?template=Repo+tool+issue
1
2
3
4
5
6
7
8
9
10
11
12
13
14
15
16
17
18
19
20
21
22
23
24
25
26
27
28
29
30
31
32
33
34
初始化一个新客户端

repo init
-u:指定从中检索清单代码库的网址。
-m:选择代码库中的清单文件。
-b:指定修订版本,即特定的 manifest-branch。
eg:repo init -u https://android.googlesource.com/platform/manifest

将客户端同步到代码库
repo sync

# 新建一个分支
repo start

# 删除不用的本地分支
repo abandon

# 删除已经合并分支
repo prune

# 切换分支
repo checkout

# 显示当前分支的状态
repo status

# 查看修改
repo diff

# 将更改上传到审核服务器
repo upload

# 显示manifest文件内容
repo manifest

repo init在当前目录中安装 Repo,这会创建一个 .repo/ 目录,其中包含用于 Repo 源代码和标准 Android 清单文件的 Git 代码库。该 .repo/ 目录中还包含 manifest.xml,这是一个指向 .repo/manifests/ 目录中所选清单的符号链接。

清单文件是以xml的格式组织的,一个清单库可以包含多个清单文件和多个分支,每个清单文件和分支都有对应的版本。

  • remote元素:定义了名为korg的远程版本库,库的基址为git://172.16.1.31
  • project元素:用于定义一个项目,path属性表示在工作区clone的位置,name属性表示该项目的远程版本库的相对路径。
  • default元素:设置各个项目默认远程版本库为Korg,默认的分支为gingerbread-exdroid-stable。各个项目还可以定义自己的remote
  • revision覆盖默认的配置。
  • project元素下的子元素copyfile:定义了项目clone后的一个附件动作,从src拷贝文件到dest

repo目录下有manifest、project、repo文件夹等信息

  • manifest:看某个模块当前是在哪个分支
  • project:
  • repo:查看Python封装的脚本

dumpsys 是一个用于在 Android 系统中获取各种信息的命令。它提供了系统状态、应用程序、服务、进程、内存使用情况、网络连接等方面的详细信息。

dumpsys命令的语法结构如下:

1
2
3
4
dumpsys [options] [service | name]
其中:
options 是可选的命令选项,用于指定不同的输出参数。
service | name 是可选的服务或名称,用于指定你想要获取信息的特定服务或应用程序名称。

dumpsys命令用法

可通过dumpsys命令查询系统服务的运行状态(对象的成员变量属性值),命令格式:dumpsys 服务名, 例如:

1
2
3
4
5
6
dumpsys activity //查询AMS服务相关信息
dumpsys window //查询WMS服务相关信息
dumpsys cpuinfo //查询CPU情况
dumpsys meminfo //查询内存情况
dumpsys activity > text.txt//将查询到的信息写到执行文件
dumpsys activity | grep xx //查询结果中再进行指定筛选条件

可查询的服务有很多,可通过下面任一命令查看当前系统所支持的dump服务:

1
2
adb shell dumpsys -l
adb shell service list

系统服务

表一:

服务名 类名 功能
activity ActivityManagerService AMS相关信息
package PackageManagerService PMS相关信息
window WindowManagerService WMS相关信息
input InputManagerService IMS相关信息
power PowerManagerService PMS相关信息
batterystats BatterystatsService 电池统计信息
battery BatteryService 电池信息
alarm AlarmManagerService 闹钟信息
dropbox DropboxManagerService 调试相关
procstats ProcessStatsService 进程统计
cpuinfo CpuBinder CPU
meminfo MemBinder 内存
gfxinfo GraphicsBinder 图像
dbinfo DbBinder 数据库

表二:

服务名 功能
SurfaceFlinger 图像相关
appops app使用情况
permission 权限
processinfo 进程服务
batteryproperties 电池相关
audio 查看声音信息
netstats 查看网络统计信息
diskstats 查看空间free状态
jobscheduler 查看任务计划
wifi wifi信息
diskstats 磁盘情况
usagestats 用户使用情况
devicestoragemonitor 设备信息

获取2次代码改动的对应代码及行数信息

patch介绍

1
2
3
-p, --patch
交互地在索引和工作树之间选择补丁块并将它们添加到索引中。这让用户有机会在将修改后的内容添加到索引之前查看差异。
这可以有效地运行 add --interactive,但是会绕过初始命令菜单,而直接跳转到 patch 子命令。有关详细信息。

使用:

1
2
3
4
5
6
7
8
9
10
11
12
13
14
git add -p

commit b329f455f522487133975df6bcaad461d6963d3a
Author: Your Name <you@example.com>
Date: Tue Apr 25 16:33:09 2023 +0800
simple doublescreen move task to other
diff --git a/services/core/java/com/android/server/wm/DisplayContent.java b/services/core/java/com/android/server/wm/DisplayContent.java
index a03dce364209..695c300b51fd 100644
--- a/services/core/java/com/android/server/wm/DisplayContent.java
+++ b/services/core/java/com/android/server/wm/DisplayContent.java

+ import com.android.server.DoubleScreenMovePointerEventListener;
...
(1/1) Stage this hunk [y,n,q,a,d,e,?]?

输入 git add -p 进入 patch mode , 此时 git 会自动将改动切分成多个片段,并展示第一个片段,提示你进行选择。

提示语句是 Stage this hunk [y,n,q,a,d,/,s,e,?]?

这些字母都是什么意思呢? 输入?回车,可以查看详细的帮助信息:

1
2
3
4
5
6
7
8
9
10
11
12
13
14
y - 暂存此区块
n - 不暂存此区块
q - 退出;不暂存包括此块在内的剩余的区块
a - 暂存此块与此文件后面所有的区块
d - 不暂存此块与此文件后面所有的 区块
g - 选择并跳转至一个区块
/ - 搜索与给定正则表达示匹配的区块
j - 暂不决定,转至下一个未决定的区块
J - 暂不决定,转至一个区块
k - 暂不决定,转至上一个未决定的区块
K - 暂不决定,转至上一个区块
s - 将当前的区块分割成多个较小的区块
e - 手动编辑当前的区块
? - 输出帮助

常见的AMS、PWS、WMS等等都是系统服务,运行于system_server进程,并且向servicemanager进程注册其Binder以便其他进程获取binder与对应的服务进行通信。为了新增自定义系统服务,我们可以参考AMS等原生系统服务编写如下文件:

1、AIDL文件:生成Binder类,其中Stub即为Binder的服务端;

2、XXManagerService:系统服务类,继承自Stub;

3、XXManager:封装了AIDL接口方法的类,相当于Binder客户端(Proxy),其他进程通过此类完成与系统服务的通信。

增加系统服务

1、AIDL

在frameworks/base/core/java/com/enjoy/service中编写IEnjoyManager.aidl

1
2
3
4
5
6
7
8
// IEnjoyManager.aidl
package com.enjoy.service;

// Declare any non-default types here with import statements

interface IEnjoyManager {
void sendMessage(String msg);
}

在frameworks/base/Android.mk中声明AIDL文件:

1
2
3
4
LOCAL_SRC_FILES += ....
core/java/android/app/IActivityManager.aidl \
core/java/com/enjoy/service/IEnjoyManager.aidl \
....

2、系统服务

在frameworks/base/services/core/java/com/enjoy/service中编写EnjoyManagerService.java

1
2
3
4
5
6
7
8
9
10
11
12
13
14
15
package com.enjoy.service;

import android.os.RemoteException;
import android.util.Log;

public class EnjoyManagerService extends IEnjoyManager.Stub {

private static final String TAG = "Enjoy";

@Override
public void sendMessage(String msg) throws RemoteException {
Log.i(TAG, "sendMessage: " + msg);
}
}

3、客户端代理

在frameworks/base/core/java/com/enjoy/service下编写EnjoyManager.java

1
2
3
4
5
6
7
8
9
10
11
12
13
14
15
16
17
18
19
20
21
22
23
package com.enjoy.service;

import android.os.RemoteException;
import android.util.Log;

public class EnjoyManager {

private static final String TAG = "Enjoy";
private IEnjoyManager service;

public EnjoyManager(IEnjoyManager service) {
this.service = service;
}

public void sendMessage(String msg) {
try {
service.sendMessage(msg);
} catch (RemoteException e) {
e.printStackTrace();
}
}
}

framework/base/Android.mk:

1
2
3
4
5
6
packages_to_document := \
android \
javax/microedition/khronos \
org/apache/http/conn \
org/apache/http/params \
com/enjoy/service

4、修改Context

在frameworks/base/core/java/android/content/Context.java中加入常量:

1
public static final String ENJOY_SERVICE="enjoy";

5、注册系统服务

在frameworks/base/services/java/com/android/server/SystemServer.java中 注册系统服务

1
2
3
4
5
6
import com.enjoy.service.EnjoyManagerService;
private void startOtherServices(){
//......
ServiceManager.addService(Context.ENJOY_SERVICE,new EnjoyManagerService());
//......
}

6、注册应用系统服务获取器

在frameworks/base/core/java/android/app/SystemServiceRegistry.java注册服务获取器:

1
2
3
4
5
6
7
8
9
10
11
12
13
import com.enjoy.service.IEnjoyManager;
import com.enjoy.service.EnjoyManager;
static{
registerService(Context.ENJOY_SERVICE, EnjoyManager.class,
new CachedServiceFetcher<EnjoyManager>() {
@Override
public EnjoyManager createService(ContextImpl ctx) throws ServiceNotFoundException {
// 获取服务
IBinder b = ServiceManager.getServiceOrThrow(Context.ENJOY_SERVICE);
IEnjoyManager service = IEnjoyManager.Stub.asInterface(b);
return new EnjoyManager(service);
}});
}

7、配置SELinux权限

system/sepolicy/private/service_contexts

1
2
activity                                  u:object_r:activity_service:s0					   
enjoy u:object_r:enjoy_service:s0

system/sepolicy/public/service.te:

1
2
type activity_service, app_api_service, ephemeral_app_api_service, system_server_service, service_manager_type;
type enjoy_service, app_api_service, ephemeral_app_api_service, system_server_service, service_manager_type;

system/sepolicy/private/untrusted_app_all.te :

1
allow untrusted_app enjoy_service:service_manager find;

*8、配置白名单

如果以当前案例的方式新增自定义系统服务,因为SystemServiceRegistry 中需要使用到com.enjoy下的类,为了让其获取此包下类的引用,需要配置:build/core/tasks/check_boot_jars/package_whitelist.txt ,加入:com\.enjoy\..* 。否则会因为无法获取类引用而编译报错!

1
2
3
4
5
dalvik\..*
libcore\..*
android\..*
com\.android\..*
com\.enjoy\..*

若新增的服务像AMS等原有系统服务的IActivityManager.aidl与ActivityManager一样放在android.app包下即可不用进行此步处理!

9、编译并刷机

1
2
3
4
5
6
#编译
make update-api
make –j4
#刷机
adb reboot bootloader
reboot flashall -w

10、使用自定义服务

10.1 利用双亲委托机制

在需要使用自定义服务的app中编写EnjoyManager(包名与framework中一致):

1
2
3
4
5
6
7
8
9
10
11
package com.enjoy.service;

import android.os.RemoteException;
import android.util.Log;

public class EnjoyManager {

public void sendMessage(String msg) {

}
}

此时由于类加载的双亲委托机制,app在运行时实际使用的是framework中的EnjoyManager。app中的EnjoyManager仅仅只是为了编译成功编写的空壳。

10.2 修改SDK

修改app使用的sdk,可以通过make sdk 将SDK完成编译出来。也可以直接在out/target/common/obj/JAVA_LIBRARIES/framework_intermediates中找到EnjoyManager类将其加入原生SDK中的android.jar

SystemService

系统服务需要通过ServiceManager.addService("xx", new XXManagerService);将自己(Binder Stub)注册进入SM才能够让其他进程利用Binder与之通信。而自定义系统服务如果需要根据系统启动的不同阶段进行不同的处理则需要注册生命周期回调。以AMS为例:

/frameworks/base/services/java/com/android/server/SystemService中启动AMS:

1
2
3
4
5
6
7
8
9
10
11
12
13
private void startBootstrapServices() {
//...
// Activity manager runs the show.
traceBeginAndSlog("StartActivityManager");
mActivityManagerService = mSystemServiceManager.startService(
ActivityManagerService.Lifecycle.class).getService();
mActivityManagerService.setSystemServiceManager(mSystemServiceManager);
mActivityManagerService.setInstaller(installer);
traceEnd();
//...
mActivityManagerService.setSystemProcess();
//...
}

AMS中的setSystemProcess方法的实现为:

1
2
3
4
5
6
7
8
public void setSystemProcess() {
//...

ServiceManager.addService(Context.ACTIVITY_SERVICE, this, /* allowIsolated= */ true,
DUMP_FLAG_PRIORITY_CRITICAL | DUMP_FLAG_PRIORITY_NORMAL | DUMP_FLAG_PROTO);

//...
}

setSystemProcess中会完成向SM注册AMS的实现。而在setSystemProcess之前有一段代码:

1
2
mActivityManagerService = mSystemServiceManager.startService(
ActivityManagerService.Lifecycle.class).getService();

则为注册生命周期监听,ActivityManagerService.Lifecycle就相当于生命周期的回调接口对象,它继承自:

/frameworks/base/services/core/java/com/android/server/SystemService。这个SystemService中主要需要实现两个方法:

  • onStart() :mSystemServiceManager.startService第一时间回调该函数。

  • onBootPhase(int phase) : 系统启动的各个阶段会回调该函数

    • SystemService.PHASE_WAIT_FOR_DEFAULT_DISPLAY:这是一个依赖项,只有DisplayManagerService中进行了对应处理;
    • SystemService.PHASE_LOCK_SETTINGS_READY:经过这个引导阶段后,服务才可以接收到wakelock相关设置数据;
    • SystemService.PHASE_SYSTEM_SERVICES_READY:经过这个引导阶段 后,服务才可以安全地使用核心系统服务
    • SystemService.PHASE_ACTIVITY_MANAGER_READY:经过这个引导阶 段后,服务可以发送广播
    • SystemService.PHASE_THIRD_PARTY_APPS_CAN_START:经过这个引导阶段后,服务可以启动第三方应用,第三方应用也可以通过Binder来调用服务。
    • SystemService.PHASE_BOOT_COMPLETED:经过这个引导阶段后,说明服务启动完成,这时用户就可以和设备进行交互。

比如AMS中的Lifecycle:

1
2
3
4
5
6
7
8
9
10
11
12
13
14
15
public static final class Lifecycle extends SystemService {
@Override
public void onBootPhase(int phase) {
mService.mBootPhase = phase;
if (phase == PHASE_SYSTEM_SERVICES_READY) {
mService.mBatteryStatsService.systemServicesReady();
mService.mServices.systemServicesReady();
} else if (phase == PHASE_ACTIVITY_MANAGER_READY) {
// 准备广播处理
mService.startBroadcastObservers();
} else if (phase == PHASE_THIRD_PARTY_APPS_CAN_START) {
mService.mPackageWatchdog.onPackagesReady();
}
}
}

在AMS中会处理PHASE_ACTIVITY_MANAGER_READY ,经过这个阶段后,也就是需要在下一个阶段PHASE_THIRD_PARTY_APPS_CAN_START才可以发送广播。

同步问题

在修改了SDK之后,可能出现同步错误:同步

此时我们需要去修改AGP插件中的一个类:MockableJarGenerator

在我的工程当中当前使用的AGP版本为:7.2.1,从C:\Users\Administrator\.gradle\caches\modules-2\files-2.1\com.android.tools.build\builder\7.2.1 目录下找到builder-7.2.1-sources.jar 并将其解压,找到com.android.builder.testing 中的MockableJarGenerator。

将此类放入Android Studio工程app模块的单元测试中,并在app的gradle中加入:

1
2
3
4
5
6
7
dependencies {   
testImplementation 'org.ow2.asm:asm:7.1'
testImplementation 'org.ow2.asm:asm-commons:7.1'

// testImplementation 'com.google.guava:guava:23.6-jre'
testImplementation group:'com.google.guava', name:'guava', version:'23.6-jre'
}

操作步骤为:

AS配置

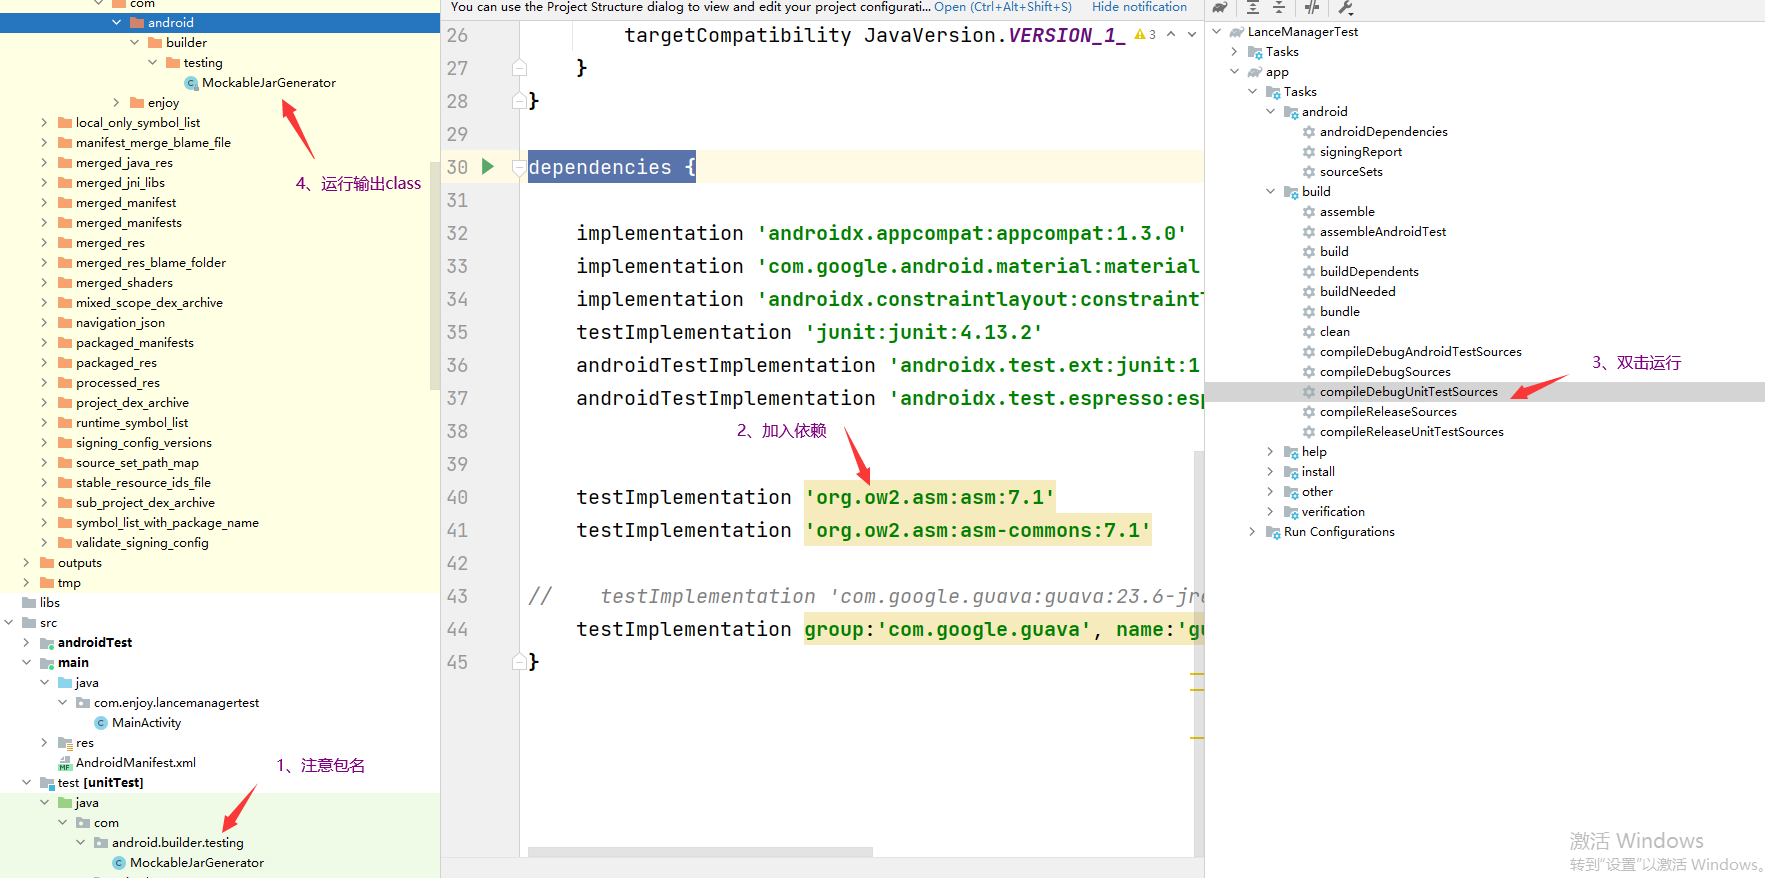
最后将C:\Users\Administrator\.gradle\caches\modules-2\files-2.1\com.android.tools.build\builder\7.2.1builder-7.2.1.jarMockableJarGenerator.class替换成刚刚编译的class文件。

MyAccessibilityService:

1
2
3
4
5
6
7
8
9
10
11
12
13
14
15
16
17
18
19
20
21
22
23
24
25
26
27
28
29
30
31
32
33
34
35
36
37
38
39
40
41
42
43
44
45
46
47
48
49
50
51
52
53
54
55
56
57
58
59
60
61
62
63
package com.withub.android.cloudsharingcourt.util;

import android.accessibilityservice.AccessibilityService;
import android.text.TextUtils;
import android.view.accessibility.AccessibilityEvent;
import android.view.accessibility.AccessibilityNodeInfo;

import java.util.HashMap;
import java.util.Map;

public class MyAccessibilityService extends AccessibilityService {
Map<Integer, Boolean> handledMap = new HashMap<>();
public MyAccessibilityService() {
}
@Override
public void onAccessibilityEvent(AccessibilityEvent event) {
AccessibilityNodeInfo nodeInfo = event.getSource();
if (nodeInfo != null) {
int eventType = event.getEventType();
if (eventType== AccessibilityEvent.TYPE_WINDOW_CONTENT_CHANGED ||
eventType == AccessibilityEvent.TYPE_WINDOW_STATE_CHANGED) {
if (handledMap.get(event.getWindowId()) == null) {
boolean handled = iterateNodesAndHandle(nodeInfo);
if (handled) {
handledMap.put(event.getWindowId(), true);
}
}
}
}
}

private boolean iterateNodesAndHandle(AccessibilityNodeInfo nodeInfo) {
if (nodeInfo != null&&nodeInfo.getClassName()!=null&&!TextUtils.isEmpty(nodeInfo.getText())) {
int childCount = nodeInfo.getChildCount();
if ("android.widget.Button".equals(nodeInfo.getClassName())||"android.widget.TextView".equals(nodeInfo.getClassName())) {
String nodeContent = nodeInfo.getText().toString();
if ("安装".equals(nodeContent)
||"打开".equals(nodeContent)
||"完成".equals(nodeContent)
|| "确定".equals(nodeContent)
|| "下一步".equals(nodeContent)
|| "确认".equals(nodeContent)
|| "继续安装".equals(nodeContent)) {
nodeInfo.performAction(AccessibilityNodeInfo.ACTION_CLICK);
return true;
}
} else if ("android.widget.ScrollView".equals(nodeInfo.getClassName())) {
nodeInfo.performAction(AccessibilityNodeInfo.ACTION_SCROLL_FORWARD);
}
for (int i = 0; i < childCount; i++) {
AccessibilityNodeInfo childNodeInfo = nodeInfo.getChild(i);
if (iterateNodesAndHandle(childNodeInfo)) {
return true;
}
}
}
return false;
}

@Override
public void onInterrupt() {
}
}
1
2
3
4
5
6
7
8
9
10
11
12
13
//清单文件中注册
<service
android:name=".util.MyAccessibilityService"
android:label="自动智能安装"
android:permission="android.permission.BIND_ACCESSIBILITY_SERVICE">
<intent-filter>
<action android:name="android.accessibilityservice.AccessibilityService" />
</intent-filter>

<meta-data
android:name="android.accessibilityservice"
android:resource="@xml/accessibility_service_config" />
</service>
1
2
3
4
5
6
7
8
9
10
11
12
13
14
//检查是否已开启无障碍自动安装权限
//用法:boolean enabled = isAccessibilityServiceEnabled(mContent, MyAccessibilityService.class);
public boolean isAccessibilityServiceEnabled(Context context, Class<? extends AccessibilityService> service) {
AccessibilityManager am = (AccessibilityManager) context.getSystemService(Context.ACCESSIBILITY_SERVICE);
List<AccessibilityServiceInfo> enabledServices = am.getEnabledAccessibilityServiceList(AccessibilityServiceInfo.FEEDBACK_ALL_MASK);

for (AccessibilityServiceInfo enabledService : enabledServices) {
ServiceInfo enabledServiceInfo = enabledService.getResolveInfo().serviceInfo;
if (enabledServiceInfo.packageName.equals(context.getPackageName()) && enabledServiceInfo.name.equals(service.getName()))
return true;
}

return false;
}
1
2
3
//跳转到设置开启无障碍模式页面;
Intent intent = new Intent(Settings.ACTION_ACCESSIBILITY_SETTINGS);
mContent.startActivity(intent);

一、谈谈你对 JNI 和 NDK 的理解

JNI:

1
2
3
JNI 是 `Java Native Interface` 的缩写,即 Java 的本地接口。
目的是使得 Java 与本地其他语言(如 C/C++)进行交互。
JNI 是属于 Java 的,与 Android 无直接关系。

NDK:

1
2
3
NDK 是 `Native Development Kit` 的缩写,是 Android 的工具开发包。
作用是更方便和快速开发 C/C++ 的动态库,并自动将动态库与应用一起打包到 apk。
NDK 是属于 Android 的,与 Java 无直接关系。

总结:

JNI 是实现的目的,NDK 是 Android 中实现 JNI 的手段。

二、谈谈你对 JNIEnv 和 JavaVM 理解

JavaVM

1
2
3
JavaVM 是虚拟机在 JNI 层的代表。
一个进程只有一个 JavaVM。(重要!)
所有的线程共用一个 JavaVM。(重要!)

JNIEnv

1
2
JNIEnv 表示Java调用native语言的环境,封装了几乎全部 JNI 方法的指针。
JNIEnv 只在创建它的线程生效,不能跨线程传递,不同线程的 JNIEnv 彼此独立。(重要!)

注意:

1
2
在 native 环境下创建的线程,要想和 java 通信,即需要获取一个 JNIEnv 对象。我们通过 `AttachCurrentThread` 和
`DetachCurrentThread` 方法将 native 的线程与 JavaVM 关联和解除关联。

三、解释一下 JNI 中全局引用和局部引用的区别和使用

全局引用

1
2
通过 `NewGlobalRef` 和 `DeleteGlobalRef` 方法创建和释放一个全局引用。
全局引用能在多个线程中被使用,且不会被 GC 回收,只能手动释放。

局部引用

1
2
3
4
通过 `NewLocalRef` 和 `DeleteLocalRef` 方法创建和释放一个局部引用。
局部引用只在创建它的 native 方法中有效,包括其调用的其它函数中有效。因此我们不能寄望于将一个局部引用直接保存在全局变量中下次
使用(请使用全局引用实现该需求)。
我们可以不用删除局部引用,它们会在 native 方法返回时全部自动释放,但是建议对于不再使用的局部引用手动释放,避免内存过度使用。

扩展:弱全局引用

1
2
3
通过 `NewWeakGlobalRef` 和 `DeleteWeakGlobalRef` 创建和释放一个弱全局引用。

弱全局引用类似于全局引用,唯一的区别是它不会阻止被 GC 回收。

四、JNI 线程间数据怎么互相访问

1
考察点和上体类似,线程本来就是共享内存区域的,因此我们需要使用 `全局引用`。

五、怎么定位 NDK 中的问题和错误

1
2
3
4
5
6
7
一般在开发阶段的话,我们可以通过 log 来定位和分析问题。

如果是上线状态(即关闭了基本的 log),我们可以借助 NDK 提供的 `addr2line` 工具和 `objdump` 工具来定位错误。详情:

[so 动态库崩溃问题定位(addr2line与objdump)](https://blog.csdn.net/afei__/article/details/81181827)

其它还可以使用 C/C++ 的一些分析工具。

六、静态注册和动态注册

静态注册:

1
通过 `JNIEXPORT` 和 `JNICALL` 两个宏定义声明,`Java + 包名 + 类名 + 方法名` 形式的函数名。不好的地方就是方法名太长了。

动态注册:

1
2
通常在 `JNI_OnLoad` 方法中通过 `RegisterNatives` 方法注册,可以不再遵从固定的命名写法(当然为了代码容易理解,名称还是
尽量和 Java 中保持一致)。

七、API

有的变态题目还是会考验你一些 API 的运用,比如怎么在 JNI 里面调用 Java 的方法,怎么在 JNI 里面抛异常等等。所以一些 API 还是要熟悉一下的,大致都是什么功能,名字大致是啥呀,这个太多了,看链接介绍吧:

JNI 方法大全及使用示例

#framework学友提供

一. cmake 版本号声明

1
2
# 声明一个我们使用的最小版本
cmake_minimum_required(VERSION 3.10.2)

二. 设置项目名称

1
2
# 这个项目名称一般和生成的库名称相同
project(test)

三. 添加头文件搜索目录

1
include_directories(../../../include)

四. 添加源文件

1
2
3
4
# 使用变量添加
set(SOURCES test.cpp xxx.cpp)
# 添加所有
FILE(GLOB SRCS "*.CPP" "*.h")

五. 生成一个库

1
2
3
4
5
6
7
8
add_library( # Sets the name of the library.
srt-lib # 库的名字

# Sets the library as a shared library.
SHARED # 动态库

# Provides a relative path to your source file(s).
srt-lib.cpp srt1-lib.cpp) # 源文件列表

六. 搜索一个库(预构建库)

1
2
3
4
5
6
7
find_library( # Sets the name of the path variable.
log-lib # 可以理解别名

# Specifies the name of the NDK library that
# you want CMake to locate.
log # 这个是liblog.so 在ndk目录中自带的一个库
)

七. 设置一个变量

1
2
# 设置LIBDIR为 ${CMAKE_CURRENT_SOURCE_DIR}/../../../libs/${ANDROID_ABI}
set(LIBDIR ${CMAKE_CURRENT_SOURCE_DIR}/../../../libs/${ANDROID_ABI})

八. 导入预构建库

1
2
3
4
5
6
# 导入静态库
add_library(ssl STATIC IMPORTED)
set_target_properties(srt PROPERTIES IMPORTED_LOCATION ${LIBDIR}/libssl.a)
# 导入动态库
add_library(ssl SHARED IMPORTED)
set_target_properties(srt PROPERTIES IMPORTED_LOCATION ${LIBDIR}/libssl.so)

九. 链接库

1
2
3
4
5
6
target_link_libraries( # Specifies the target library.
test

# Links the target library to the log library
# included in the NDK.
${log-lib})

十. 设置库的输出目录

1
2
set_target_properties(test PROPERTIES LIBRARY_OUTPUT_DIRECTORY ${CMAKE_LIBRARY_OUTPUT_DIRECTORY_${ARCH}})